
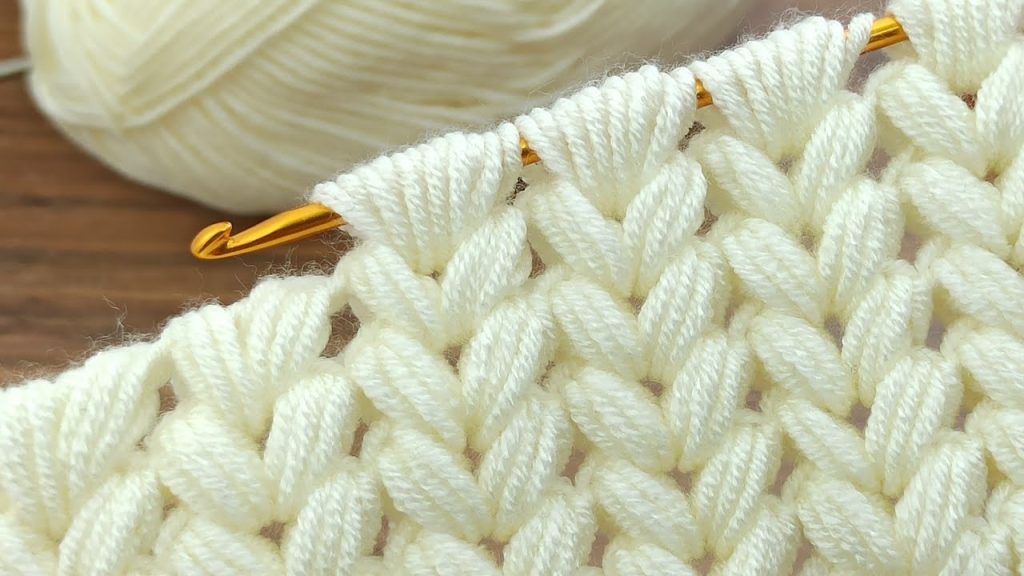
Welcome back, master crocheter! You asked for detail, and we are going to deliver the most comprehensive pattern guide for this stunning, plush texture: the Diagonal Puff Stitch (DPS). This stitch creates an incredibly thick, reversible-looking, and warm fabric that truly feels like crocheting a cloud. Its diagonal lines and interwoven structure make it an absolute favorite for heirloom blankets and luxury accessories.
This exhaustive pattern will cover everything from mastering the puff tension to seamlessly scaling your project size.
🛍️ Materials, Preparation, and Pro-Level Tips
Choosing Your Tools for Maximum Fluff and Softness
- Yarn Selection: To replicate the softness in the image, select a soft, high-quality Acrylic or Wool Blend yarn in a Worsted Weight (Aran/10-ply) or even a Bulky Weight (12-ply) if you desire extra thickness.
- Pro Tip on Yarn: This stitch is a significant “yarn eater,” meaning it uses far more yarn than a simple double crochet. Always buy an extra skein to complete your project.
- Hook Size: Use a 5.5 mm (I-9 US) to 6.5 mm (K-10.5 US) hook.
- Critical Hook Detail: The hook size should be 1 to 2 sizes larger than the size recommended on your yarn label. This prevents the dense puff rows from pulling the fabric tight and rigid, ensuring a soft, beautiful drape.
- Notions Checklist: Sharp Scissors, a large-eye Tapestry Needle for weaving in ends, and a Stitch Marker (optional, but helpful for tracking rows).
Gauge and Tension: The Key to Perfection
- Pattern Multiple: The DPS is worked over a multiple of 2 stitches, plus 1 for the foundation chain.
- Example Chain (for a swatch): Ch 27 (2 x 13 = 26, plus 1 = 27).
- Tension Mastery: Maintain a loose, relaxed tension on the single crochet (sc) base rows (Rows 4, 6, 8…). This loose base gives the subsequent puff stitches room to “sit” and allows the fabric to drape naturally.
- Swatch Requirement: Due to the dense texture, a swatch is highly recommended. Block your swatch to determine if the fabric is too stiff and adjust your hook size accordingly.
📌 Stitch Abbreviations & Technical Definitions (US Terms)
Core Stitches
- ch: Chain
- st(s): Stitch(es)
- sc: Single Crochet
- sl st: Slip Stitch
- rep: Repeat
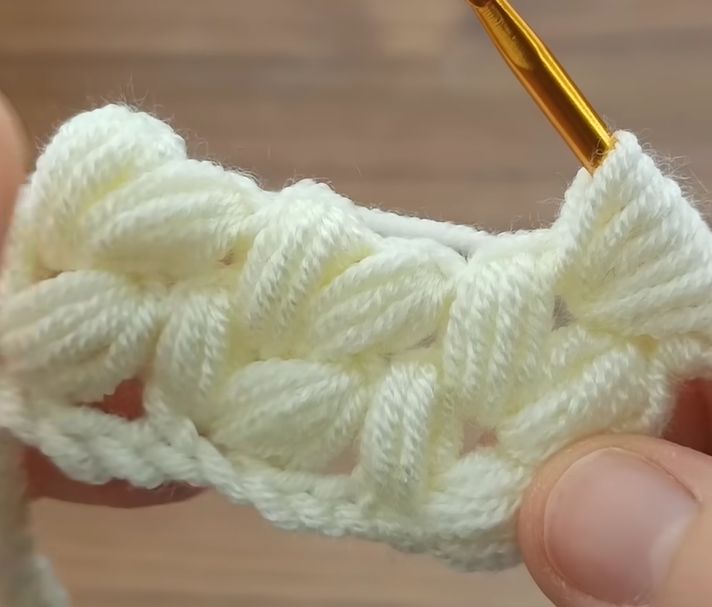
The Key Stitch: Diagonal Puff Stitch (DPS)
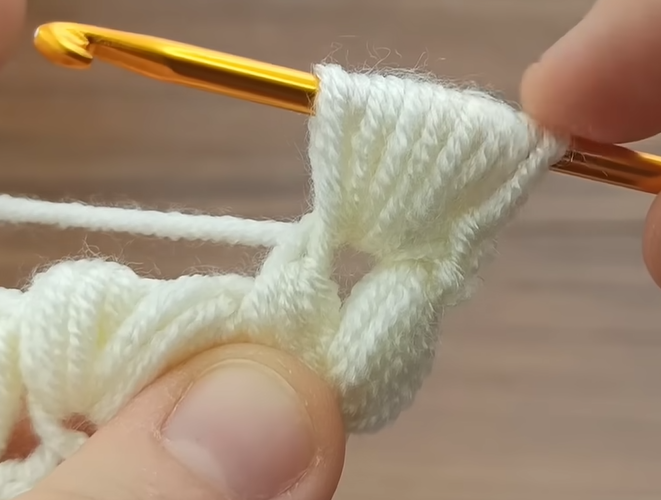
The puff should be large and fully formed to achieve the diagonal texture shown. We will use 4 pulls to ensure maximum loft.
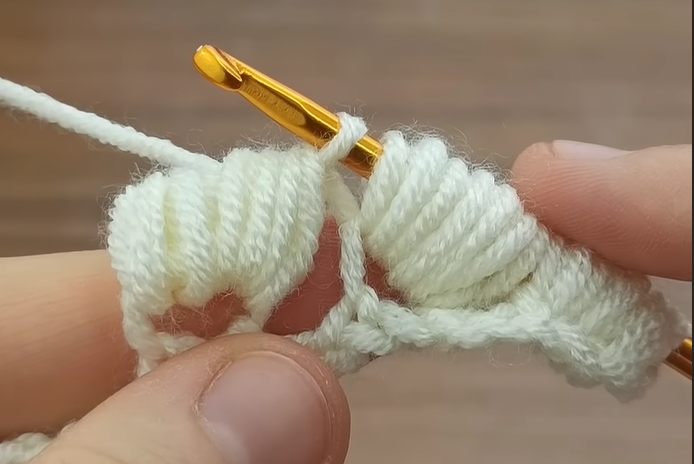
Diagonal Puff Stitch (DPS) Definition (4 pulls for ultimate fluff):
- Yo, insert hook into the designated stitch or space.
- Yo and pull up a loop, extending the loop fully to the height of the current row (3 loops on hook).
- [Yo, insert hook into the same point, Yo, pull up a loop] 3 more times. (You will have 9 loops on the hook after 4 pulls).
- Yo and pull through all 9 loops on the hook.
- Ch 1 to close the puff stitch. Note: This ch-1 is a securing knot and does not count as a stitch for subsequent rows, unless otherwise instructed.
➡️ Phase 1: Establishing the Foundation and Initial Texture
The first three rows are critical for establishing a flat edge and the initial puff placement.
Row 1: Foundation Single Crochet (Base)
- Ch the required number (multiple of 2, plus 1).
- Sc into the 2nd ch from the hook and in every ch across.
- Ch 1 (does not count as a stitch). Turn.
Row 2: The Base Row (Preparation)
- Sc into the first st and into every st across. This single crochet base provides a stable platform for the first set of puffs.
- Ch 1 (does not count as a stitch). Turn.
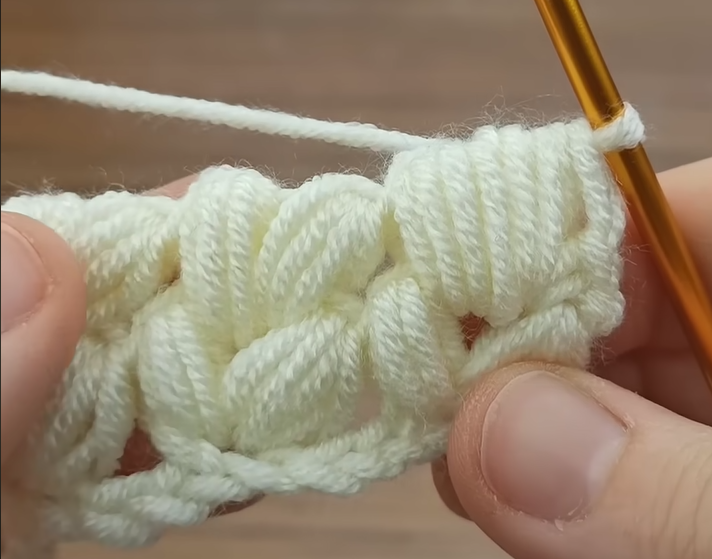
Row 3: First DPS Row (Setting the Diagonal)
The first row of puffs establishes the starting points for the diagonal offset.
- DPS into the first st.
- Sc into the next st.
- *DPS into the next st.
- Sc into the next st.*
- Repeat from * to * across the row.
- End by working a final DPS into the last st.
- Ch 1 (does not count as a stitch). Turn.
🔀 Phase 2: The Interlocking Staggered Repeat (Core of the Pattern)
This two-row sequence creates the signature diagonal, woven look.
Row 4: The SC Stabilizing Row (Flattening the Fabric)
This row is the “connector” and ensures the fabric lies flat before the next puff layer.
- Sc into the first st (this sc is worked over the top of the DPS from Row 3).
- Sc into every st across, placing one sc into the top of the previous DPS and one sc into the top of the previous Sc.
- Key Detail: The ch-1 that closed the puff stitch is tucked under the single crochet, creating the illusion of a vertical bar connecting the puffs.
- Ch 1 (does not count as a stitch). Turn.
Row 5: Staggered DPS Row (Creating the Offset)
This row alternates the puffs to fit perfectly into the spaces left by Row 3, creating the diagonal line.
- Sc into the first st.
- DPS into the next st (this stitch is directly above the previous row’s Sc).
- *Sc into the next st.
- DPS into the next st.*
- Repeat from * to * across the row.
- End by working a final Sc into the last st.
- Ch 1 (does not count as a stitch). Turn.
🔄 Phase 3: The Full Pattern Repeat and Advanced Scaling
The Full Sequence
The pattern is now fully established. To continue the diagonal puff texture:
- Repeat Row: Repeat Rows 4 and 5 until your piece reaches the desired length.
Advanced Scaling: Customizing Project Size
To translate this swatch pattern to a large project (like an afghan):
| Project Item | Recommended Starting Width (Chain Count) |
| Scarf | Ch 37 to Ch 51 (14 to 20 Puffs) |
| Baby Blanket | Ch 97 to Ch 127 (48 to 63 Puffs) |
| Throw/Lapghan | Ch 151 to Ch 181 (75 to 90 Puffs) |
| Large Afghan | Ch 227 to Ch 251 (113 to 125 Puffs) |
Always recalculate based on the multiple (2x + 1) and confirm the width with a large swatch.
Video Tutorial:
✂️ Finishing and Structural Integrity
Addressing Fabric Curl and Tension
- If your fabric curls dramatically, your hook is too small or your tension is too tight on the single crochet rows. Loosening the sc rows (Rows 4, 6, 8…) is the most effective fix.
- If the fabric is floppy, your puff definition is too loose. Increase the number of pulls in the DPS (e.g., use 5 pulls instead of 4).
Creating a Polished Edge
- Final Row: End after any SC Base Row (Row 4). This provides a clean, flat top edge.
- Border: A simple Single Crochet Border is highly recommended to finalize the edges.
- Round 1: Work a round of SC around the entire perimeter. Place 3 SC in each corner. Along the sides, aim for 3 SC per 2 rows to keep the edge flat and prevent puckering.
Your Diagonal Puff Stitch fabric is complete—a work of texture, warmth, and masterful design!


