
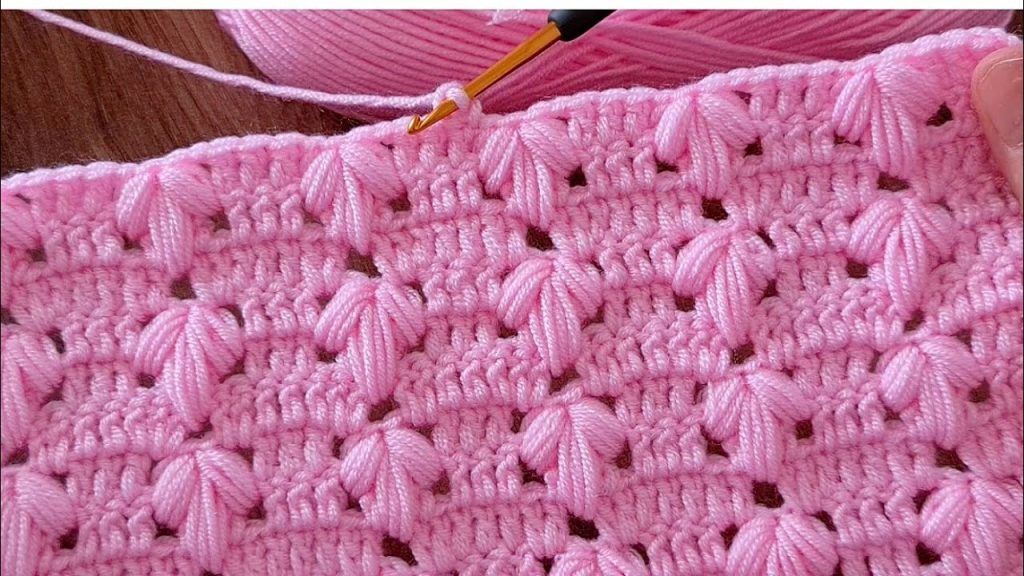
Welcome, texture fans! Today, we’re diving into a dreamy stitch that combines the density of a single crochet with the dimensional beauty of a puff stitch. This pattern—which we’ll call the Extended Puff Stitch—creates adorable, staggered “petals” or “almonds” that stand proud against a structured background. The resulting fabric is incredibly soft, thick, and warm, making it perfect for baby blankets, scarves, and cold-weather accessories.
The key to this pattern is the precise placement of the long puff stitch into the row two below. Let’s master this lovely pink texture!
🛍️ Materials & Setup
Choosing Your Tools
- Yarn: A Worsted Weight (Aran/10-ply) or DK Weight (8-ply) yarn is ideal. A smooth acrylic or wool blend, like the one shown, will define the petals beautifully.
- Hook: A crochet hook size appropriate for your yarn. A 4.5 mm to 5.0 mm (H-8 US) hook is recommended. A slightly smaller hook helps keep the single crochet base tight and pushes the puffs forward.
- Notions: Scissors and a tapestry needle.
Gauge and Multiple
- Pattern Multiple: This pattern is worked over a multiple of 3 stitches, plus 1 for the foundation chain.
- Example Chain (for a swatch): Ch 28 (3 x 9 = 27, plus 1 = 28).
📌 Stitch Abbreviations & Technical Definitions (US Terms)
Standard Abbreviations
- ch: Chain
- st(s): Stitch(es)
- sc: Single Crochet
- sl st: Slip Stitch
- rep: Repeat
The Key Stitch: Extended Puff Stitch (EPS)
The EPS is a puff worked two rows below to create the long, tapered shape. The number of loops can be adjusted based on yarn weight (4 or 5 pulls is typical).
Extended Puff Stitch (EPS) Definition (Using 4 pulls):
- Yo, insert hook into the designated sc space two rows below.
- Yo and pull up a loop, extending the loop to the height of the current row. (3 loops on hook).
- [Yo, insert hook into the same space, Yo, pull up a loop] 3 more times. (9 loops on hook).
- Yo and pull through all 9 loops on the hook.
- Ch 1 to close the puff stitch (this chain counts as a stitch).
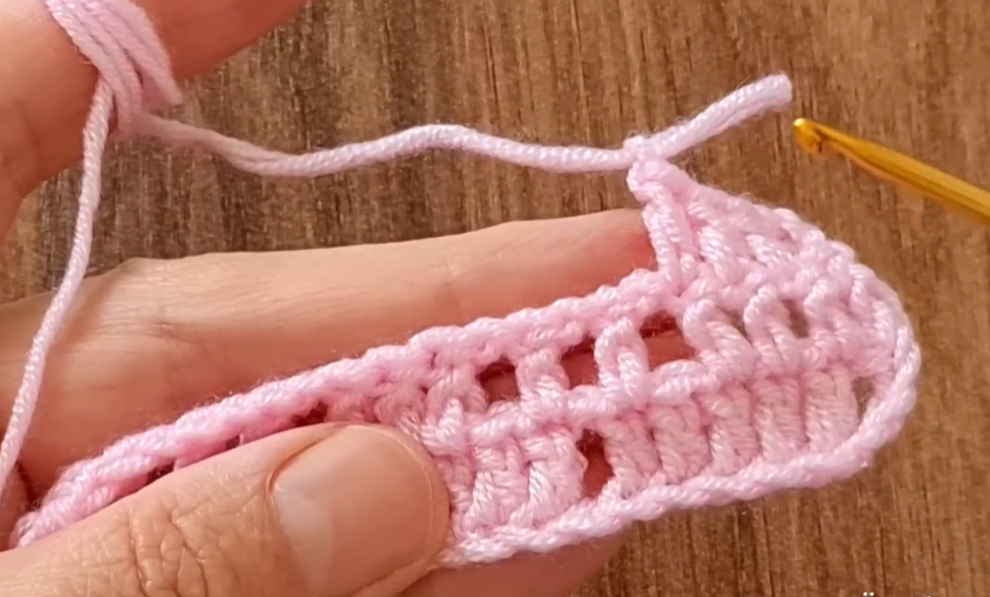
➡️ Phase 1: Establishing the Foundation
The first two rows create the dense SC base needed to support the extended puffs.

Row 1: Foundation Single Crochet
- Ch the required number (multiple of 3, plus 1).
- Sc into the 2nd ch from the hook and in every ch across.
- Ch 1 (does not count as a stitch). Turn.
Row 2: The SC Base Row
This row establishes the grid spaces for the first set of puff stitches.
- Sc into the first st and in every st across.
- Ch 1 (does not count as a stitch). Turn.
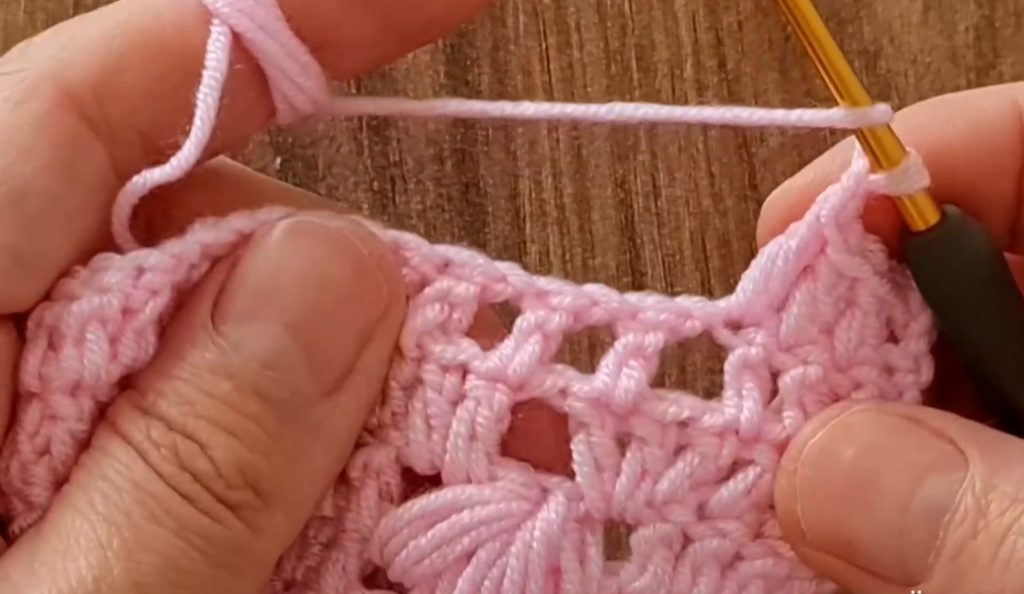
💖 Phase 2: Building the Texture (Row 3)
This row introduces the first set of extended puff stitches.
Row 3: First EPS Row
The puffs are worked into the middle stitch of every 3-stitch repeat from Row 1 (the foundation row).
- Sc into the first st.
- *EPS into the next sc of Row 1.
- Sc into the next 2 sts (sc from Row 2).*
- Repeat from * to * across the row.
- End by working a sc into the last st.
- Ch 1 (does not count as a stitch). Turn.
💡 Placement Tip: The SC stitches of Row 2 are completely covered by the EPS and the subsequent SCs, creating a seamless horizontal background. The EPS pushes the SC stitches of Row 2 forward.
🔀 Phase 3: The Staggered Repeat
To achieve the beautiful offset look, the next puff row must be staggered.
Row 4: The SC Stabilizing Row
This row prepares the base for the next row of staggered puffs.
- Sc into the first st and in every st across.
- Ch 1 (does not count as a stitch). Turn.
Row 5: The Staggered EPS Row
The puffs are now offset, worked into the spaces between the puffs from Row 3.
- Sc into the first 2 sts.
- *EPS into the next sc of Row 3 (the sc that sits between the two previous puffs).
- Sc into the next 2 sts.*
- Repeat from * to * across the row.
- End by working sc into the last st.
- Ch 1 (does not count as a stitch). Turn.
Stitch Count Check: Your EPS should now be perfectly centered in the dip between the two puffs of Row 3, creating the interlocking effect.
The Full Pattern Repeat
To continue this textured fabric, you will repeat the four key rows:
- Next Row: Repeat Row 4 (SC Stabilizing Row).
- Following Row: Repeat Row 3 (Starting with SC, EPS, SC 2, EPS…).
The full sequence for the fabric is: Rows 1-5, then repeat Rows 4 and 5 for the remainder of the project.
Video Tutorial:
✂️ Finishing and Edging Details
Fabric Characteristics
Due to the extended puff stitches, this pattern uses significantly more yarn than basic single or double crochet. The result is a thick, firm, and highly insulating fabric with fantastic texture.
Creating a Straight Edge
The stitch naturally creates a straight, sturdy edge, making it easy to finish.
- Final Row: End after any SC Stabilizing Row (Row 4). Work one final row of sl st across the top for a clean, tight, finished edge, or add a simple border of single crochet (sc).
- Blocking: While the single crochet base keeps the fabric firm, a light steam block can help relax the fibers and make the extended puffs lay more evenly.
This Extended Puff Stitch creates a beautiful, cozy fabric that is visually appealing and wonderfully warm.


