
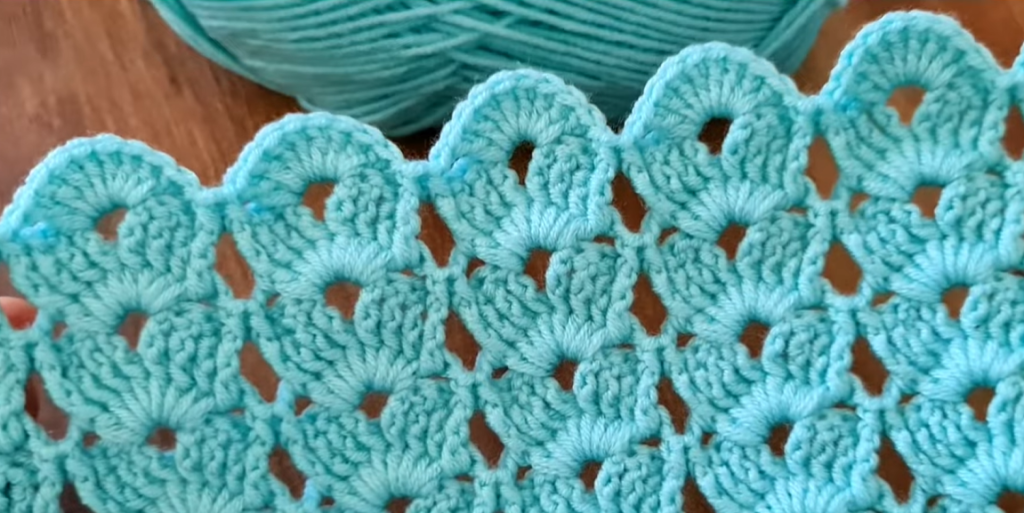
Welcome back, fiber artists! You loved the initial guide, but this truly amazing stitch warrants a closer look. The Crocodile Stitch (also known as the Dragon Scale or Fish Scale stitch) is a three-dimensional marvel that adds unparalleled texture and depth to any project. While it requires focus, mastering it is one of the most satisfying achievements in crochet.
We’re going to break down every step, from the foundational row to advanced finishing techniques, ensuring your scales are perfect every time.
🧶 Materials & Gauge (Getting Prepared)
Choosing Your Yarn
- Weight: I highly recommend a Worsted Weight (Aran/10-ply) or DK Weight (8-ply) yarn. The puffiness of the scales looks best with medium-weight yarn.
- Fiber: A smooth acrylic or wool blend is ideal. Highly fuzzy or textured yarns (like bouclé or velvet) will obscure the scale pattern.
- Color: Use a solid or slow-changing variegated color (like the bright turquoise in your photo). Fast-changing colors will distract from the dimensional texture.
Hook Size and Gauge
- Hook: Start with a 5.0 mm (H-8 US) for worsted weight. If you’re a tight crocheter, go up to a 5.5 mm to ensure the scales have enough room to breathe and lie flat.
- Gauge (Essential for Scarf/Garment): Once you master the stitch, measure your swatch. One full scale (Row 2) plus the V-stitch space before and after should measure approximately 2 inches wide and 1.5 inches tall. Adjust your hook size until you are happy with the density of the scales.
📚 Stitch Abbreviations & Technical Definitions
Standard Abbreviations (US Terms)
- ch: Chain
- st(s): Stitch(es)
- sk: Skip
- sl st: Slip Stitch
- sc: Single Crochet
- dc: Double Crochet
- rep: Repeat
- tog: Together
Key Pattern Components
- V-Stitch (v-st): Defined as (dc, ch 1, dc) all worked into the same stitch or space. This is the foundation for the scale.
- Crocodile Scale (CS): Defined as a group of 10 double crochet stitches worked around the two vertical posts of the V-stitch, with a ch-1 in the middle.
✨ Phase 1: The Foundation – Setting Up the V-Stitches
The Crocodile Stitch is always worked over a foundation of V-Stitches. This is your “skeleton” row.
The Math (Pattern Multiple)
The pattern repeat is based on the V-Stitch setup:
$$\text{Foundation Chain} = (\text{Multiple of 6}) + 3 \text{ chains}$$
- Why 6? You need 2 chains for the first leg of the V-Stitch, 2 chains to skip, and 2 chains for the second leg/space.
- Why +3? This accounts for the 2 turning chains (which count as a dc) and the one extra chain needed to start the first V-stitch base.
Example Swatch: Ch 27
| Step | Action | Description |
| Foundation | Ch 27 | Start your swatch. |
| Row 1 | Ch 3 (counts as dc), dc into the 4th chain from the hook. | This forms the base for your first half-scale. |
| *Ch 1, sk 2 chs.* | Create the necessary spacing. | |
| Dc into the next ch, ch 1, dc into the same chain (V-st made). | This is the foundation for your first full scale. | |
| Rep * to * across the row. | You should be placing V-stitches every 3rd chain stitch. | |
| Ch 1, sk 2 chs, dc 2 into the last ch. | This forms the base for your last half-scale. | |
| Turn. | You should have 4 full V-Stitches and 2 V-st bases (half-scales). |
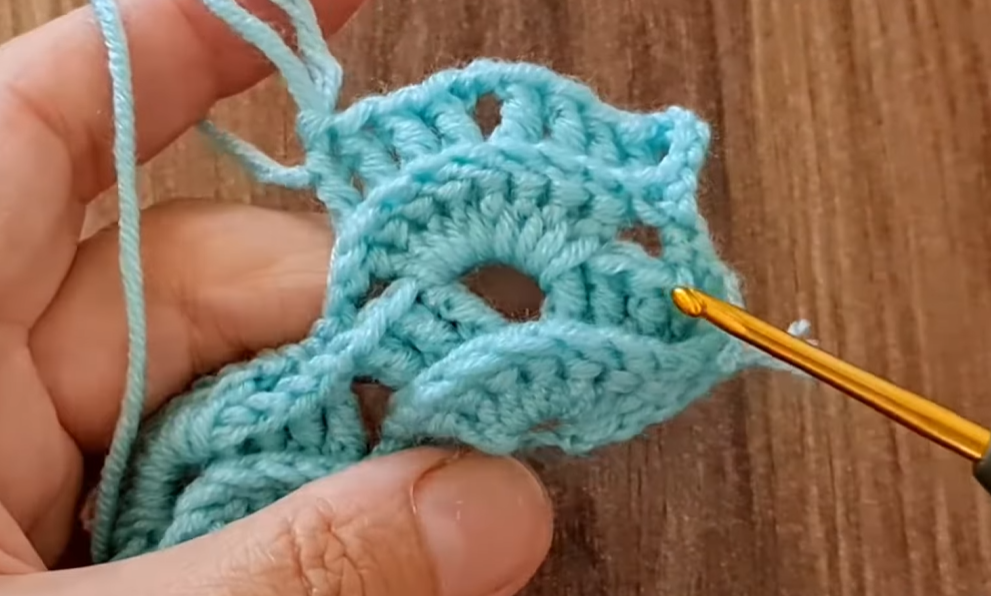
🐊 Phase 2: Building the Scales – Row 2
This is the most crucial row. You will only be working scales into every other V-Stitch, which creates the staggered look and allows the scales to lie flat.
Row 2: Creating the Scales
- Ch 1 (does not count as a stitch, this is just a turning chain for the sc).
- Sc into the first dc stitch (secures the edge).
- *Work a Crocodile Scale (CS) around the posts of the next V-Stitch (V-st #1):
- Dc 5 down the post of the first dc of the V-st.
- Ch 1 (this small chain is the “hinge” at the bottom of the scale).
- Dc 5 up the post of the second dc of the V-st.
- (Your scale is complete: 10 dc with a ch-1 hinge).
- Sc into the ch-1 space of the next V-Stitch (V-st #2). This anchors the bottom of the scale you just made.
- Sk the next V-Stitch (V-st #3).
- Sc into the ch-1 space of the next V-Stitch (V-st #4). This prepares for the next scale.*
- Repeat from * to * across the row.
- Sc into the turning chain (Ch 3) from Row 1.
- Turn.
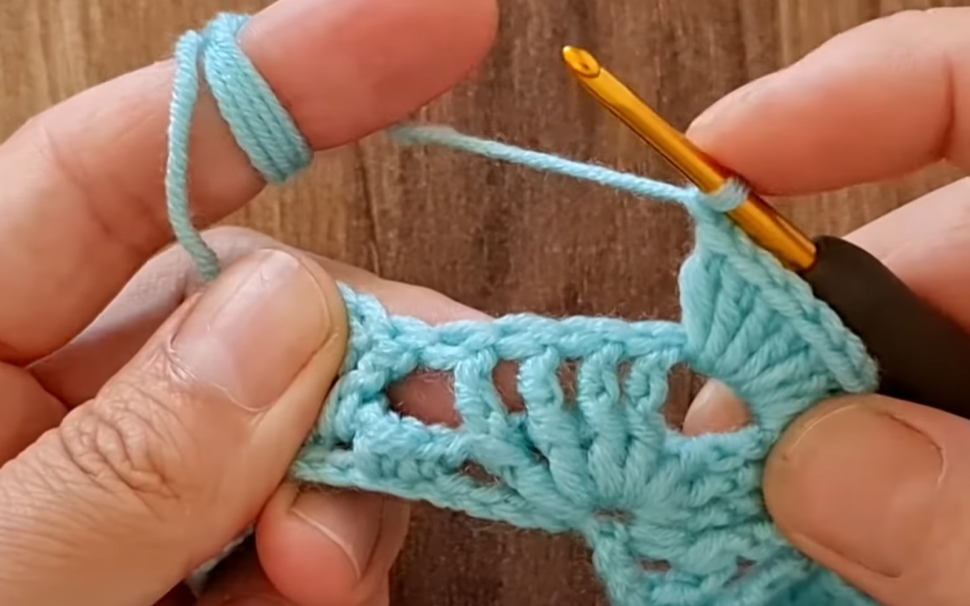
🧐 Troubleshooting Tip: If your scale doesn’t look like a fan, you might be working into the stitch instead of around the post. You must insert your hook under the vertical bar of the dc stitch.
🔄 Phase 3: The Repeat – Staggering the Texture
To achieve the staggered, overlapping look seen in the photo, you must alternate where you place the scales. Row 3 sets the V-Stitches in the gaps created by Row 2.
Row 3: Setting Up the Next V-Stitch Row (In the Gaps)
This row is worked behind the scales.
- Ch 3 (counts as first dc).
- Dc into the first st (the sc from the previous row), forming the first half-V-st base.
- *Ch 1, sk the next CS (the large scale fan).
- Dc into the sc at the center of the skipped scale, ch 1, dc into the same sc (V-Stitch made).
- Sk the next CS.
- Dc into the sc at the center of the next skipped scale, ch 1, dc into the same sc (V-Stitch made).*
- Repeat from * to * across the row.
- Ch 1, sk the next CS.
- Dc 2 into the last sc, forming the last half-V-st base.
- Turn.
Row 4: Working Scales in the New Gaps
This row starts with a skip, meaning you are now placing scales over the V-stitches you skipped in Row 2.
- Ch 1, sc into the first st.
- Sk the first V-Stitch.
- *Sc into the ch-1 space of the next V-Stitch.
- Work a CS around the posts of the next V-Stitch.
- Sk the next V-Stitch.
- Sc into the ch-1 space of the next V-Stitch.*
- Repeat from * to * across the row, ending with a CS around the final V-Stitch base.
- Sc into the turning chain (the Ch 3) from the previous row.
- Turn.
The Final Repeat Sequence
To continue, simply alternate these two scale-making rows:
- Next Row: Repeat Row 3 (V-Stitch setup).
- Following Row: Repeat Row 2 (Scale row, starting with a scale).
Video Tutorial:
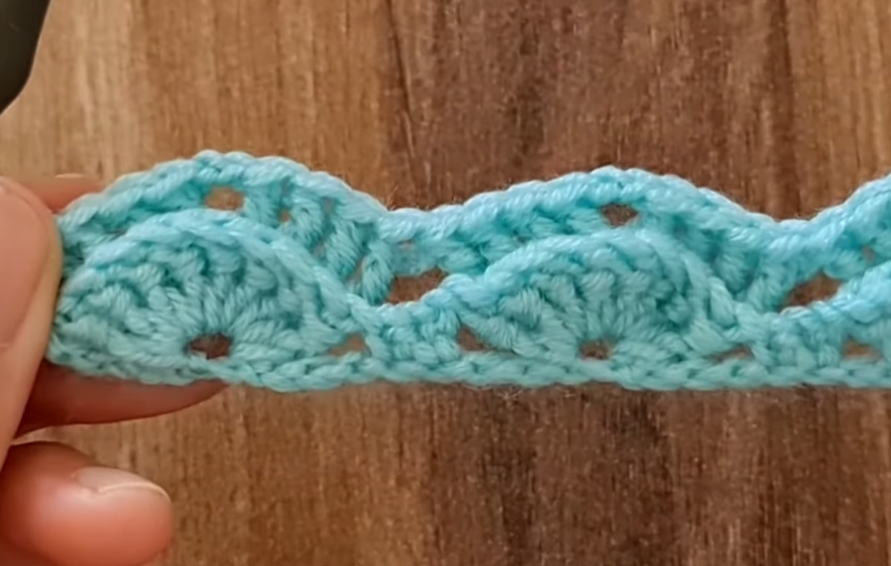
🛑 Finishing and Edging Details
Straightening the Edge
Because the Crocodile Stitch inherently creates a scalloped edge, you must add a final edge row if you want a straight, clean finish (like for an afghan).
- Final Row Option 1 (Straight Edge): After completing a V-Stitch Row (Row 3), Ch 1 and work 1 sc into every stitch and ch-1 space across. Important: Place 3 sc over the Ch 3 turning chain at the end to turn the corner neatly.
- Final Row Option 2 (Scalloped Edge): If you prefer a decorative border, work a simple picot or shell border into the ch-1 spaces between the scales.
Weaving in Ends
Due to the open nature of this stitch, ends can easily poke out. Weave your ends through the back of the base V-Stitches (Row 3), not the scales themselves. This anchors the yarn securely behind the dense texture.
This stitch is truly a showpiece. Enjoy the process of creating such a rich, beautiful fabric!


