
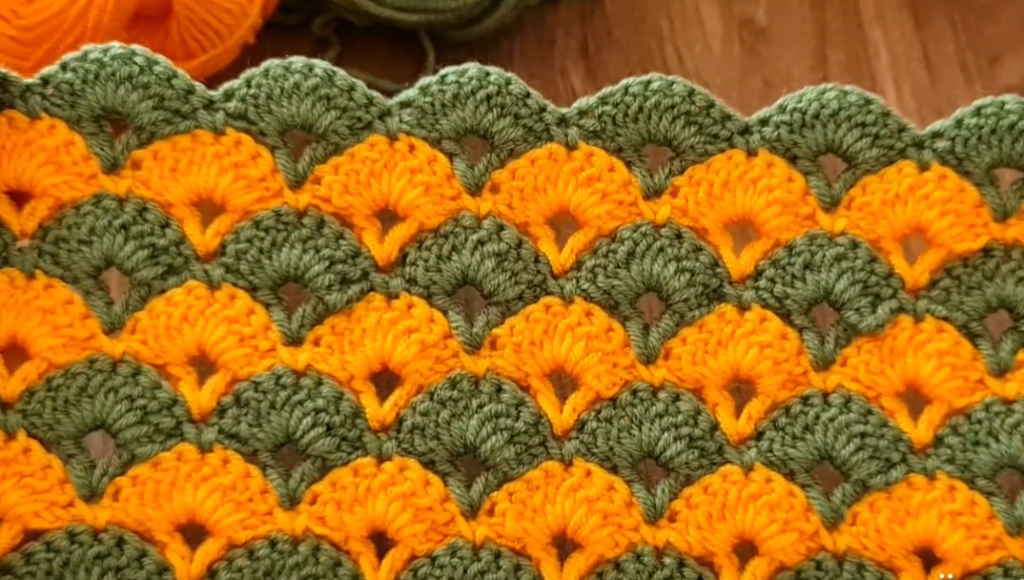
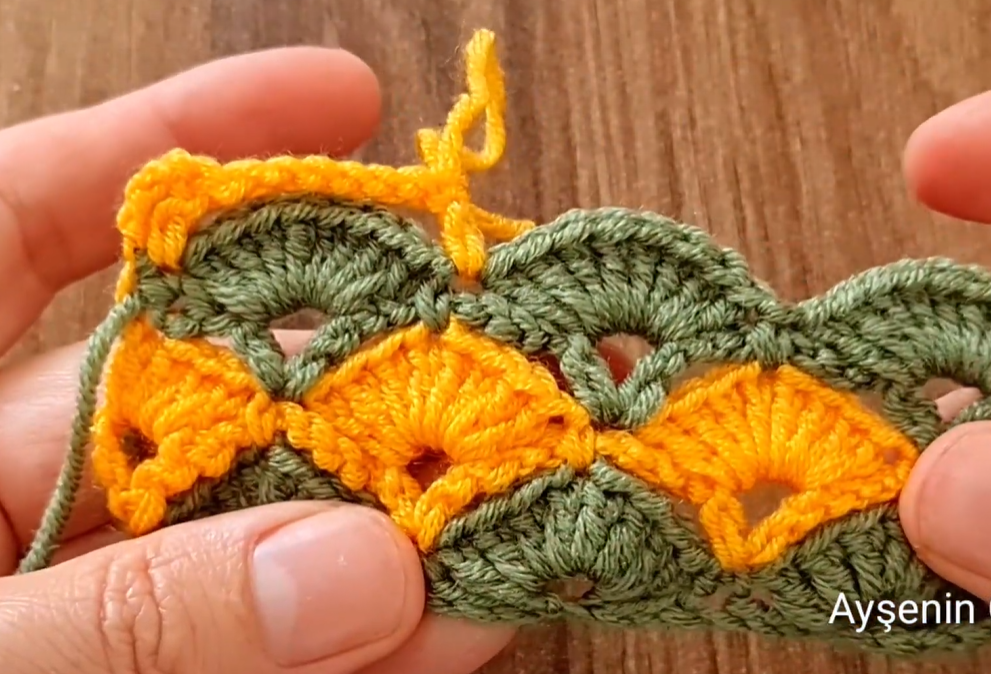
Welcome, color enthusiasts! Today, we’re diving into a captivating stitch that uses strategic color changes to create a beautiful, interlocking wave pattern, often called the Scallop Shell Stitch. This technique builds upon a dense shell cluster, making it a wonderful choice for warm, textured projects like afghans, throws, and heavy scarves.
The two-row repeat is rhythmic and satisfying, but the key is mastering the shell placement and the color transition. Let’s grab our yarn and start this vibrant journey!
🛍️ Materials & Setup
Choosing Your Tools
- Yarn: You will need two strongly contrasting colors of yarn. A Worsted Weight (Aran/10-ply) or DK Weight (8-ply) yarn is recommended.
- Color A (CA): The bottom color of the wave/shell (Orange/Yellow in the photo).
- Color B (CB): The top color of the wave/shell (Green in the photo).
- Hook: A crochet hook size appropriate for your yarn. A 5.0 mm (H-8 US) or 5.5 mm (I-9 US) hook works well for worsted weight. This stitch is dense, so a slightly larger hook aids drape.
- Notions: Scissors and a tapestry needle. You will be dropping and picking up yarn at the edge, so secure edging is key.
Gauge and Multiple
- Pattern Multiple: This pattern is worked over a multiple of 10 stitches, plus 1 for the foundation chain.
- Example Chain (for a swatch): Ch 31 (10 x 3 = 30, plus 1 = 31).
📌 Stitch Abbreviations & Technical Definitions (US Terms)
Standard Abbreviations
- ch: Chain
- st(s): Stitch(es)
- sk: Skip
- sc: Single Crochet
- dc: Double Crochet
- sl st: Slip Stitch
- CA: Color A (Orange)
- CB: Color B (Green)
- rep: Repeat
The Key Stitches
- DC Shell: Defined as a cluster of 5 Double Crochet (dc) stitches worked into the same stitch or space.
- DC Cluster (or DC5tog): Defined as 5 incomplete Double Crochet stitches worked over 5 consecutive stitches, then joined at the end. This closes the diamond/scallop shape.
DC Cluster (DC5tog) Definition:
- Yo, insert hook into the first st, yo, pull up a loop, yo, pull through 2 loops (2 loops on hook).
- Rep Step 1 in the next 4 stitches (6 loops on hook after 5 incomplete dc’s).
- Yo, pull through all 6 loops on the hook to join the cluster.
➡️ Phase 1: Establishing the Foundation (Color A)
The foundation sets up the perfect base for the rhythmic repetition of the shells.
Row 1 (CA): Foundation Single Crochet
- Using CA, Ch the required number (multiple of 10, plus 1).
- Sc into the 2nd ch from the hook and in every ch across.
- Ch 1 (does not count as a stitch). Turn.
Row 2 (CA): The Scallop Base Row
This row creates the base for both the peaks (shells) and the valleys (clusters) of the wave.
- Sc into the first st.
- *Sk 4 sts.
- Work a DC Shell (dc 5) into the next st.
- Sk 4 sts.
- Sc into the next st.*
- Repeat from * to * across the row.
- End with an sc in the last st.
- Before completing the last sc, change to CB. Insert hook into the last st, YO with CA, pull through 2 loops (2 loops on hook). Drop CA, YO with CB, pull through the last 2 loops to complete the sc.
- Ch 3 (counts as first dc). Turn.
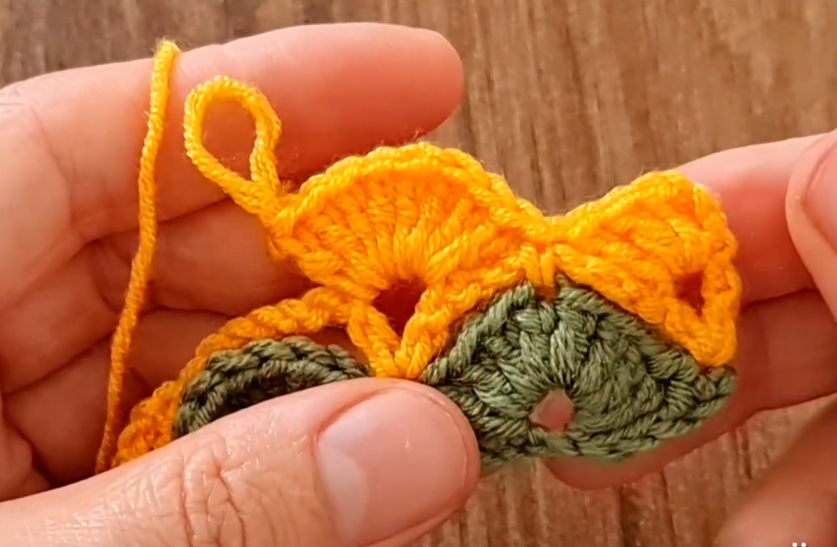
🌳 Phase 2: Closing and Shifting the Shells (Color B)
This row uses Color B to close the base of the shells and position the pattern so the next set of shells will be staggered in the gaps.
Row 3 (CB): The Cluster and Chain Row
This row forms the bottom of the new scallops (the green section in the photo).
- Using CB, dc 2 into the first st (half of a DC Shell).
- Ch 1, sk 2 sts.
- Work a DC Cluster (DC5tog) across the next 5 stitches (the center 5 dc of the Shell from Row 2).
- Ch 1, sk 2 sts.
- *Work a DC Shell (dc 5) into the sc from Row 2.
- Ch 1, sk 2 sts.
- Work a DC Cluster (DC5tog) across the next 5 stitches (the center 5 dc of the Shell).*
- Repeat from * to * across the row.
- End by working a DC Shell (dc 5) into the last sc of Row 2.
- Drop CB, leaving it attached at the edge.
- Pick up CA, Ch 1 (does not count as a stitch). Turn.
🧐 Stitch Note: This is where the wave shifts. The DC Shells are now worked into the previous sc stitches, and the DC Clusters are worked over the previous shells.
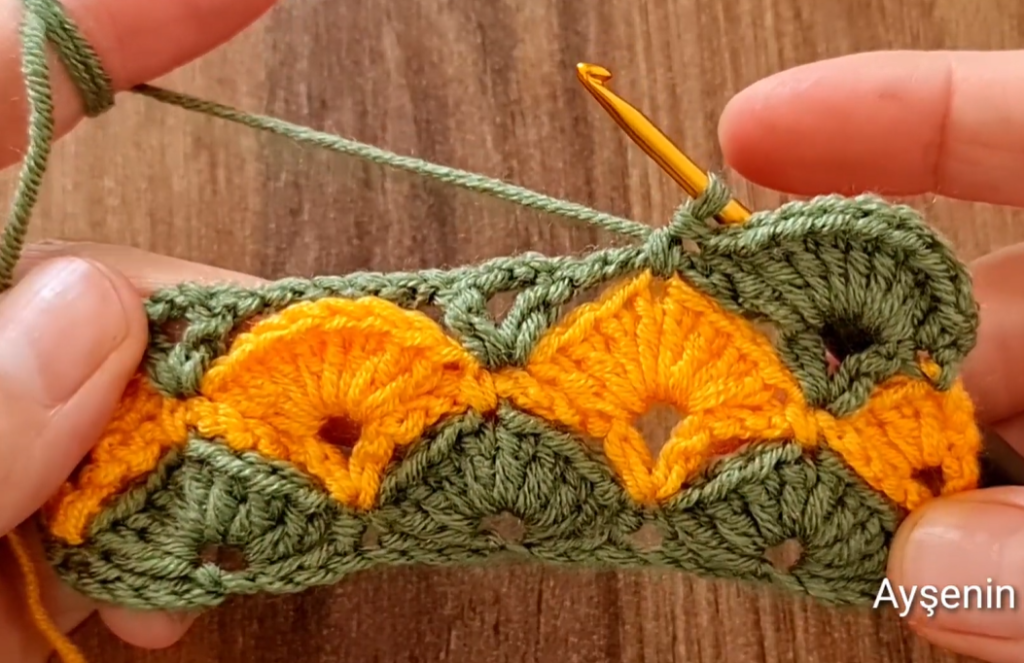
☀️ Phase 3: The Repeat and Color Change
You will now repeat the cluster/shell structure, but the colors will alternate to create the two-tone wave effect.
Row 4 (CA): Next Scallop Base Row
This row uses SCs to stabilize the pattern and sets the base for the next shell clusters.
- Using CA, sc into the first st.
- Sk 2 sts (the last 2 dc of the half-shell).
- *Work a DC Shell (dc 5) into the center of the DC Cluster (the single stitch at the top of the cluster) from Row 3.
- Sk 2 sts (the first 2 dc of the next Shell).
- Sc into the center dc of the Shell from Row 3.*
- Repeat from * to * across the row.
- End with a sc in the 3rd ch of the starting Ch 3 from Row 3.
- Before completing the last sc, change to CB.
- Ch 3 (counts as first dc). Turn.
Row 5 (CB): Next Cluster and Chain Row
This row is similar to Row 3, but the Shells and Clusters are offset.
- Using CB, dc 2 into the first st (half of a DC Shell).
- Ch 1, sk 2 sts (the last 2 dc of the half-shell).
- *Work a DC Cluster (DC5tog) across the next 5 stitches (the center 5 dc of the Shell from Row 4).
- Ch 1, sk 2 sts.
- Work a DC Shell (dc 5) into the sc from Row 4 (the one between the shells).*
- Repeat from * to * across the row.
- End by working a DC Cluster (DC5tog) across the last 5 stitches of the last shell.
- Drop CB, leave attached.
- Pick up CA, Ch 1 (does not count as a stitch). Turn.
🎨 Phase 4: The Complete Pattern Repeat
To continue the beautiful wave pattern, repeat the four key rows:
- Next CA Row: Repeat Row 4 (SC and Shell Row).
- Next CB Row: Repeat Row 5 (Cluster and Shell Row).
The full sequence for the fabric is: Rows 2-5, then repeat Rows 4 and 5 until your piece is the desired length.
Video Tutorial:
✂️ Finishing and Edging Details
Managing the Colors
Since you change colors at the end of every shell row (Rows 3 and 5), you have two options:
- Carrying the Yarn: The best option for this pattern is to carry the unused color loosely up the side edge of your work. The density of the fabric will help contain the carried strands, and you can finish the edge with a simple SC border to hide them completely.
- Cutting the Yarn: If you want a perfectly flat edge, you must cut the yarn after every color change and weave in all tails later.
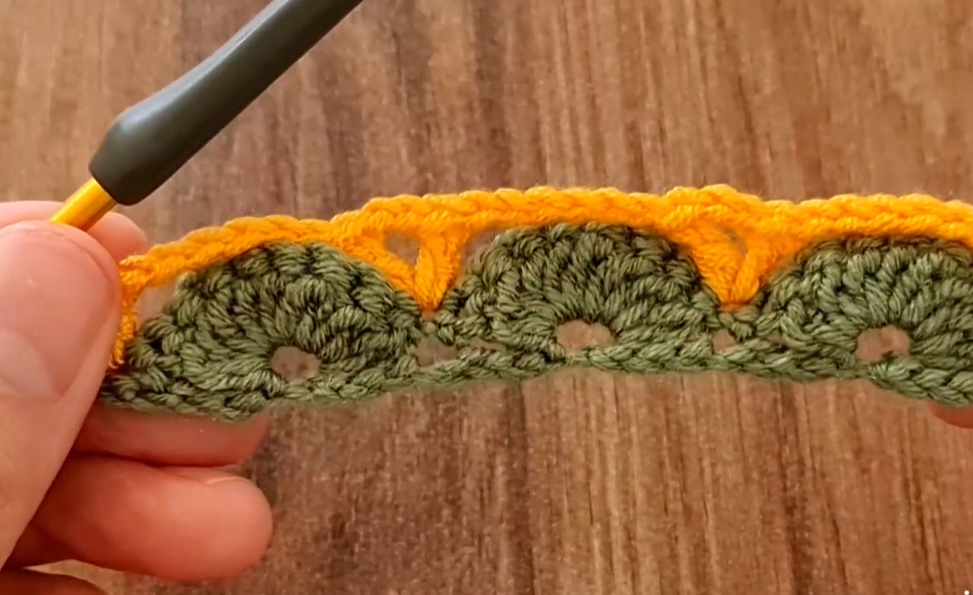
The Final Scalloped Edge
The beauty of this stitch is the natural scallop it creates. If you end on a Cluster/Shell Row (Row 3 or 5), you’ll have a beautifully finished scalloped edge, ready for a simple SC border to clean up the sides.
- Edging Tip: To stabilize the scalloped edge, work a simple SC border around the entire piece, placing 1 SC into each stitch and carefully spacing them evenly along the side edges where you carried the yarn.
This two-color Scallop Shell Stitch creates a stunning, dynamic textile. Enjoy the process!


