
Hello, texture innovators! We’re diving into a captivating crochet stitch that is wonderfully modern and deeply satisfying to create. This two-color pattern—which we’ll call the Vertical Spike Stitch—uses a simple repeat but achieves a complex, woven look with its long, contrasting stitches dropping into the rows below.
The fabric created is thick, warm, and highly stable, making it ideal for projects where structure and clean lines are desired. Let’s master the technique!
🛍️ Materials & Setup
Choosing Your Tools
- Yarn: You will need two contrasting colors of yarn. A smooth Worsted Weight (Aran/10-ply) yarn works best to keep the stitch definition crisp.
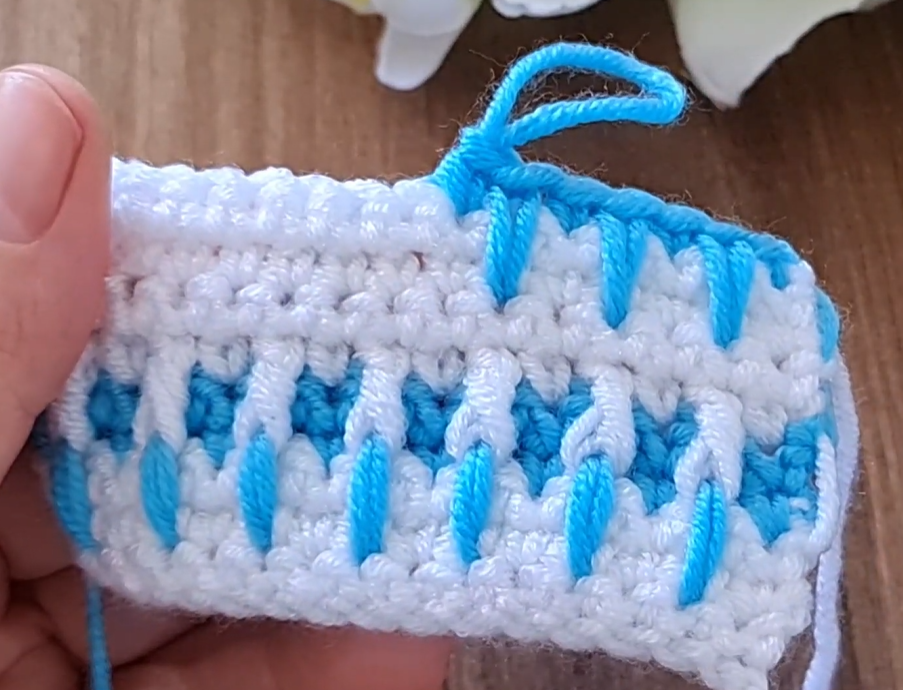
- Color A (CA): The main background color (White in the photo).
- Color B (CB): The contrasting vertical spike color (Blue in the photo).
- Hook: A crochet hook size appropriate for your yarn. A 4.5 mm to 5.0 mm (H-8 US) hook is ideal. A slightly smaller hook helps maintain the density of the background Single Crochet rows.
- Notions: Scissors and a tapestry needle. You will be dropping and picking up yarn at the edge of every row.
Gauge and Multiple
- Pattern Multiple: This pattern is worked over a multiple of 2 stitches, plus 1 for the foundation chain.
- Example Chain (for a swatch): Ch 27 (2 x 13 = 26, plus 1 = 27).
📌 Stitch Abbreviations & Technical Definitions (US Terms)
Standard Abbreviations
- ch: Chain
- st(s): Stitch(es)
- sc: Single Crochet
- CA: Color A (White)
- CB: Color B (Blue)
- rep: Repeat
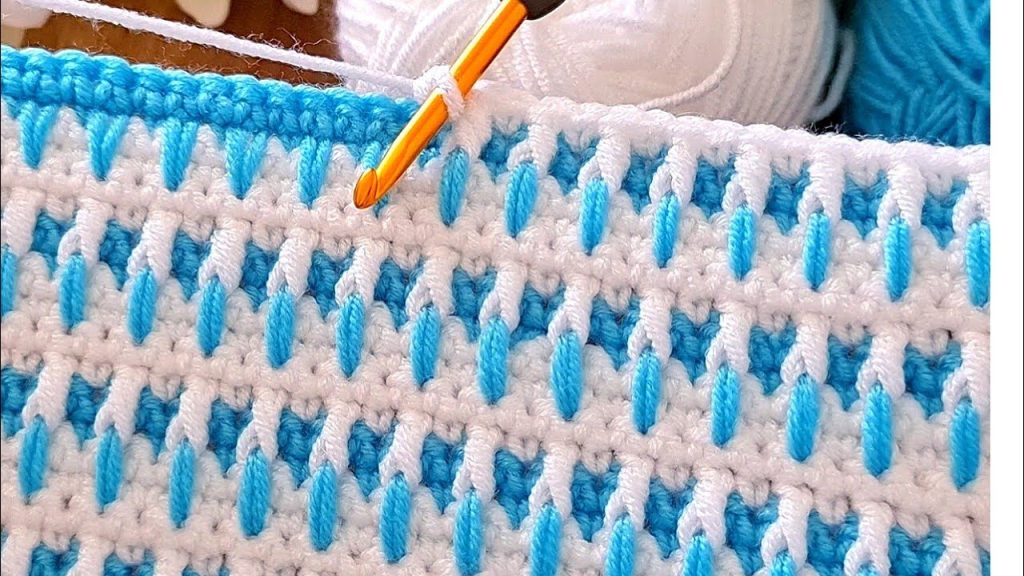
The Key Stitch: Long Single Crochet Spike (LSC)
The LSC is the central element of the pattern, creating the “drip” effect.
Long Single Crochet Spike (LSC) Definition:
- Insert hook into the designated stitch space two rows below.
- Yarn Over (YO) and pull up a loop, extending the loop to the height of the current row (2 loops on hook).
- YO and pull through both loops to complete the single crochet stitch.
Result: A single crochet that is taller than usual, spanning two rows.
🎨 Phase 1: Establishing the Foundation (Color A)
The first two rows set up the stable, dense single crochet base required for the spike stitches.
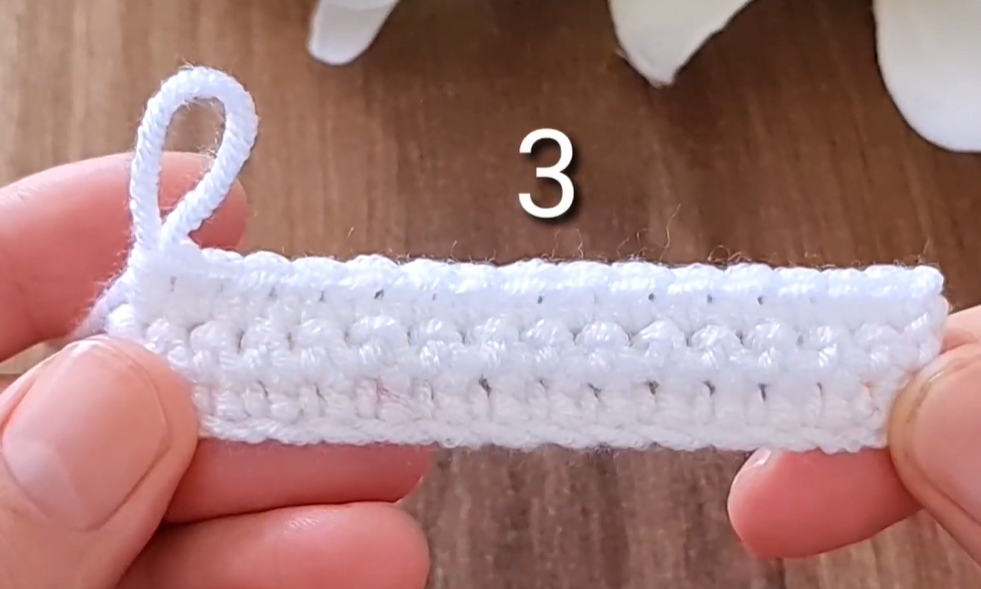
Row 1 (CA): Foundation Single Crochet
- Using CA, Ch the required number (multiple of 2, plus 1).
- Sc into the 2nd ch from the hook and in every ch across.
- Drop CA, leaving it attached at the edge.
- Pick up CB, Ch 1 (does not count as a stitch). Turn.
Row 2 (CB): The SC Base
- Using CB, sc into the first st and in every st across.
- Drop CB, leaving it attached at the edge.
- Pick up CA, Ch 1 (does not count as a stitch). Turn.
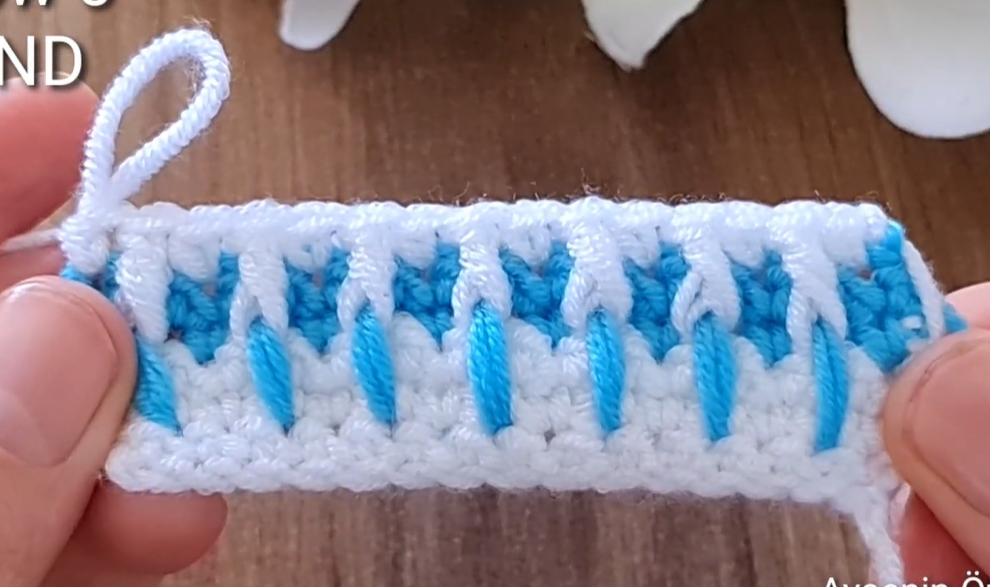
💧 Phase 2: Introducing the Vertical Spike (Color A)
This row uses the background color (CA) to create the first horizontal bar and sets up the spaces for the contrasting spikes (CB).
Row 3 (CA): Horizontal Bar Row
- Using CA, sc into the first st.
- *Sc into the next st.
- Sc into the next st.*
- Repeat from * to * across the row.
- Drop CA.
- Pick up CB, Ch 1 (does not count as a stitch). Turn.
Row 4 (CB): The Spike Stitch Row
This is where the contrasting vertical lines are introduced. The spikes will be placed into the skipped spaces of Row 2.
- Using CB, sc into the first st.
- *Work a Long Single Crochet Spike (LSC) into the next sc of Row 2 (the row two below).
- Sc into the next st (the sc from Row 3).
- LSC into the next sc of Row 2.*
- Repeat from * to * across the row, ending with a sc in the last st.
- Drop CB.
- Pick up CA, Ch 1 (does not count as a stitch). Turn.
💡 Placement Tip: The LSC stitches essentially skip the SC in the row immediately below (Row 3), pushing those stitches down and creating the horizontal bar effect.
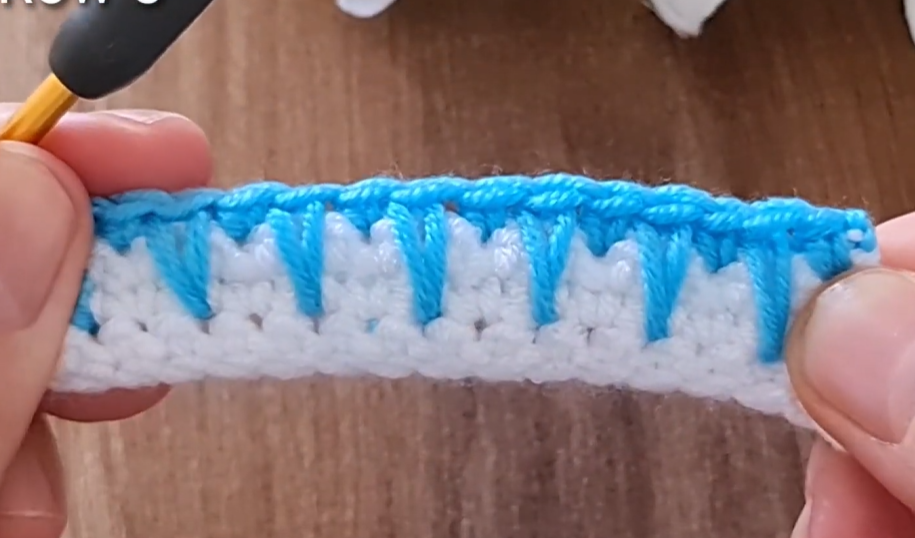
〰️ Phase 3: The Staggered Repeat (Color A & B)
To get the clean, alternating look, the pattern is offset on the next repeat.
Row 5 (CA): Next Horizontal Bar Row
This row is a straight repeat of Row 3, worked entirely in single crochet.
- Using CA, sc into the first st and in every st across.
- Drop CA.
- Pick up CB, Ch 1 (does not count as a stitch). Turn.
Row 6 (CB): The Staggered Spike Row
The spikes are now offset, sitting in the spaces between the spikes from Row 4.
- Using CB, LSC into the first sc of Row 4 (the row two below).
- *Sc into the next st (the sc from Row 5).
- LSC into the next sc of Row 4.*
- Repeat from * to * across the row.
- End by working an LSC into the last sc of Row 4.
- Drop CB.
- Pick up CA, Ch 1 (does not count as a stitch). Turn.
🔄 Phase 4: The Complete Pattern Repeat
The pattern is now fully established. To continue this beautiful fabric, you will repeat the two main rows:
- Next Row (CA): Repeat Row 5 (Horizontal Bar Row: SC in every stitch).
- Next Row (CB): Repeat Row 4 (Spike Stitch Row: SC, LSC, SC, LSC across).
The full sequence for the fabric is: Rows 1-6, then repeat Rows 5 and 6 until your piece is the desired length.
Video Tutorial:
✂️ Finishing and Edging Details
Managing the Colors
This stitch requires changing colors at the end of every row (Rows 3 through 6). The best technique is to carry the yarn loosely up the edge.
- Since the fabric is thick, a simple Single Crochet border worked around the entire finished piece will easily cover the carried strands and give your work a clean, professional finish.
Creating a Straight Edge
The stitch naturally creates a straight edge, making it easy to finish or add a border.
- Final Row: End after a Horizontal Bar Row (Row 3 or 5) using Color A. Work one final row of sc in Color A to match the foundation rows.
- Border: Add a simple border in either CA or CB (or both!) by working a tight single crochet around the entire perimeter of the project, placing 3 sc in each corner to keep it flat.
This Vertical Spike Stitch creates a stunning, graphic, and thick textile. Enjoy the texture you’ve created!


