
✨ Introduction: The Woven Look
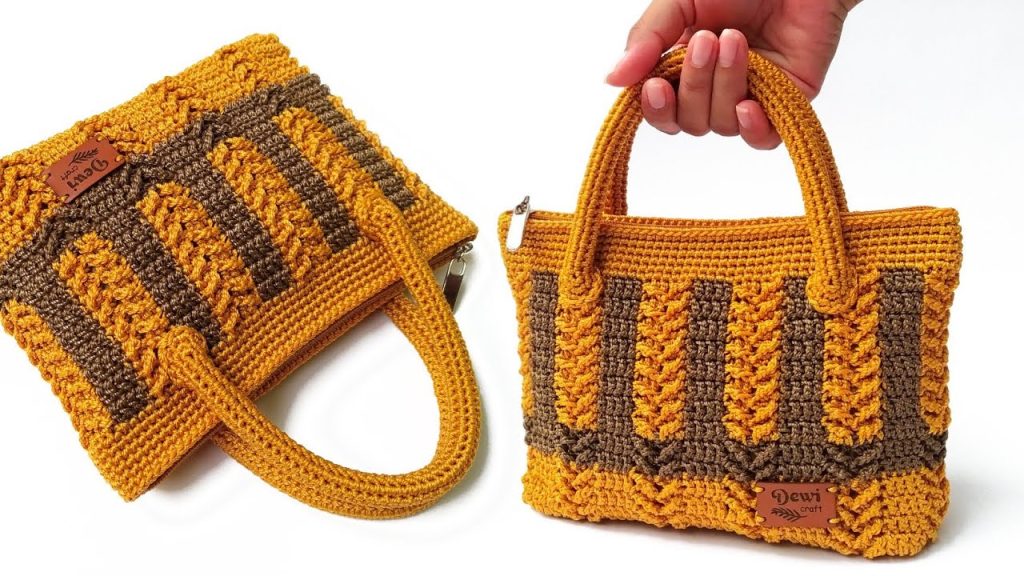
Welcome to the detailed pattern for the Interlocking Celtic Weave Tote, a modern and structured handbag inspired by the beautiful, geometric stitch featured in the video. This project is defined by its robust construction, built on a solid rectangular base, and the intricate texture of its main body stitch—a combination of Double Crochet (DC) and Treble Crochet (TR) that creates a stunning, interwoven “X” effect.
This bag is an excellent choice for crocheters ready for an intermediate challenge. The result is a bag that is firm, durable, and elegant, especially when worked with a specialty yarn like nylon or polypropylene (nautical) thread, as demonstrated in the tutorial.
Key Design Features
- Interlocking X Stitch: A rhythmic pattern of crossed stitches that creates a dense, basket-like texture, eliminating the need for lining for structure (though lining is still recommended for function).
- Solid Base: Begins with a flat, rectangular base that provides a stable foundation, allowing the bag to stand on its own.
- Customizable: The pattern is based on a simple 10-stitch repeat, making it easy to adjust the bag’s final circumference.
📚 Materials & Terminology
| Abbreviation | Meaning |
| ch | Chain |
| st(s) | Stitch(es) |
| sl st | Slip Stitch |
| sc | Single Crochet |
| dc | Double Crochet |
| tr | Treble Crochet (Yarn over twice, insert hook, pull through 2 loops 3 times) |
| sk | Skip |
| rep | Repeat |
| BP | Back Post |
Special Stitches
- Left Cross (L-Cross): Creates a slanted stitch where the TR sits behind the subsequent DCs.
- Action: Sk 2 sts, TR in the 3rd st. Go back and work 1 DC in the 1st skipped st, 1 DC in the 2nd skipped st.
- Right Cross (R-Cross): Creates a slanted stitch where the TR sits in front of the subsequent DCs.
- Action: Sk 1 st, 1 DC in the next 2 sts. Work 1 TR in the skipped st, inserting the hook from behind the two DCs just made. (This TR is worked around the Front Post of the skipped stitch, but in the base of the previous row).
Materials Needed
- Yarn: Durable yarn is essential for structure. Nylon, Polypropylene/Nautical Yarn, or T-shirt Yarn (Fine weight).
- Hook: 4.0 mm crochet hook (or size needed to achieve firm gauge with chosen yarn).
- Tools: Scissors, tapestry needle, and stitch markers.
- Optional Hardware: Purse lining, zipper, and strap hardware (D-rings or clips).
📐 Gauge & Sizing
The gauge is critical for the size of your base. Aim for a very firm fabric.
- Base Dimensions (Approximate):
- Length: 20 cm (7.9 inches)
- Width: 6 cm (2.4 inches)
- Main Body Height: 16 cm (6.3 inches)
- Main Body Length: 23 cm (9 inches)
Stitch Count Goal: Your final single crochet round must have a stitch count that is a multiple of 10 stitches (e.g., 100, 110, or 120). We will proceed assuming a target of 110 stitches to accommodate the dimensions given.
🟥 Part 1: The Structured Rectangular Base
The bag starts with a flat rectangle worked in single crochet rows, followed by a final shaping round.

Foundation and Base Rows
- Ch 41 (For a 40-stitch working width).
- Row 1: SC in the 2nd ch from the hook and in each ch across. [40 SC] Ch 1, turn.
- Rows 2–12: SC in each st across. [40 SC] Ch 1, turn.
- (Note: Adjust the number of rows for a wider base; 12 rows creates a width of approximately 6 cm).
Round 13: Perimeter Shaping (Setting the Stitch Count)
This round works SC all around the perimeter to prepare for the body motif.
- SC in each of the 40 stitches along the top edge.
- Corner 1: Work 3 SC into the last stitch to turn the corner.
- Work SC evenly down the 12 row ends of the short side (approximately 12–14 SC).
- Corner 2: Work 3 SC into the next corner space.
- SC in each of the 40 stitches along the bottom foundation edge.
- Corner 3: Work 3 SC into the next corner space.
- Work SC evenly up the 12 row ends of the short side.
- Corner 4: Work 3 SC into the final corner space (next to the starting stitch).
- Sl st to the first SC of the round.
Adjusting to Multiple of 10
- Count your stitches. If your total stitch count is not a multiple of 10 (e.g., you have 106 stitches), you must increase in this round until you reach the nearest multiple of 10 (e.g., 110 stitches). Distribute the necessary increases (4 in this example) evenly across the sides.
- The final stitch count used in the main body pattern is the total number of stitches divided by 10.

🌐 Part 2: The Interlocking Motif
The main body of the bag is worked in the round using the 10-stitch Interlocking X repeat.
Motif Round 1 (Setup Round)
- Ch 3 (counts as 1 DC). DC in the next 3 sts. [4 DC]
- L-Cross: Sk 2 sts, TR in the 3rd st. Go back and work 1 DC in the 1st skipped st, 1 DC in the 2nd skipped st.
- R-Cross: Sk 1 st, 1 DC in the next 2 sts. Work 1 TR in the skipped st, inserting the hook from behind the two DCs just made.
- *DC in the next 4 sts.
- L-Cross: Sk 2 sts, TR in the 3rd st. Go back and work 1 DC in the 1st skipped st, 1 DC in the 2nd skipped st.
- R-Cross: Sk 1 st, 1 DC in the next 2 sts. Work 1 TR in the skipped st, inserting the hook from behind the two DCs just made.*
- Rep from * around. Sl st to the top of the beginning Ch 3 to join.
Motif Round 2: The Shift
- To create the interlocking pattern, the “separation” DCs must shift with each round.
- In this round, the 4 DC separation block will be worked over the previous round’s Interlocking Crosses.
- Ch 3 (counts as 1 DC).
- L-Cross: Sk 2 sts, TR in the 3rd st. Go back and work 1 DC in the 1st skipped st, 1 DC in the 2nd skipped st.
- R-Cross: Sk 1 st, 1 DC in the next 2 sts. Work 1 TR in the skipped st, inserting the hook from behind the two DCs just made.
- *DC in the next 4 sts. (This block is worked over the previous round’s Crosses).
- L-Cross: Sk 2 sts, TR in the 3rd st. Go back and work 1 DC in the 1st skipped st, 1 DC in the 2nd skipped st.
- R-Cross: Sk 1 st, 1 DC in the next 2 sts. Work 1 TR in the skipped st, inserting the hook from behind the two DCs just made.*
- Rep from * around until you reach the start. DC in the remaining stitches (to complete the 4 DC group). Sl st to the top of the beginning Ch 3 to join.
Subsequent Motif Rounds (Pattern Repeat)
- Round 3 and beyond: Repeat Round 2. You will notice the L-Cross always starts on the first DC of the previous round’s R-Cross group, and the 4 DC separation block is worked over the previous round’s L-Cross and R-Cross pattern.
Continue working the motif pattern until the bag reaches the desired height (approximately 8 rounds for a medium-sized bag, or until the bag is about 16 cm tall).
🧵 Part 3: Top Border and Finishing
Once the bag reaches the desired height, you will work a simple single crochet border to create a neat opening.
Top Border Rounds
- Round 1 (SC Prep): Ch 1. SC in the same st and in each st around. Sl st to first SC.
- This round helps flatten the textured edge of the bag.
- Rounds 2–6 (Height): Ch 1. SC in each st around. Sl st to first SC.
- The video suggests 6 rounds of SC for the top border, but adjust this number based on your preference for border width.
Final Edge
- Work one final round of Slip Stitch around the entire top opening of the bag. This creates a very firm, professional edge that prevents stretching.
- Fasten off and weave in all remaining ends securely.
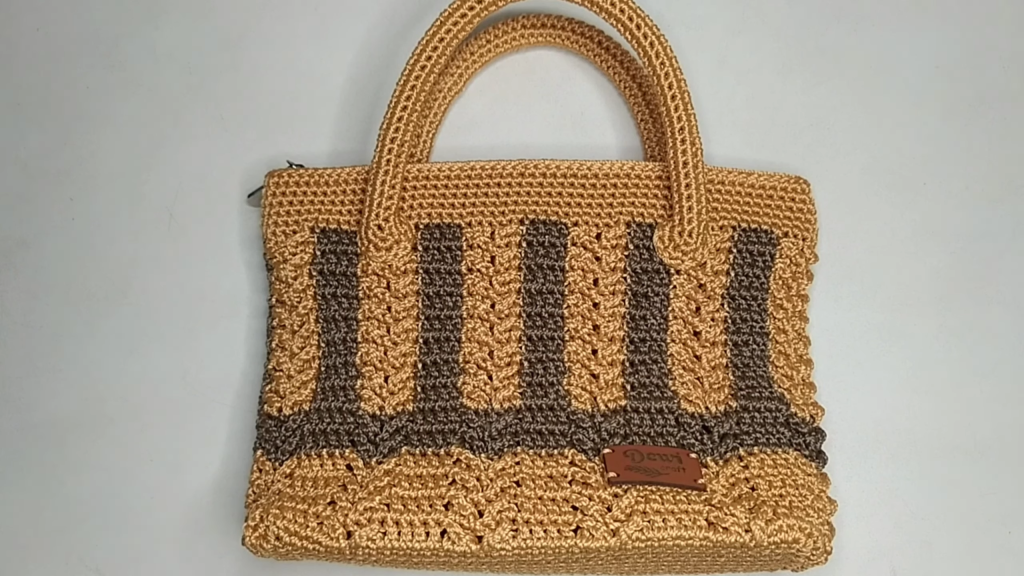
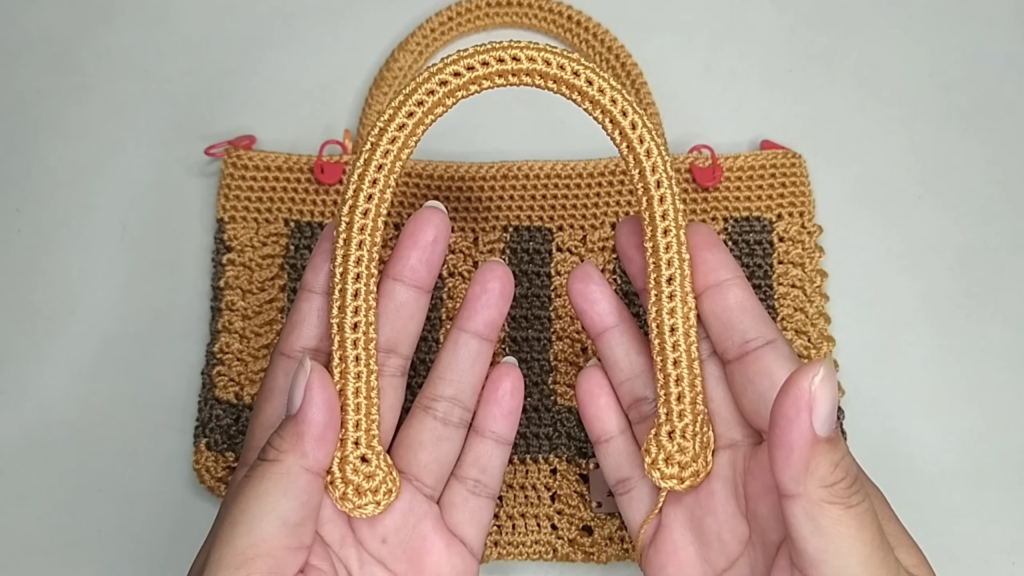
🪢 Part 4: Handle and Assembly
The handle is typically a sturdy chain or braided cord, often incorporating a hose/tubing inside for extra rigidity, as suggested in the video.
Creating the Handle (Example)
- Foundation: Ch 60 (or desired length).
- Row 1: SC in the 2nd ch from the hook and in each ch across. Ch 1, turn.
- Rows 2–3: SC in each st across. Ch 1, turn.
- Finishing: Cut the yarn, leaving a long tail. Place the plastic hose/tubing inside the knitted tube (if using). Pinch the ends shut and use the tail to firmly sew the ends closed.
- Assembly: Attach the finished strap directly to the top corners of the bag opening using the final tails, or attach the carabiner clips/D-rings to the strap ends and clip them to the bag.
Video Tutorial:
Lining and Zipper (Optional but Recommended)
- To create a fully functional, finished bag, it is highly recommended to sew in a fabric lining and a zipper. These additions protect the contents and further enhance the bag’s structure. Consult a separate sewing or lining tutorial for this step.
Your Structured Interlocking Tote is complete and ready to use!


