
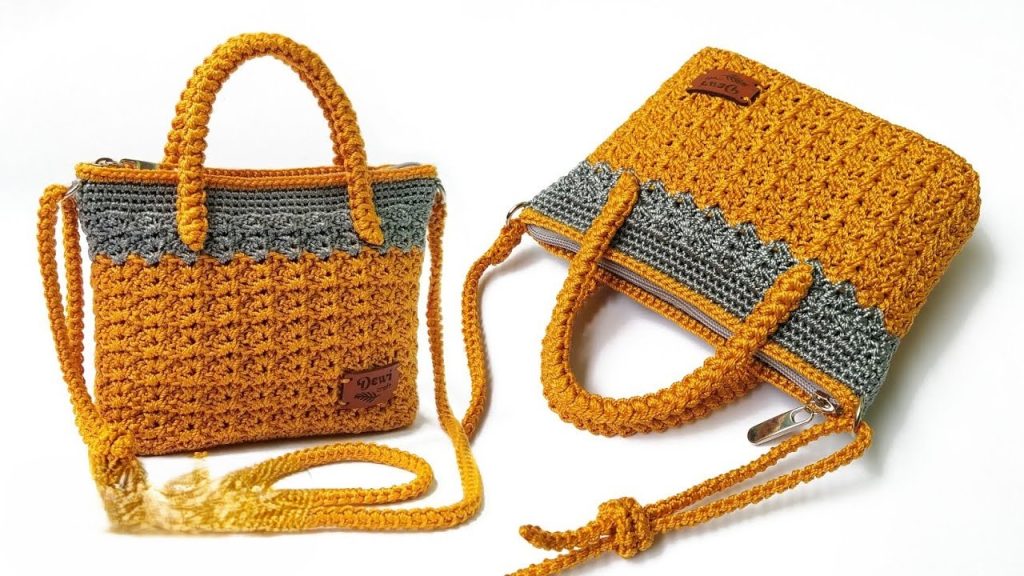
✨ Introduction: Structure Meets Texture
Welcome to the detailed pattern for the Avenue Shell Tote, a chic and compact handbag defined by its beautiful texture and robust structure. Inspired by the functional and elegant design in the video, this tote is built on a solid rectangular base, ensuring it stands up neatly. The main body utilizes a variation of the classic Shell Stitch, which we’ll call the Offset Shell Stitch, creating rows of dense texture that give the bag a sophisticated, modern look.
This project is ideal for crocheters who appreciate a well-defined shape. The repetitive body stitch is easy to memorize once the setup is complete, making it a perfect TV-crocheting project. Using a nylon or polypropylene (nautical) yarn, as suggested in the original tutorial, enhances the bag’s firm shape and durability.
Key Features of the Design
- Firm Structure: Achieved through a tight, rectangular single crochet base and dense stitch work in the body.
- Offset Shell Stitch: A simple yet effective pattern that creates a beautiful, all-over textured fabric.
- Simple Construction: The bag is worked continuously from the base up, requiring minimal seaming.
- Functional Finish: Includes instructions for adding D-rings and creating a sturdy tubular strap.
📚 Materials & Terminology
| Abbreviation | Meaning |
| ch | Chain |
| st(s) | Stitch(es) |
| sl st | Slip Stitch |
| sc | Single Crochet |
| dc | Double Crochet |
| sk | Skip |
| rep | Repeat |
| sp | Space |
| MR | Magic Ring |
| ( ) | Repeat instructions inside parentheses |
Special Stitch: Offset Shell (OS)
The OS is worked into the skipped chain space of the previous round to create the shifted pattern.
OS Stitch: (2 DC, Ch 1, 1 SC) all worked into the same chain-1 space.
Materials Needed
- Yarn: Approximately 150–200 grams of a sturdy yarn. Nylon, Polypropylene/Nautical Yarn, or a firm Cotton/Acrylic Worsted Weight (#4) is recommended for best shape.
- Note: The pattern is written for a single main color, but stripes can be added.
- Hook: 4.0 mm crochet hook (or one size smaller than suggested for your yarn to maintain a firm tension).
- Tools: Scissors, tapestry needle, and a stitch marker.
- Hardware: Two 1.5 cm D-Rings for attaching the strap.
📐 Gauge & Sizing
A firm gauge is essential for the bag to hold its shape.
- Base Dimensions (Target):
- Length: 17 cm (6.7 inches)
- Width: 6 cm (2.4 inches)
- Initial Chain Count: 36 chains (for 35 working stitches).
- Body Stitch Multiple: The final SC round around the base must be a multiple of 4 stitches. (We will proceed with a target count of 108 stitches, which is divisible by 4).
- Finished Bag Dimensions (Approximate):
- Length (Circumference): ~54 cm
- Height (Excluding Handle): ~14 cm
🧱 Part 1: The Structured Rectangular Base
The bag starts with a flat rectangle worked in rows of single crochet, followed by a final shaping round.
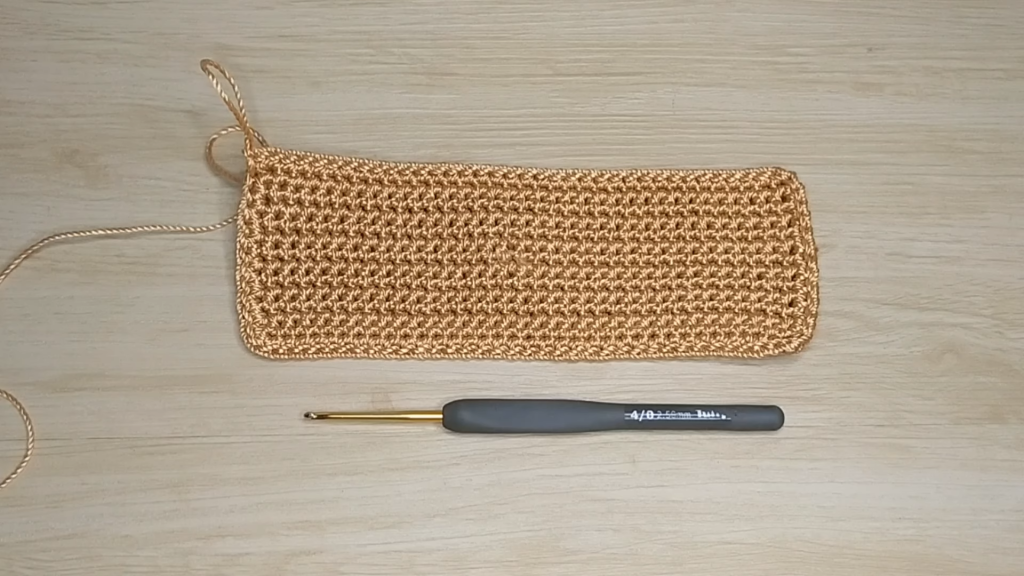
Foundation and Base Rows
- Ch 36 (This gives you 35 working stitches across the width).
- Row 1: SC in the 2nd ch from the hook and in each ch across. [35 SC] Ch 1, turn.
- Rows 2–12: SC in each st across. [35 SC] Ch 1, turn.
- (Note: 12 rows yields a 6 cm width. Adjust the number of rows if you desire a deeper base).
Round 13: Perimeter Shaping (Setting the Stitch Count)
This round works SC all around the perimeter to prepare for the body motif. The final stitch count must be a multiple of 4.
- Ch 1 (does not count as st). SC in each of the 35 stitches along the top edge.
- Corner 1: Work 3 SC into the last stitch to turn the corner.
- Work SC evenly down the 12 row ends of the short side (aim for 12–14 SC).
- Corner 2: Work 3 SC into the next corner space.
- SC in each of the 35 stitches along the bottom foundation edge.
- Corner 3: Work 3 SC into the next corner space.
- Work SC evenly up the 12 row ends of the short side (matching the count from the other side).
- Corner 4: Work 3 SC into the final corner space (next to the starting stitch).
- Sl st to the first SC of the round.
- Important: Count your final stitches. If the count is not a multiple of 4 (e.g., 108 or 112), add or subtract single crochet stitches in the four corner groups until you reach the nearest multiple of 4. For this pattern, we will proceed assuming a count of 108 stitches.

🐚 Part 2: The Offset Shell Body Motif
The main body is worked in continuous rounds using the Offset Shell Stitch, turning the work after each round to maintain a clean texture.
Motif Round 1: Establishing the Pattern
- Ch 3 (counts as 1 DC).
- Work 1 DC into the same st (the st where you joined).
- Ch 1. Work 1 SC into the same st. This creates the first OS unit [2 DC, ch 1, 1 SC].
- *Sk 3 sts. Work (2 DC, Ch 1, 1 SC) all into the next st (this is one full OS unit).*
- Rep from * around.
- You should have 3 sts remaining. Sk the last 3 sts. Sl st to the top of the beginning Ch 3 to join.
- [27 Shell Units]
Motif Round 2: Reversing and Offsetting
- Ch 1, TURN your work. (The turn is crucial to align the next round correctly).
- The next stitch (SC from the previous round) is skipped. You will work into the Ch-1 space of the first Shell Unit.
- Work (2 DC, Ch 1, 1 SC) all into the first Ch-1 space. (This is the first OS unit, now sitting in between the previous units).
- *Work (2 DC, Ch 1, 1 SC) all into the Ch-1 space of the next Shell unit.*
- Rep from * around.
- Sl st to the first SC of the round (which is the last stitch of the round due to the turn).
Motif Rounds 3–13: The Repeat
- Ch 1, TURN your work.
- Work (2 DC, Ch 1, 1 SC) all into the Ch-1 space of the first Shell unit.
- *Work (2 DC, Ch 1, 1 SC) all into the Ch-1 space of the next Shell unit.*
- Rep from * around.
- Sl st to the first SC of the round.
- Continue repeating this pattern until the bag reaches the desired height (The video suggests 13 rounds of the main motif, or approximately 14 cm).

📌 Part 3: Top Border and Hardware Prep
Once the bag body is the correct height, we create a firm single crochet border and incorporate the D-rings for the strap.
Finishing Rounds
- Round 1 (SC Prep): Ch 1, TURN your work (to return to the “right side” facing). SC in the same st and in each st around, working 1 SC into each st and 1 SC into each Ch-1 space. [108 SC] Sl st to first SC.
- Rounds 2–5 (Reinforcement): Ch 1. SC in each st around. Sl st to first SC.
Attaching the D-Rings
- Find the exact center points of the front and back of the bag (54 stitches apart). Place markers here.
- Identify the four points where the D-rings will be attached, spaced about 4–6 stitches apart on either side of the center point.
- Round 6 (D-Ring Integration): Ch 1. SC in each st until you reach the first D-Ring attachment point.
- Attach D-Ring: Holding the D-Ring against the top edge of the bag, work 4 SC over the ring and into the bag fabric simultaneously.
- SC in the next 46 stitches (or until the next attachment point).
- Attach D-Ring: Work 4 SC over the ring and into the bag fabric simultaneously.
- Continue SC around the entire perimeter until you reach the starting stitch. Sl st to the first SC to join.
- Round 7 (Final Edge): Work one final round of Slip Stitch (Sl St) around the entire edge, including over the D-ring attachments, to create a neat, firm finish.
- Fasten off and weave in the tail.
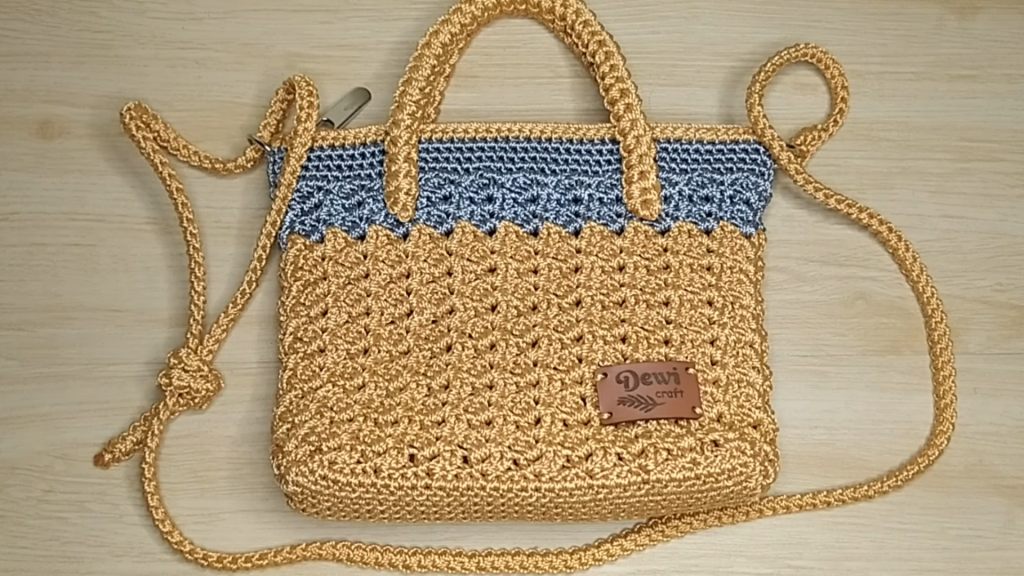
🧶 Part 4: The Tubular Handle
The handle is created using the simple and robust Slip Stitch Cord technique, perfect for use with nylon or nautical yarn. The video suggests a length of 120 cm for a long strap and 25 cm for a shorter strap (make two if desired).
The Slip Stitch Cord (Long Strap)
- Ch 121 (or your desired length + 1).
- Row 1: Sl St in the 2nd ch from the hook and in each ch across. [120 Sl St]
- Turning: Do not chain or turn as normal. Gently twist the work and identify the back loops or side loops created by the previous slip stitches.
- Subsequent Rounds: Work 1 Sl St into the visible back/side loop of each previous Sl St around the cord. The work will naturally begin to curl and form a dense, round tube.
- Continue working the Sl St into the outer loop of the tubular cord until it reaches the desired length. The cord will be very firm.
- Fasten off, leaving a tail. Attach carabiner clips or simply knot the ends to the D-rings installed on the bag.
Video Tutorial:
Short Handles (Optional)
If you are making the short handles, the process is the same, but they should be worked with a double strand of yarn for extra thickness, as noted in the video, and made shorter (e.g., 26 chains for a 25 cm strap).
Final Touches
- Weave in any remaining yarn tails.
- (Optional) Install a zipper and fabric lining for a professional finish.
Your beautifully textured Avenue Shell Tote is now complete!


