
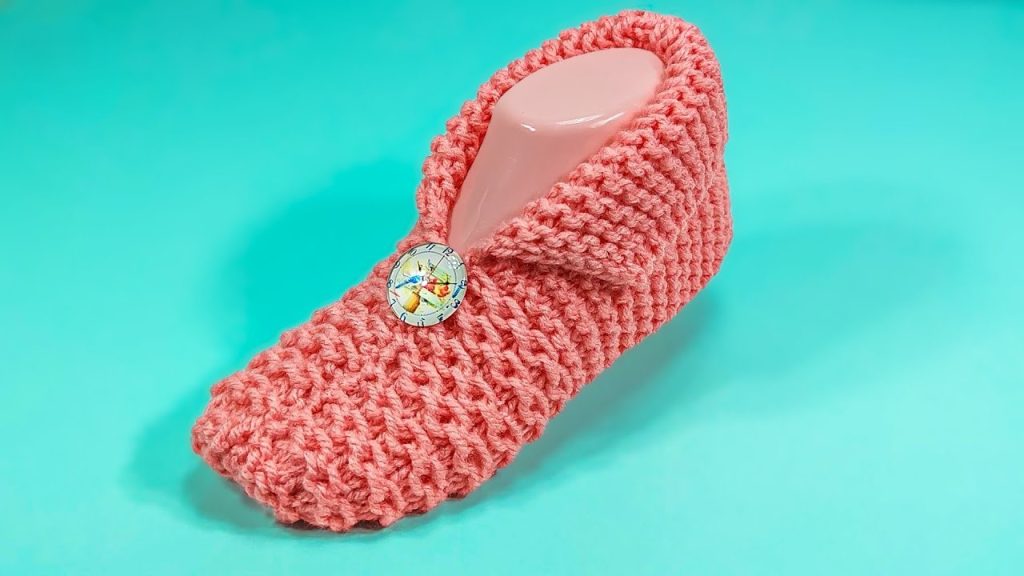
Step into comfort with these charming knitted slippers! This pattern creates a thick, plush fabric that is warm and durable, thanks to the use of the simple yet effective Seed Stitch. The slipper is constructed flat and then seamed, making it a straightforward project even for knitters new to garment construction. The added detail of a fold-over cuff and a decorative button gives it a professional, boutique finish.
⭐️ Project Snapshot and Techniques
| Feature | Detail |
| Skill Level | Easy to Intermediate. Knowledge of knit and purl is required. |
| Stitch Pattern | Seed Stitch (K1, P1 repeat) for maximum texture and durability. |
| Construction | Knitted flat as one piece (toe to heel) and then seamed. |
| Sizing | Easily adaptable. Instructions are detailed for a Women’s Medium (US size 7-8). |
| Needle Type | Straight needles or a long circular needle (used flat). |
🧵 Materials & Gauge
Yarn
- Weight: Bulky (Category 5) or two strands of Worsted Weight (Category 4) held together. Using a thicker yarn or doubled yarn helps achieve the thick, dense texture seen in the photo.
- Fiber: Acrylic, Wool, or a blend is recommended for warmth and washability. The sample uses a lovely rosy pink color.
- Yardage: Approximately 150-200 yards of Bulky weight yarn (or 300−400 yards of Worsted Weight to hold double).
Needles
- Size: 5.5 mm (US 9) to 6.0 mm (US 10), depending on your tension and yarn choice. Use the size that gives you a dense, sturdy fabric.
Notions
- Tapestry Needle for seaming and weaving in ends.
- Scissors.
- 1 Decorative Button (approx. 1−1.5 inches wide) per slipper.
- Optional: Stitch markers.
Gauge (The Seed Stitch)
To ensure your slipper fits the foot size correctly, it’s essential to check your gauge.
- In Seed Stitch (after blocking): 16 stitches × 24 rows = 4 inches by 4 inches (10 cm×10 cm).
- Critical Measurement: Your finished flat piece should measure approximately 7 inches wide (for the heel/cuff) by 10.5 inches long before seaming.
👣 Sizing and Fit Notes
Customizing Width (Number of Stitches)
The number of cast-on stitches determines the width of the slipper, which wraps around the back of the heel and up the sides.
- To make the slipper wider (for a larger ankle/instep), increase your cast-on number by multiples of 2 (to maintain the Seed Stitch pattern).
Customizing Length (Number of Rows)
The number of rows determines the foot length.
- To make the slipper longer, simply work more rows in the main body section until the piece measures the length of the wearer’s foot, plus ∼1 inch for the toe and heel seam allowance.
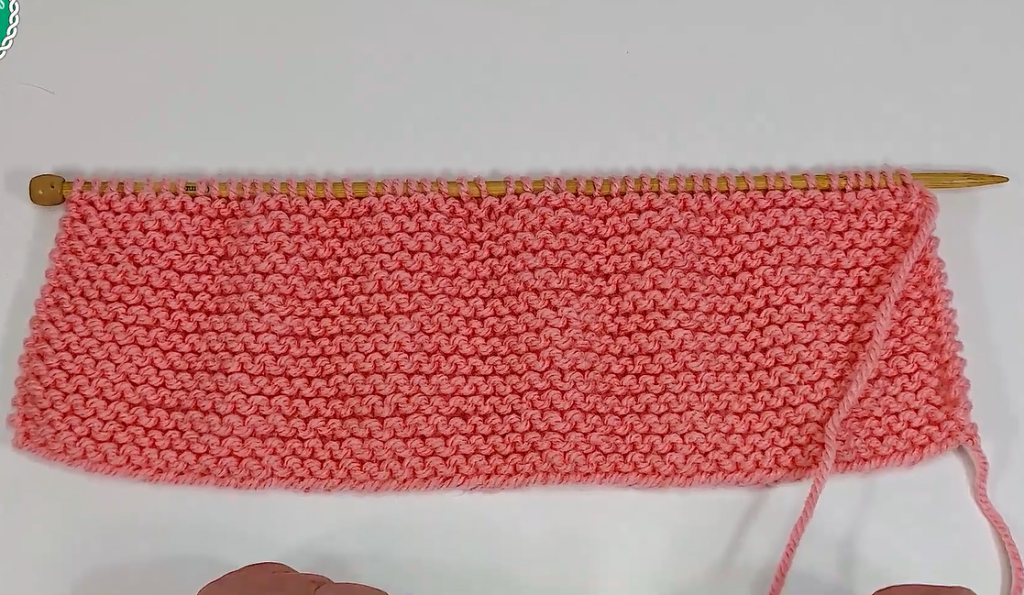
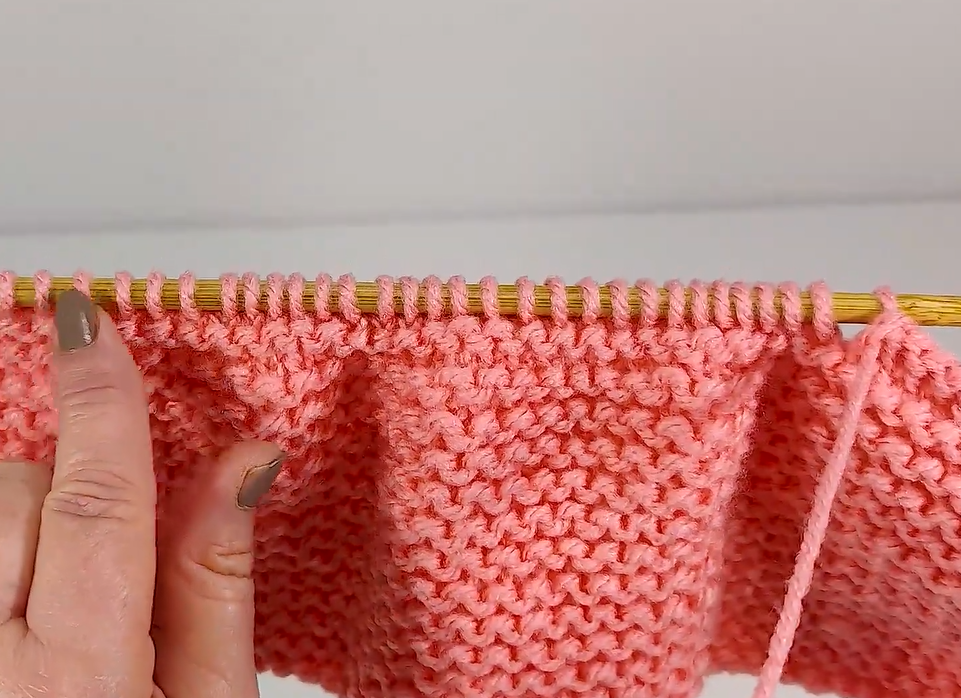
📝 The Seed Stitch Pattern
The Seed Stitch is worked over an odd or even number of stitches, but to keep the texture consistent, this pattern uses an even number.
- Row 1 (Right Side): K1, P1 repeat to the end of the row.
- Row 2 (Wrong Side): P1, K1 repeat to the end of the row. (You are knitting the purl stitches and purling the knit stitches from the previous row.)
🧶 Pattern Instructions (Make 2)
1. The Cuff and Heel Section
This section forms the top opening, cuff, and back of the heel.
Cast On: Using the long-tail method, Cast On 36 stitches (or the number that equals your desired width).
Rows 1 – 10 (Cuff/Opening): Work in the Seed Stitch (as defined above). (36 sts)
Row 11 (Buttonhole Placement – Optional): If you are using a button, you need a buttonhole here. If not, continue in Seed Stitch. RS: Work 3 sts in Seed Stitch, K2tog, YO (or use a 2-stitch buttonhole method), continue in Seed Stitch to the end of the row. (36 sts)
Rows 12 – 40 (Heel Section): Continue working in Seed Stitch until the piece measures approximately 7 inches from the cast-on edge. This length determines the height of your heel and the start of the toe shaping.
2. Shaping the Toe (Footbed)
We now decrease stitches to shape the toe end of the slipper.
Row 41 (Decrease Row 1 – RS): K1, K2tog, work in Seed Stitch until 3 stitches remain, SSK, P1. (34 sts)
Row 42 (WS): Work even in Seed Stitch. (34 sts)
Row 43 (Decrease Row 2 – RS): K1, K2tog, work in Seed Stitch until 3 stitches remain, SSK, P1. (32 sts)
Row 44 (WS): Work even in Seed Stitch. (32 sts)
Row 45 (Decrease Row 3 – RS): K1, K2tog, work in Seed Stitch until 3 stitches remain, SSK, P1. (30 sts)
Rows 46 – 60 (Foot Length): Continue working even in Seed Stitch until the piece measures approximately 10.5 inches from the cast-on edge. This will create the final length of your slipper.

3. Final Toe Shaping
This final section tapers the end sharply to form a nice, rounded toe.
Row 61 (Decrease Row 4 – RS): K1, K2tog, work in Seed Stitch until 3 stitches remain, SSK, P1. (28 sts)
Row 62 (WS): Work even in Seed Stitch.
Row 63 (Decrease Row 5 – RS): K1, K2tog, work in Seed Stitch until 3 stitches remain, SSK, P1. (26 sts)
Row 64 (WS): Work even in Seed Stitch.
Row 65 (Decrease Row 6 – RS): K1, K2tog, work in Seed Stitch until 3 stitches remain, SSK, P1. (24 sts)
Bind Off: Bind off all 24 stitches using the standard bind-off method. Leave a very long tail (∼24 inches) for seaming.
✂️ Finishing and Seaming: The Final Shape
1. The Toe Seam
This seam runs along the top of your toes.
- Fold the piece in half lengthwise, aligning the bound-off edge with the sides of the slipper.
- Thread the long tail onto your tapestry needle.
- Seam across the bound-off edge to close the top of the toe.

2. The Sole Seam
This seam runs along the bottom of your foot.
- Continue seaming down the long side edge, joining the cast-on edge with the bind-off edge. This creates the bottom of the foot, or the sole.
- Use the Mattress Stitch for an invisible, flat seam that will be comfortable underfoot. Stop seaming when you reach the point where the cuff will begin to fold over (at the start of your Row 10/11 section).
3. The Heel Seam
This seam closes the back of the slipper.
- Bring the two corners of the cast-on edge together (the two short ends).
- Seam these two edges together to form the heel.
- Securely weave in all remaining loose ends on the inside of the slipper.
4. The Button Cuff
- Turn the slipper right-side out.
- Place the slipper on your foot (or a slipper form).
- Fold the front cuff down and slightly diagonally across the instep, as shown in the image.
- If you created a buttonhole, align it with where you want the button to sit on the foot.
- Sew the decorative button securely to the front of the slipper body, right below the cuff fold. This button is mostly for decoration and to keep the cuff fold neat.
Video Tutorial:
✨ Care and Maintenance Tips
- Washing: If you used acrylic yarn, you can usually machine wash on a gentle cycle and lay flat to dry. For wool, hand wash with a gentle wool soap and lay flat to dry to prevent felting.
- Non-Slip Sole: For safety, consider applying Non-Slip Grip Fabric Paint (often sold for socks) in dots or a simple pattern on the bottom sole. This is highly recommended for use on smooth floors.
You now have a beautiful, textured pair of slippers ready to keep your feet warm! Enjoy this satisfying and detailed project.
Do you plan to use a bulky weight yarn or hold two strands of worsted together for this project?


