
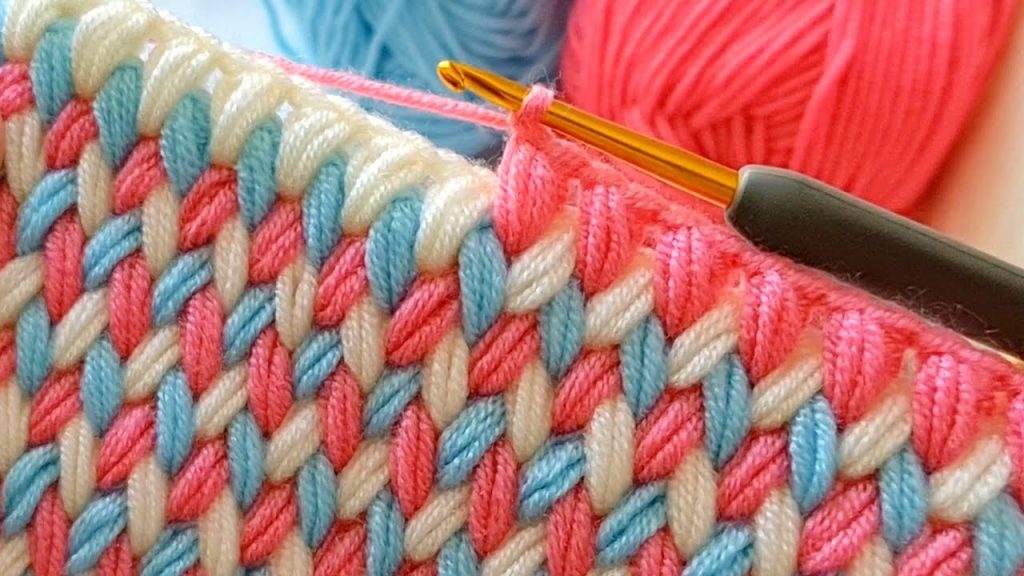
Welcome, adventurous color workers! The stitch in this photo is a showstopper, combining three colors (pink, white, and blue) into a dense, interlocking vertical weave. This fabric is incredibly warm, sturdy, and has a fascinating texture that looks beautiful from both sides. It’s perfect for reversible scarves, stable bags, and cozy throws.
The key to this pattern is the color changes every two rows and working a modified Front Loop/Back Loop Single Crochet to create the woven rib effect. Let’s master this colorful technique!

🛍️ Materials & Setup
Choosing Your Tools
- Yarn: You will need three contrasting colors of smooth Worsted Weight (Aran/10-ply) yarn. The smooth yarn is crucial for keeping the stitches crisp.
- Color A (CA): Pink (the dominant color in the photo)
- Color B (CB): White
- Color C (CC): Blue
- Hook: A crochet hook size appropriate for your yarn. A 4.5 mm to 5.0 mm (H-8 US) hook is ideal. A slightly smaller hook helps maintain the fabric’s density and structure.
- Notions: Scissors and a tapestry needle. You will be carrying or floating two non-working colors up the side edge.
Gauge and Multiple
- Pattern Multiple: This pattern is worked over a multiple of 2 stitches, plus 1 for the foundation chain.
- Example Chain (for a swatch): Ch 27 (2 x 13 = 26, plus 1 = 27).
📌 Stitch Abbreviations & Technical Definitions (US Terms)
Standard Abbreviations
- ch: Chain
- st(s): Stitch(es)
- sc: Single Crochet
- sl st: Slip Stitch
- CA, CB, CC: Color A, B, C
- rep: Repeat
The Key Stitches
- Back Loop Single Crochet (BLSC): Insert hook under the back loop only of the stitch, yo, pull up a loop, yo, pull through 2 loops.
- Front Loop Single Crochet (FLSC): Insert hook under the front loop only of the stitch, yo, pull up a loop, yo, pull through 2 loops.
- Color Change (CC): Always change color on the last yarn over of the last stitch of the row.
➡️ Phase 1: Establishing the Foundation (Color A)
The foundation sets up the initial structure for the ribbing.
Row 1 (CA): Foundation Single Crochet
- Using CA, Ch the required number (multiple of 2, plus 1).
- Sc into the 2nd ch from the hook and in every ch across.
- Before completing the last sc, change to CB.
- Ch 1 (does not count as a stitch). Turn.
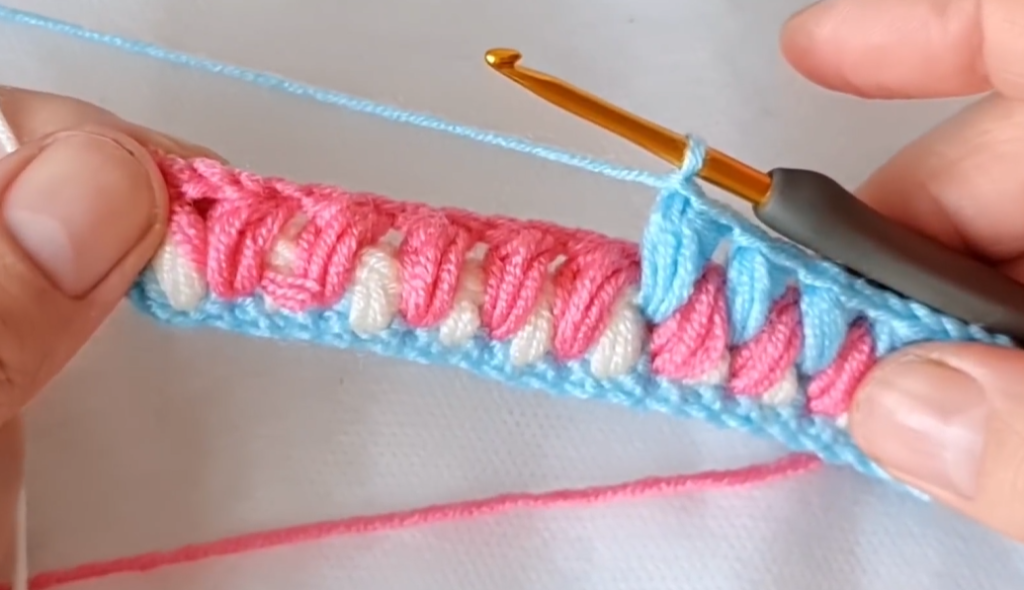
🎨 Phase 2: Building the Rib Structure (Colors B & C)
This pattern uses a two-row repeat, alternating Front Loop and Back Loop work to create the vertical columns. Note that CA is carried up the side during these rows.
Row 2 (CB): The Back Loop Pass
This row defines the first set of vertical ribs.

- Using CB, BLSC into the first st.
- *FLSC into the next st.
- BLSC into the next st.*
- Repeat from * to * across the row. You should end with a BLSC into the last st.
- Before completing the last BLSC, change to CC.
- Ch 1 (does not count as a stitch). Turn.
Row 3 (CC): The Opposite Loop Pass
This row uses the opposite loops, continuing the ribbing and locking the white vertical strands into place.
- Using CC, FLSC into the first st.
- *BLSC into the next st (this st was an FLSC in Row 2).
- FLSC into the next st (this st was a BLSC in Row 2).*
- Repeat from * to * across the row. You should end with a FLSC into the last st.
- Before completing the last FLSC, change to CA.
- Ch 1 (does not count as a stitch). Turn.
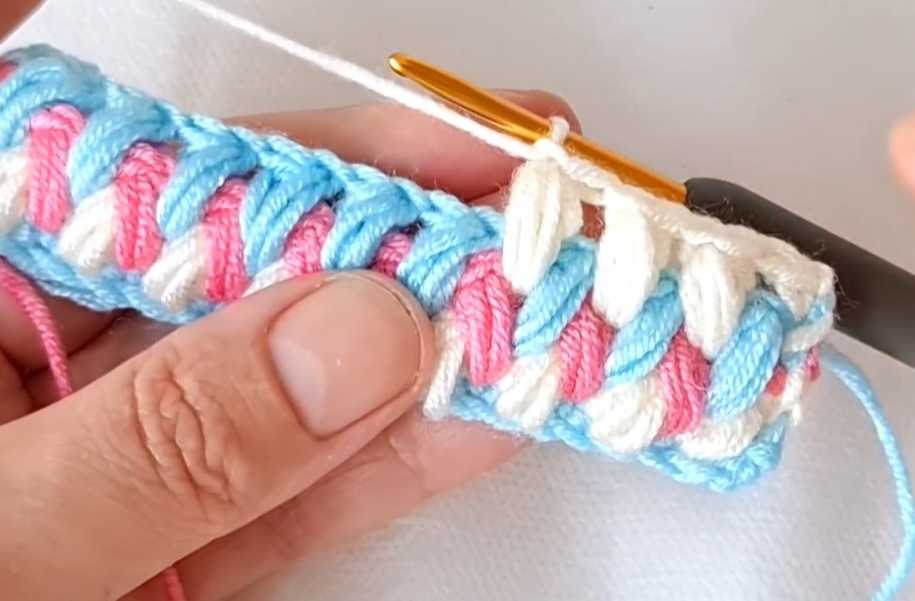
💖 Phase 3: The Staggered Repeat (Color A)
Now, we introduce Color A to continue the vertical structure, working into the loops created by the previous two colors. The pattern is now established.

Row 4 (CA): The Next Back Loop Pass
- Using CA, BLSC into the first st.
- *FLSC into the next st.
- BLSC into the next st.*
- Repeat from * to * across the row. You should end with a BLSC into the last st.
- Before completing the last BLSC, change to CB.
- Ch 1 (does not count as a stitch). Turn.
Row 5 (CB): The Opposite Loop Pass
- Using CB, FLSC into the first st.
- *BLSC into the next st.
- FLSC into the next st.*
- Repeat from * to * across the row. You should end with a FLSC into the last st.
- Before completing the last FLSC, change to CC.
- Ch 1 (does not count as a stitch). Turn.
🔄 Phase 4: The Full Pattern Repeat
To continue the beautiful tricolor rib, you will simply repeat the four core rows:
- Next Row (CC): Repeat Row 3 (starting with FLSC in the first st). Change to CA.
- Next Row (CA): Repeat Row 4 (starting with BLSC in the first st). Change to CB.
- Next Row (CB): Repeat Row 5 (starting with FLSC in the first st). Change to CC.
- Next Row (CC): Repeat Row 3 (starting with FLSC in the first st). Change to CA.
The full sequence for the fabric is: Rows 2-5, then repeat Rows 2-5 until the desired length is reached.
Video Tutorial:
🧶 Finishing & Structural Notes
Managing the Three Colors
Since you change color every row, you must carry the two non-working colors loosely up the side edge of your work.
- Tip: When you pick up a new color, give the carried colors a gentle tug to maintain tension, but don’t pull too tightly, or your fabric will buckle.
- The final border will cover these carried strands completely.
Fabric Characteristics
This technique creates a very dense, thick, and highly reversible fabric that doesn’t stretch easily width-wise but has a beautiful vertical texture.
The Final Edge
- Final Row: End after any Back Loop Pass (Row 2 or 4). This creates a slightly cleaner finishing edge.
- Border: A simple Single Crochet border is essential. Work a tight round of SC around the entire perimeter of the project, ensuring your SCs along the side edges are worked over the carried yarn to hide it completely.
This Tricolor Woven Rib Stitch creates a stunning, dynamic, and wonderfully warm textile. Enjoy the weaving!


