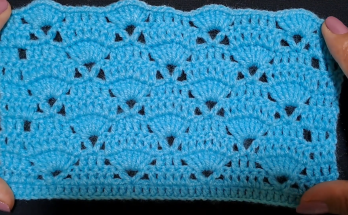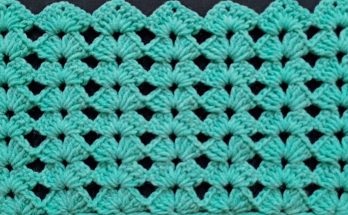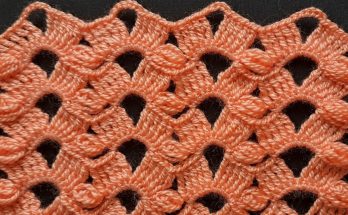
Welcome, lace lovers! Prepare to be captivated by a stitch that is both delicate and structurally fascinating. The pattern in this pink yarn—the Zig-Zag Shell Stitch—creates deep, rhythmic scallops on the top and bottom edges, with an airy, woven diamond texture running through the center. It’s perfect for elegant shawls, light blankets, and luxurious scarves.
This pattern uses a combination of simple stitches to build a complex, beautiful effect. The key lies in the spacing and the placement of the long V-stitches. Let’s get started!

🛍️ Materials & Setup
Choosing Your Tools
- Yarn: A DK Weight (8-ply) or Worsted Weight (Aran/10-ply) yarn works best. A smooth yarn, like the acrylic shown, will make the lace and the shells look crisp and defined.
- Hook: A crochet hook size appropriate for your yarn, usually slightly larger than suggested to ensure a soft drape. A 5.0 mm (H-8 US) or 5.5 mm (I-9 US) hook is a great choice.
- Notions: Scissors and a tapestry needle.
Gauge and Multiple
- Pattern Multiple: This pattern is worked over a multiple of 10 stitches, plus 2 for the foundation chain.
- Example Chain (for a swatch): Ch 42 (10 x 4 = 40, plus 2 = 42).
📌 Stitch Abbreviations & Technical Definitions (US Terms)
Standard Abbreviations
- ch: Chain
- st(s): Stitch(es)
- sk: Skip
- sc: Single Crochet
- dc: Double Crochet
- sl st: Slip Stitch
- rep: Repeat
The Key Stitches
- Shell: Defined as a cluster of 5 Double Crochet (dc) stitches worked into the same stitch or space.
- V-Stitch (V-st): Defined as (dc, ch 1, dc) all worked into the same stitch or space.
➡️ Phase 1: Establishing the Foundation
The foundation row sets the grid for the repeating shells and V-stitches that create the distinct zig-zag look.

Row 1: Foundation Single Crochet
- Ch the required number (multiple of 10, plus 2).
- Sc into the 2nd ch from the hook and in every ch across.
- Ch 3 (counts as first dc). Turn.
Row 2: The Shell and V-Stitch Base
This row establishes the first set of shells (peaks) and the V-stitches that will form the diamond valleys.
- Dc 2 into the first st (forms a half-shell).
- *Sk 4 sts.
- Work a V-st (dc, ch 1, dc) into the next st.
- Sk 4 sts.
- Work a Shell (dc 5) into the next st.*
- Repeat from * to * across the row.
- End the row by working dc 3 into the last st (forms the final half-shell).
- Ch 1 (does not count as a stitch). Turn.

🔺 Phase 2: Shaping the Peaks and Valleys (Row 3)
This row uses simple single crochet stitches and chains to define the scalloped edge and sets up the spacing for the next layer of shells.
Row 3: Peak & Valley Definition Row
- Sc into the first dc.
- Sc into the next dc.
- *Ch 3, sk 3 sts (skipping the rest of the half-shell).
- Sc into the ch-1 space of the V-st (this creates the first valley).
- Ch 3, sk 3 sts (skipping half of the next shell).
- Sc into the next st. Sc into the next st. Sc into the next st (sc over the center 3 dc of the shell).*
- Repeat from * to * across the row.
- End by working sc into the last 2 dc and sc into the 3rd ch of the starting Ch 3 from Row 2.
- Ch 3 (counts as first dc). Turn.

💠 Phase 3: The Woven Diamond (Row 4)
This row is the most complex, where long V-stitches are worked down into the V-stitches of Row 2 to create the woven diamond effect.
Row 4: The Diamond V-Stitch Row
- Dc 2 into the first st (forms a half-shell base).
- Ch 1.
- Sc into the ch-3 space of Row 3.
- Ch 1.
- *Work a V-st (dc, ch 1, dc) into the V-st of Row 2 (the row two below, inserting your hook under the sc of Row 3).
- Ch 1.
- Sc into the next ch-3 space of Row 3.
- Ch 1.*
- Repeat from * to * across the row.
- End by working dc 3 into the last sc.
- Ch 1 (does not count as a stitch). Turn.
➰ Phase 4: The Repeat Sequence
The pattern now alternates between a defining row (Row 5) and a staggered shell row (Row 6).
Row 5: The Next Defining Row (Similar to Row 3)
- Sc into the first dc.
- Sc into the next dc.
- *Ch 3, sk 3 sts (skipping dc, ch-1, sc).
- Sc into the ch-1 space of the V-st from Row 4 (the woven V-st).
- Ch 3, sk 3 sts (skipping sc, ch-1, dc).
- Sc into the next st. Sc into the next st. Sc into the next st (sc over the center 3 dc of the next shell base).*
- Repeat from * to * across the row.
- End by working sc into the last 2 dc and sc into the 3rd ch of the starting Ch 3 from Row 4.
- Ch 3 (counts as first dc). Turn.
Row 6: The Staggered Shell Row (Similar to Row 2)
The shells are now placed into the scs from Row 5, completing the staggered zig-zag effect.

- Dc 2 into the first st (forms a half-shell).
- *Sk 4 sts.
- Work a Shell (dc 5) into the sc at the center of the previous peak (the middle sc of the 3 sc cluster).
- Sk 4 sts.
- Work a V-st (dc, ch 1, dc) into the sc at the center of the previous valley (the sc between the Ch-3 spaces).*
- Repeat from * to * across the row.
- End the row by working dc 3 into the last sc.
- Ch 1 (does not count as a stitch). Turn.
The Full Pattern Sequence
To continue this beautiful texture, repeat the four key rows: Rows 3, 4, 5, and 6.
Video Tutorial:
✂️ Finishing and Edging Details
Scalloped Edges
This stitch naturally creates deep, beautiful scallops on both the starting edge (if worked from Row 2) and the final edge. No additional border is truly needed if you want a decorative finish.
- Flat Starting Edge (Optional): If you prefer a straight bottom edge, work 3-5 rows of simple single crochet (sc) before starting Row 2.
- Top Edge: The pattern ends cleanly after any Shell Row (Row 2 or 6).
Blocking
Due to the alternating open lace and dense shells, this fabric will greatly benefit from wet blocking. Blocking will even out the stitches, open up the diamond lace, and allow the scalloped edges to lie flat and symmetrically.
This Zig-Zag Shell Stitch creates a stunning, heirloom-quality fabric. Enjoy the lovely drape!


