
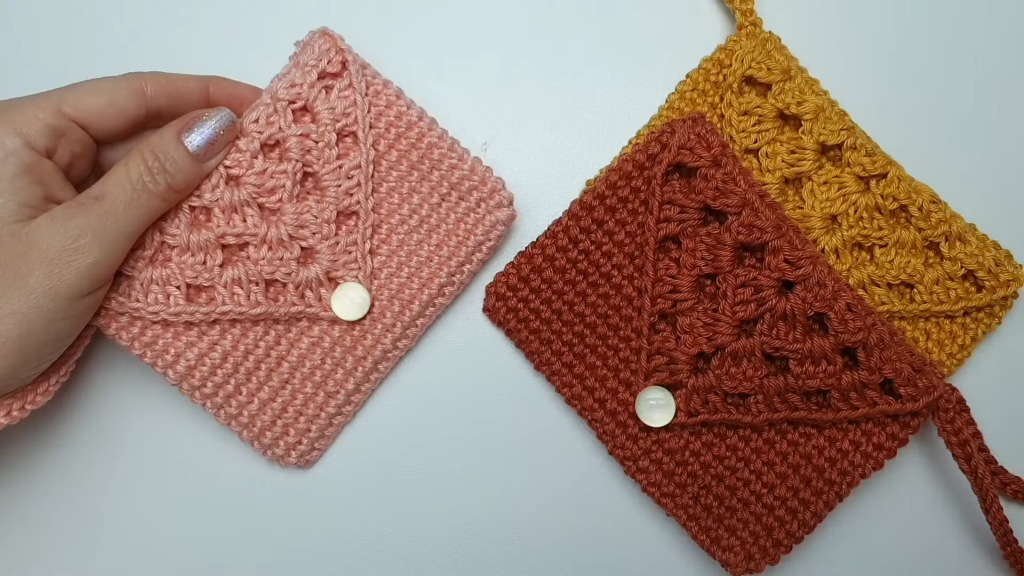
The “Infinity Stitch” Seamless Flap Wallet combines the sturdy, modern texture of Single Crochet (SC) with the delicate openwork of a Double Crochet (DC) lattice flap. The entire piece is constructed seamlessly, meaning the main body and the flap are joined without a traditional whipstitch seam, resulting in a durable and sleek accessory perfect for cards, cash, and small essentials.
This pattern is suited for intermediate crocheters or confident beginners ready to learn seamless construction.
🧶 Materials & Key Tools
| Icon | Item | Details |
| Hook | Crochet Hook | 3.0 mm (or size needed to achieve a very firm gauge). |
| Yarn | Main Color (MC) | Approximately 80-100g of Amigurumi yarn (cotton or cotton blend cord is ideal) for structure. |
| Hardware | Button | One button (e.g., 1.5 cm – 2.5 cm wide) for the flap closure. |
| Notions | Markers & Needle | Stitch Markers (essential for identifying the continuous round start/end and joining points), Scissors, and a Tapestry Needle. |
| Size | Finished Wallet | Approx. 12 cm (Length) x 9 cm (Height). |
📝 Abbreviations & Gauge Notes
Familiarize yourself with these standard U.S. crochet terms.
| Abbreviation | U.S. Terminology | Description |
| ch | Chain | |
| sl st | Slip Stitch | |
| sc | Single Crochet | |
| dc | Double Crochet | |
| st(s) | Stitch(es) | |
| rep | Repeat | |
| MR | Magic Ring | |
| BLO | Back Loop Only |
Gauge Note: This pattern relies on achieving a firm, dense fabric that holds its shape. If your gauge is too loose, use a smaller hook. Exact gauge is less important than achieving a firm tension.
🧱 Part 1: The Seamless Pouch Body
The main body of the wallet is worked in a continuous spiral of single crochet (SC) to create a seamless oval base and walls, eliminating the visible seam line often found in bags.
Foundation (Oval Base):
- Make a slip knot and ch 23.
- Row 1 (Working around the chain): Sc in the 2nd ch from the hook, and sc in the next 20 chains.
- Corner Turn: In the last chain, work 4 sc (this turns the corner and starts the other side).
- Sc in the next 20 stitches (working back up the opposite side of the chain).
- Final Corner: Work 4 sc in the very first chain stitch you worked into. (Total 49 sts).
Pouch Walls (Continuous Rounds):
Do not join with a sl st. Work in a continuous spiral.
- Place a stitch marker in the first SC of the next round to mark the start/end of the spiral.
- Round 2 – 16: Sc in each stitch around. (49 sc per round).
- Work a total of 15 continuous rounds (Rounds 2 through 16) to achieve the desired height of approximately 9 cm.
Finishing the Pouch Body:
- After completing the last SC of Round 16, cut the yarn and perform an invisible join to finish the round cleanly.
- Weave the tail end neatly into the inside of the pouch.
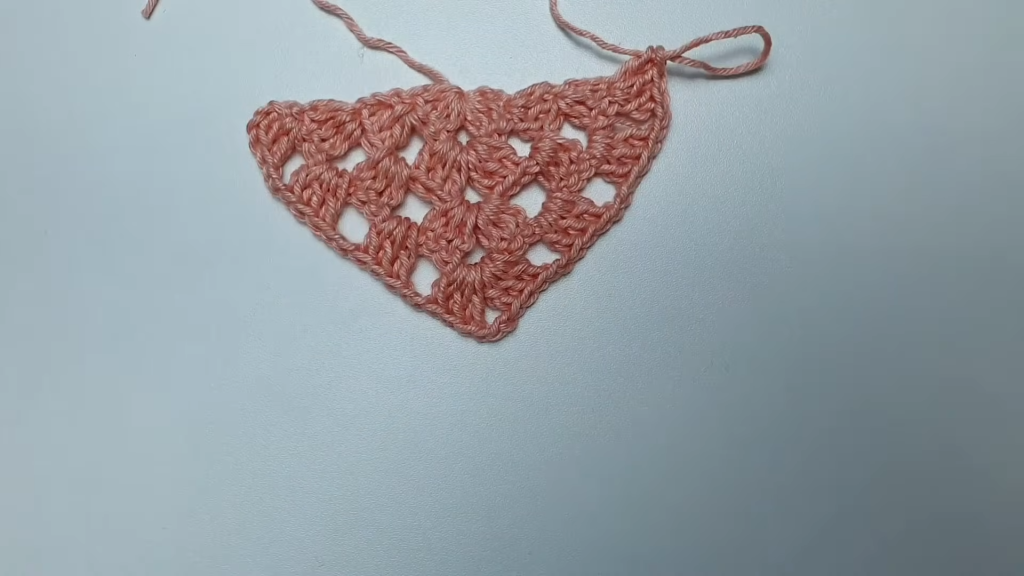
🔺 Part 2: The Triangular Lattice Flap
The flap is worked in turn rows to create the lacy, increasing triangle shape.
Row 1 (Foundation):
- Start with a MR. Ch 3 (counts as 1 DC), 2 dc into the ring.
- Ch 3 (corner space).
- 3 dc into the ring. (6 DC, 1 ch-3 space).
- Pull the MR closed. Ch 3 (counts as 1 DC), turn.
Row 2 (Increase):
- Work 2 dc into the base of the starting ch-3 (this creates an increase).
- Ch 2 (side space).
- Work (3 dc, ch 3, 3 dc) into the center ch-3 corner space below.
- Ch 2 (side space).
- Work 3 dc into the top of the ch-3 from Row 1. (2 DC sets added).
- Ch 3 (counts as 1 DC), turn.
Row 3 (Increase):
- Work 2 dc into the base of the starting ch-3 (increase).
- Ch 2. Work 3 dc into the next ch-2 space.
- Ch 2. Work (3 dc, ch 3, 3 dc) into the center ch-3 corner space.
- Ch 2. Work 3 dc into the next ch-2 space.
- Ch 2. Work 3 dc into the top of the ch-3 from Row 2 (increase). (4 DC sets added).
- Ch 3 (counts as 1 DC), turn.

Row 4 (Increase):
- Work 2 dc into the base of the starting ch-3 (increase).
- Ch 2. Work 3 dc into the next ch-2 space.
- Ch 2. Work 3 dc into the next ch-2 space.
- Ch 2. Work (3 dc, ch 3, 3 dc) into the center ch-3 corner space.
- Ch 2. Work 3 dc into the next ch-2 space.
- Ch 2. Work 3 dc into the next ch-2 space.
- Ch 2. Work 3 dc into the top of the ch-3 from Row 3 (increase). (6 DC sets added).
- Do not fasten off.
Flap Edging (Joining Edge Setup):
This is the edge that will be seamlessly joined to the pouch body.
- Ch 1, turn. Work sc stitches evenly down the straight side edge of the flap (approximately 2 or 3 sc per row end, ensuring the resulting count matches the back width of the pouch body).
- Work 1 sc into the center MR opening.
- Work sc stitches evenly up the other straight side edge.
- Crucial Step: When you reach the top corner, ch 1. Continue working SC, but this time work them into the Front Loop Only (FLO) of the SC stitches you just made. This creates a raised, perpendicular edge, which is the final joining edge.
- Sl st to the first SC of the edge row. Cut yarn and fasten off, leaving a short tail.
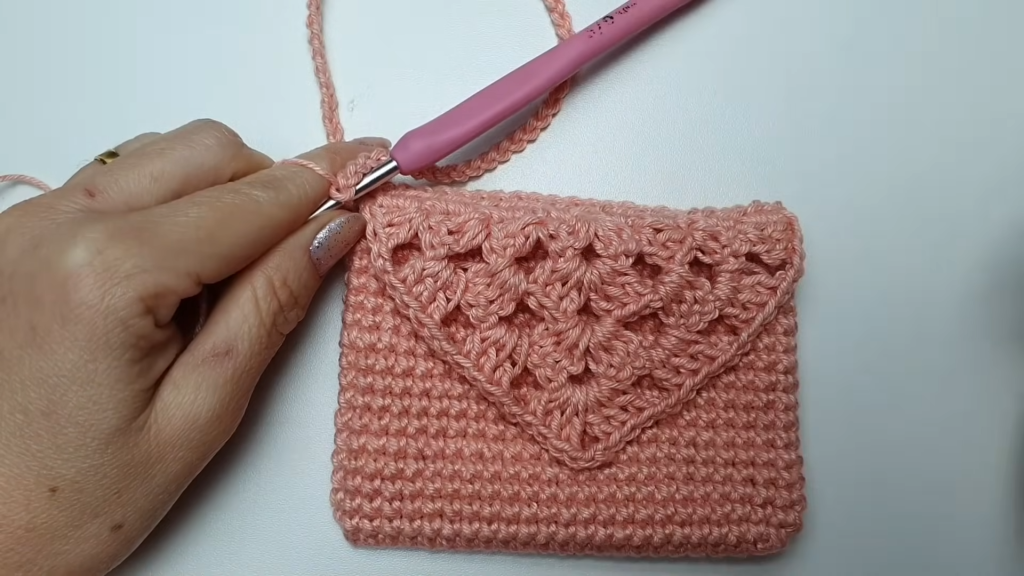
🔗 Part 3: Seamless Assembly & Finishing
Now we join the two pieces and add the final embellishments.

Seamless Flap Assembly:
- Lay the Pouch Body flat, with the front (where you want the flap to fold over) facing up.
- Take the Flap piece and place its prepared edging (from the Flap Edging step) against the back top edge of the Pouch Body.
- Align the stitches perfectly. Use a stitch marker to secure the center.
- The Invisible Join: Insert your hook through the Back Loop Only (BLO) of the flap’s edging SC and through the Back Loop Only (BLO) of the Pouch Body’s top SC edge.
- Sl st through both back loops.
- Repeat this BLO-to-BLO sl st across the entire top back edge. This technique creates a raised chain-like seam that is nearly invisible and completely seamless.
- Fasten off and secure the tail on the inside of the pouch.
Optional Wristlet Strap:
- Start a new length of yarn with a slip knot.
- Ch a length to fit comfortably around a wrist and hand (video suggests ch 54).
- Sl st to join the chain loop to the side of the wallet near the flap join.
- Working around the chain, work sl st into each chain stitch to create a sturdy, round cord.
- Sl st back into the base of the strap attachment point, fasten off, and weave in ends.
Final Button Closure:
- Lay the wallet flat and fold the triangular lattice flap over the front of the wallet.
- Mark the spot on the front pouch body where the tip of the flap naturally lands. This is where your button will be placed.
- Securely sew your chosen button to the front of the wallet.
- You will use one of the open ch-3 or ch-2 spaces in the flap’s lattice work as the buttonhole.
Video Tutorial:
✅ Final Review & Care
- Ensure all yarn tails are neatly secured and glued (as suggested in the video) if desired for extra security, especially in highly used areas.
- Your wallet should measure approximately 12 cm long by 9 cm high.
- The seamless construction makes this piece durable and perfect for everyday use.
Congratulations on completing your “Infinity Stitch” Seamless Flap Wallet!


