

Welcome to the ultimate step-by-step tutorial for the Ocean Wave Shoulder Bag. This bag features a stunning, rhythmic texture created by alternating “waves” of single crochet and half-double crochet. Made with Egyptian Macrame cord, this bag is durable, structured, and perfect for beginners looking for a project that looks much more complex than it actually is!
In this long-form masterclass, we will walk through the geometric construction of this one-piece bag—from the long foundation chain to the unique assembly that creates a spacious interior.

🧶 Materials & Tools Needed
To get that crisp, defined wave texture, the right yarn is essential.
- Yarn: Egyptian Macrame Cord (medium thickness, approx. 3mm). You’ll need roughly 300–400g depending on the desired size.
- Hook: 5.0 mm crochet hook.
- Notions: Tapestry needle for assembly, scissors, several stitch markers, and a metal/magnetic clasp for closure.
- Optional: A pre-made strap or yarn to make a “Roman Lace” cord handle (as shown in the video).
📏 Section 1: The Foundation & Strategic Mapping
The bag is worked as one long, flat piece that later folds into shape.
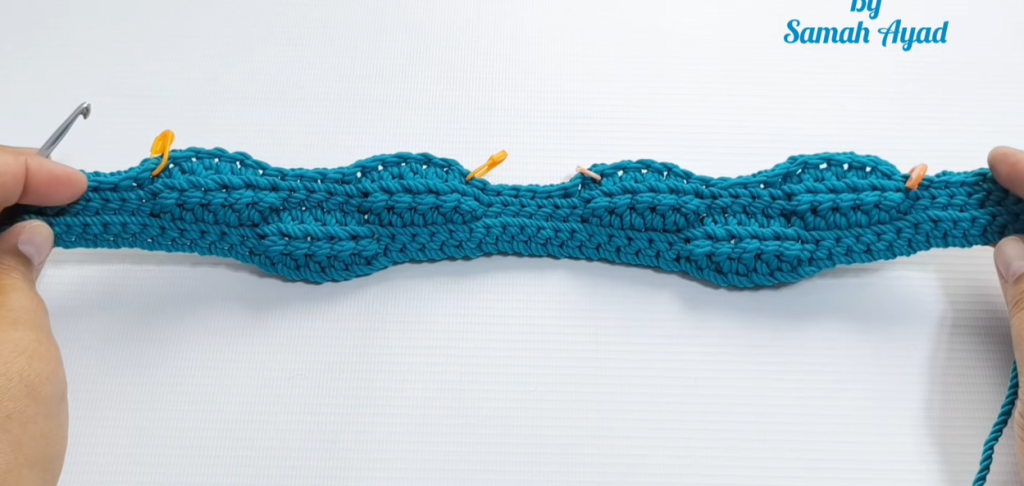
- Leaving a Tail: Before you start your slip knot, leave a 1-meter tail of yarn. We will use this later to sew the side of the bag.
- The Chain: Work 51 chains. This measures approximately 48 cm.
- Marking the “Zones”: To keep the wave pattern consistent, we must divide the 51 chains using stitch markers:
- Zone A (Handle Border): Mark the 7th chain.
- Zone B (Side Panel 1): Mark the 15th chain after the first marker.
- Zone C (Base/Bottom): Mark the next 7 chains.
- Zone D (Side Panel 2): Mark the next 15 chains.
- Zone E (Handle Border): The remaining 7 chains.
🌊 Section 2: Mastering the Wave Pattern (The 4-Row Repeat)
The “Wave” effect is created by working in the Back Loop Only (BLO) and alternating heights.
Row 1 (Foundation Row):
- Working into the “back bumps” of your chain:
- 7 Sl St (Slip Stitches).
- 5 Sl St, 5 HDC (Half Double Crochet), 5 Sl St.
- 7 Sl St (The Base).
- 5 Sl St, 5 HDC, 5 Sl St.
- 7 Sl St.
Row 2:
- Ch 1, turn. Work exactly the same stitches as Row 1, but into the BLO. (Slip stitches over slip stitches, HDC over HDC).
Row 3 (Shifting the Wave):
- Ch 1, turn.
- 7 Sl St (The borders and base always stay as Slip Stitches).
- Now, reverse the panel stitches: 5 HDC, 5 Sl St, 5 HDC.
- 7 Sl St (Base).
- 5 HDC, 5 Sl St, 5 HDC.
- 7 Sl St.
Row 4:
- Ch 1, turn. Repeat Row 3 exactly into the BLO.
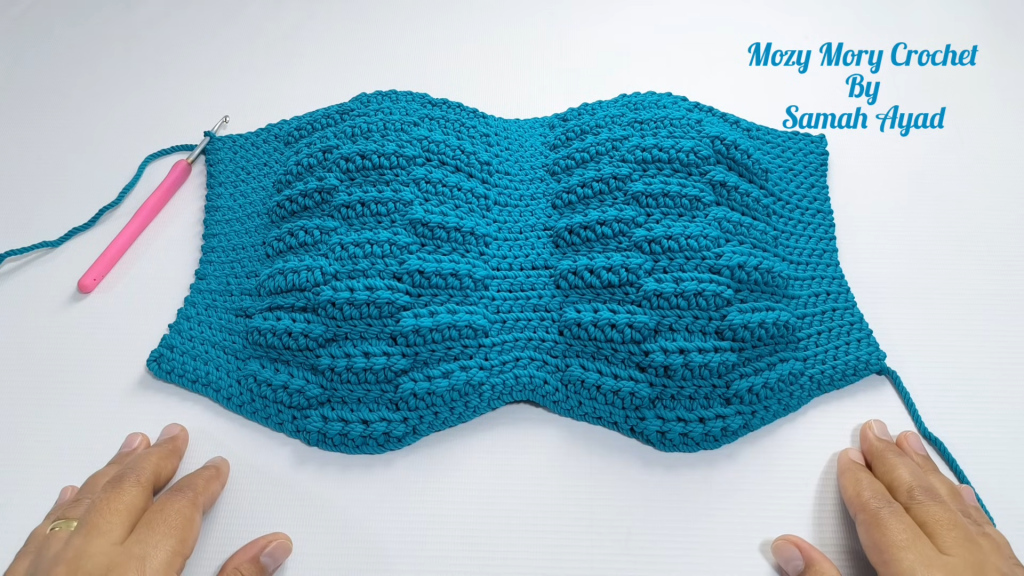
The Logic: You alternate these 4 rows. Rows 1 & 2 create a “valley,” and Rows 3 & 4 create a “peak.” Continue until you have worked 34 rows (measuring approx. 21 cm at the base and 28 cm at the widest wave part).
📐 Section 3: Dimensions & Scaling
If you want a different size:
- Width: Add more rows in increments of 4.
- Depth: Increase the “Base Zone” (the middle 7 stitches) to 9 or 11 stitches.
- Height: Add chains in groups of 5 to the “Side Panels” (the 15-stitch zones).
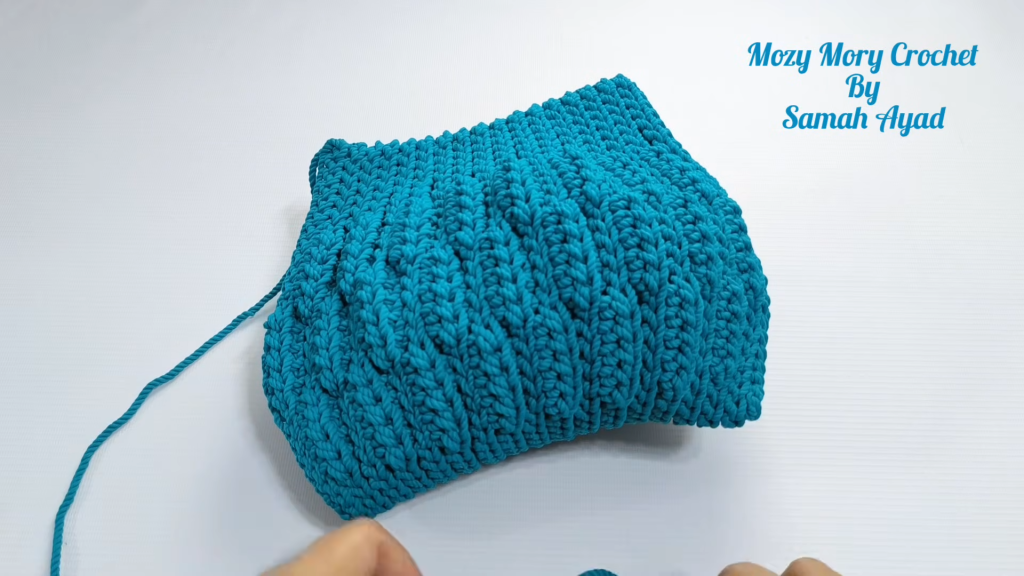
🪡 Section 4: Folding and Side Seams
Once your rectangular wave piece is finished, it’s time to turn it into a 3D bag.
- Choosing the Face: One side of the wave pattern will be more “embossed” (peaks) and the other more “carved” (valleys). Choose your favorite to be the outside.
- The Fold: Fold the two 15-stitch side panels up. The middle 7-stitch section remains flat as the bottom.
- The Seam: Using the 1-meter tail you left at the start and a tapestry needle:
- Align the edges of the border (the 7-stitch zones).
- Sew using a Mattress Stitch or a simple whip stitch through the outer loops only. This creates a clean, professional join.
- Repeat on the other side using the yarn tail from your finishing row.
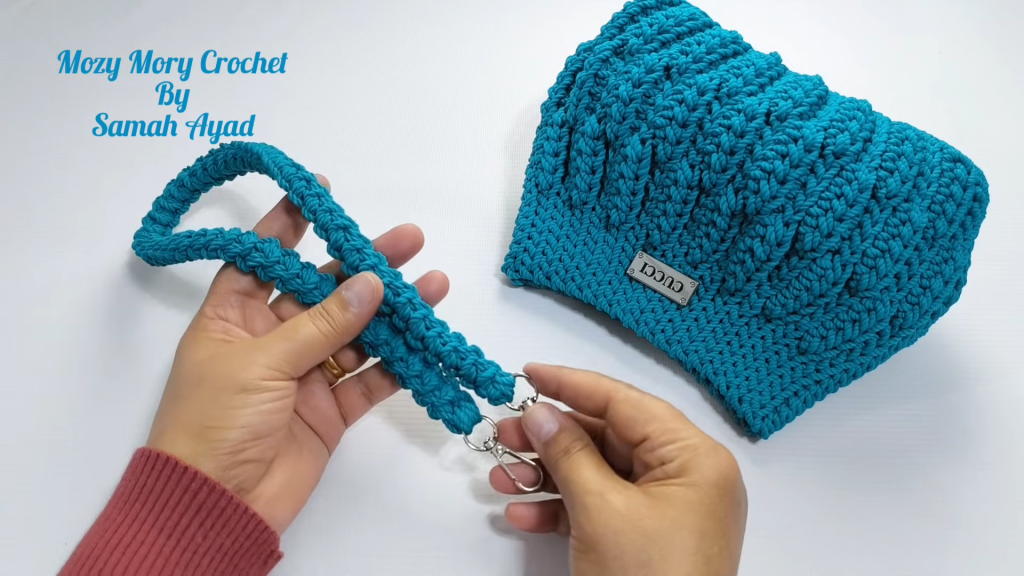
🎗️ Section 5: The “Roman Lace” Handle
The video features a sturdy Roman Lace Cord for the strap, which doesn’t stretch over time.
- Starting: Ch 3.
- Step 1: SC into the 2nd chain from hook.
- Step 2: Turn the work slightly to find the loop on the side. Insert hook, yarn over, pull through (2 loops on hook), yarn over, pull through both.
- Step 3: Turn again. You will now see two loops on the side. Insert hook through both, yarn over, pull through (2 loops on hook), yarn over, pull through both.
- Repeat: Continue Step 3 until the cord is 60 cm long for a shoulder bag, or 120 cm for a crossbody.
- Attach: Sew the ends of the cord to the inside of the 7-stitch border zones using a tapestry needle.
✨ Section 6: Finishing Touches
- Weaving Ends: Secure all yarn tails inside the bag, weaving them through the dense slip-stitch borders.
- The Clasp: Centrally align a magnetic snap or a decorative metal lock. Sew it into the solid slip-stitch sections at the top for a secure hold.
- Logo: Add a leather “Handmade” tag to the front for a boutique look.
Congratulations! You’ve completed the Ocean Wave Bag. It’s elegant, textured, and incredibly durable—perfect for summer outings or as a chic daily carryall! 🌊👜


