
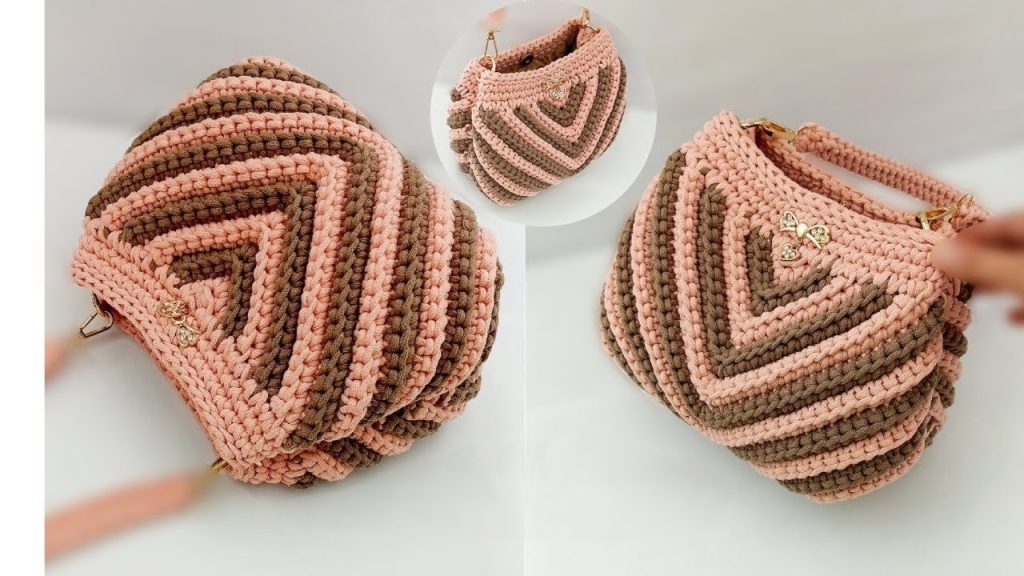
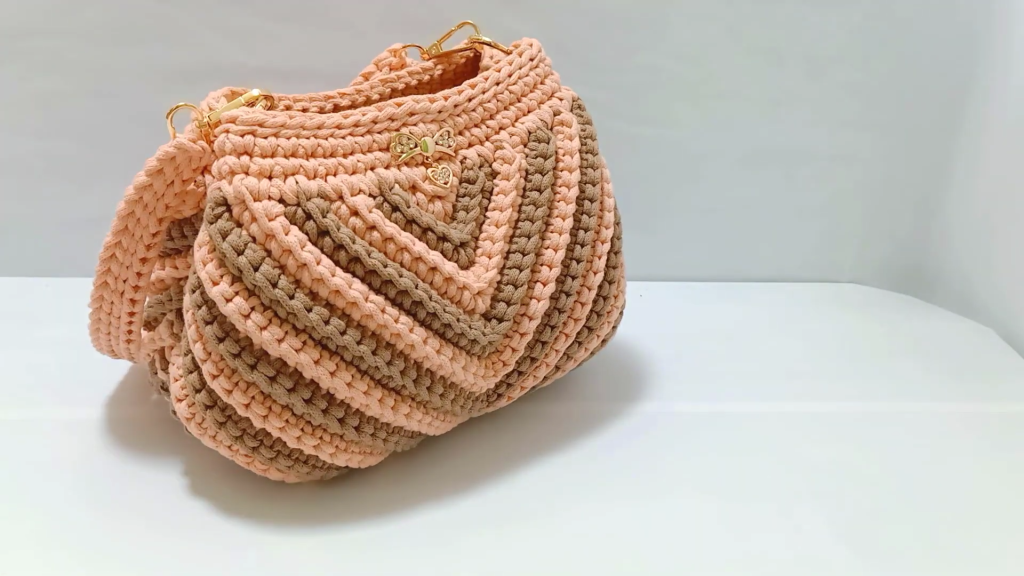
Welcome to your next favorite crochet project! If you are looking for a handbag that combines modern geometric lines with a classic, sturdy texture, the Geometric Chevron Handbag is exactly what you need. This design uses a clever play on increases and decreases to create a striking “V” or chevron shape that is both elegant and structurally sound.
In this long-form, detailed guide, we will break down every movement—from the very first magic ring to the final professional lining. Grab your hook, and let’s dive into the details!
🧶 Section 1: The Artisan’s Toolkit
To achieve the professional, boutique-look of this bag, the weight and material of your yarn are crucial. You want something that holds its shape without sagging.
- Thread: 5mm Cotton Cordon Thread (Macrame cord). You will need two contrasting colors to highlight the geometric pattern.
- Hook: 6mm Crochet Hook. A slightly larger hook helps manage the thick cotton cord without straining your hands.
- Hardware: * 2 Openable Metal Rings (Gate Rings).
- A pre-made or crochet handle (Instructional link provided in the original video’s description).
- Zipper (optional, if you prefer a zippered closure).
- Notions: * Fabric for the lining.
- Clear nylon thread or matching sewing thread.
- Stitch markers.
- Sharp scissors and a tapestry needle.
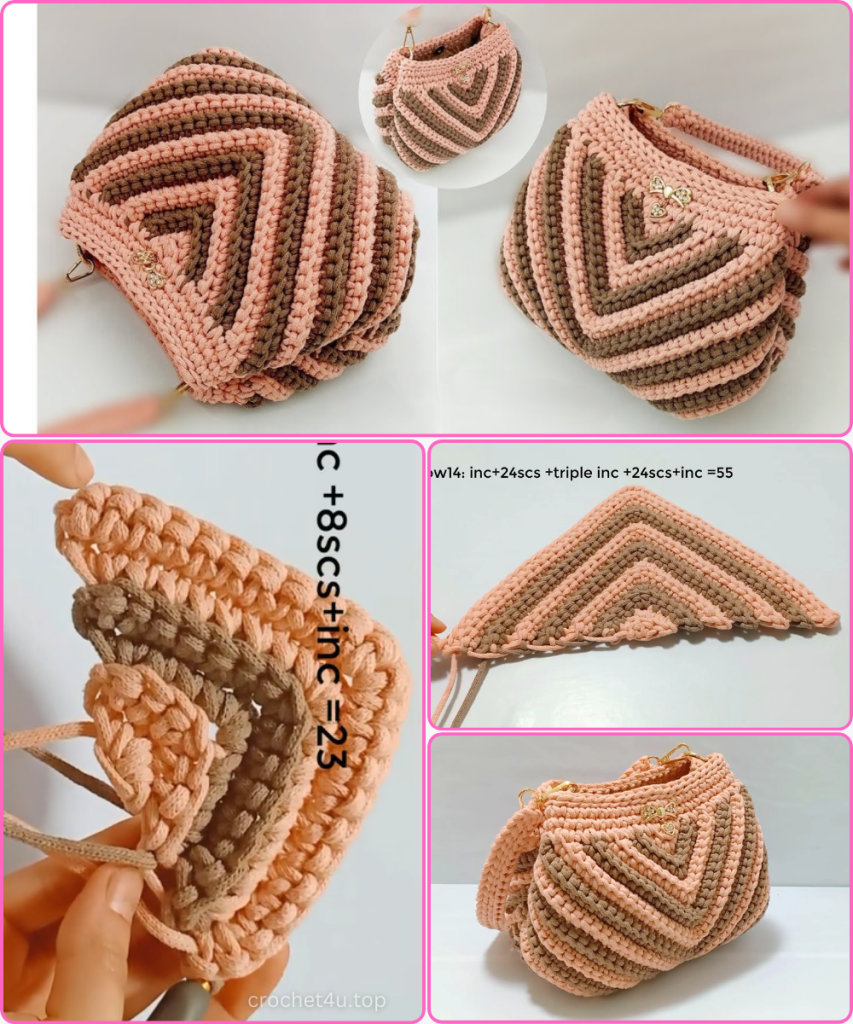
📐 Section 2: The Foundation & Expanding the Chevron (Rows 1–14)
The bag is constructed using two main panels. We start at the bottom center and work our way outward, creating a triangular base that eventually forms the chevron body. Note: All stitches are worked in the Back Loop Only (BLO) to create a beautiful ribbed texture.
- The Magic Start: Form a Magic Ring. Inside the ring, work 3 Single Crochets (SC). Pull the tail tight to close the center.
- Row 2 (First Increase): Chain 1, turn. Work an increase (2 SC) in the first stitch. In the middle stitch, work 3 SC (this is your peak). Work an increase (2 SC) in the last stitch. (Total: 7 stitches).
- Color Transition: Every two rows, you will switch colors. This keeps the chevron pattern crisp and visually stunning.
- Row 3 (Expanding): With the new color, chain 1, turn. Increase in the first stitch, SC in the next 2 stitches. In the middle stitch (the peak), work 3 SC. SC in the next 2 stitches, and increase in the last stitch. (Total: 11 stitches).
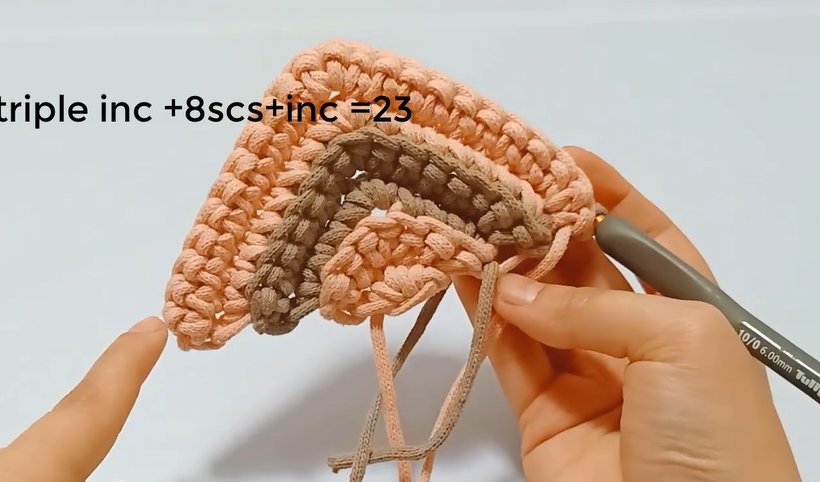
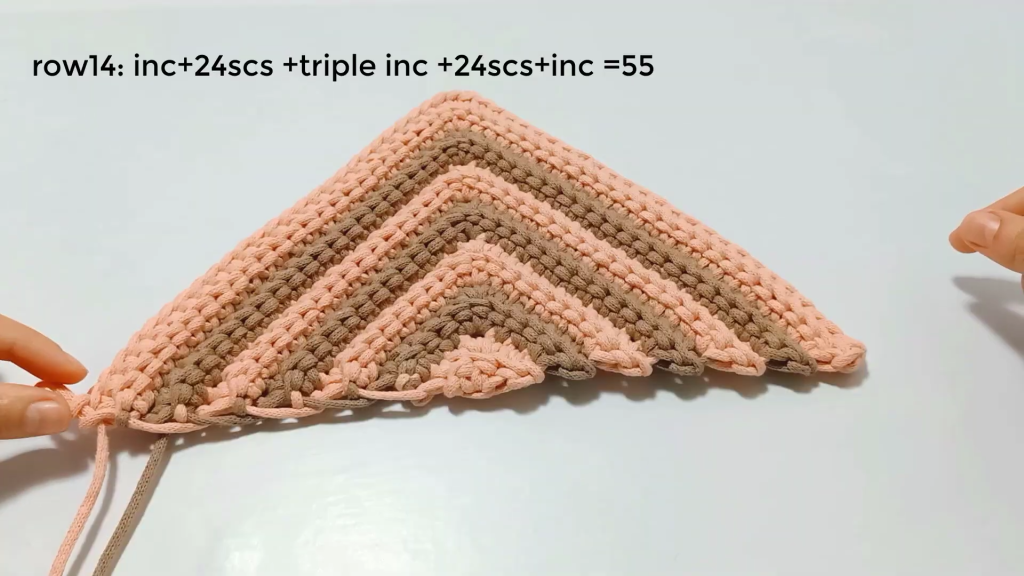
- The Growth Logic: For rows 4 through 14, follow this pattern:
- Increase in the very first and very last stitch.
- Work 3 SC in the center-most stitch of the row.
- This adds 4 stitches per row.
- By the end of Row 14, you should have a total of 55 stitches.
🏗️ Section 3: Building the Vertical Walls (Rows 15–18)
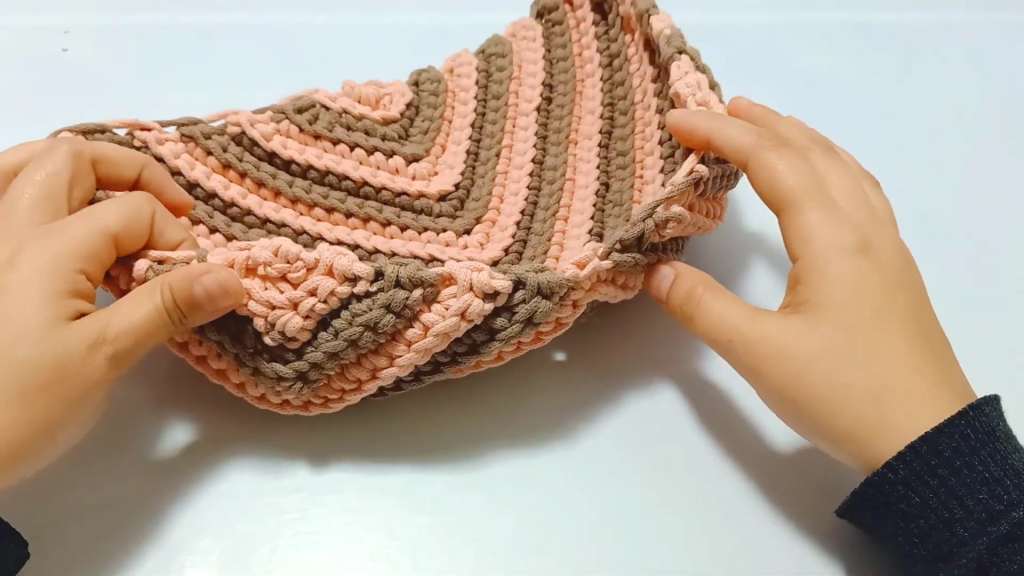
Once we have reached the desired width, we stop expanding the bag outward and start building the height. We do this by balancing the increases with decreases.
- Row 15 (The Transition): Chain 1, turn. Decrease (SC2tog) over the first two stitches. SC across until you reach the center peak. Work 3 SC in that center stitch. SC across until you reach the last two stitches, and work a decrease.
- The Balance: Because we are subtracting two stitches (one on each end) but adding two stitches (at the peak), the stitch count remains a steady 55. This forces the fabric to grow “up” rather than “out.”
- Rows 16–18: Repeat the pattern from Row 15. The sides of your work will now start to appear straight and vertical.
📉 Section 4: Shaping the Narrowing Flaps (Rows 19–27)
To create the distinct “flaps” or top edges that fold inward, we now change the math to decrease the overall stitch count.
- Row 19: Chain 1, turn. Decrease at the start. SC in the next 23 stitches. Decrease again. Leave the center stitch unworked. (This splits the work into two halves).
- Rows 20–22: Continue decreasing at the beginning and end of every row. By the end of Row 22, you should have 19 stitches remaining on one side.
- The Final Taper: Continue decreasing 4 stitches per row (at the ends and near the split) until only one stitch remains. This creates a sharp, clean triangle point.
- Repeat: Attach your yarn to the second half of the bag and repeat the narrowing process from Row 19 to 27.
🧩 Section 5: Assembly & The Power of Joining
Repeat the entire process above to create a second identical panel. Once you have two mirrored panels, it’s time to bring them together.
- Color Matching: Lay the panels together. To make the seams invisible, use the same color thread as the rows you are joining.
- The Join: Use a tapestry needle or a crochet hook to slip stitch the two panels together along the bottom and side edges. Be sure to tie each two-row color block securely to its counterpart on the other panel.
✨ Section 6: The Finishing Rim & Edging
A professional bag needs a clean top edge to house the rings and lining.
- The Edge Round: Attach your yarn to the top opening. Work one SC in the edge of every row all the way around the circumference of the bag.
- Building the Rim: Do not close the rounds with a slip stitch. Work in a continuous spiral. Work two more rounds of standard SC into both loops.
- The Final Polish: For the very last round, work a Slip Stitch in the Back Loop Only of every stitch. This creates a firm, non-stretch rim that looks like a braided cord.
🧵 Section 7: The Professional Lining
Don’t skip this! A lining prevents the crochet from stretching and keeps small items from falling out.
- Measurements: Lay your bag flat on your fabric. Trace the dimensions, adding 1cm for seam allowance.
- The Corner Trick: To give the lining depth (so it matches the bag’s 3D shape), sew a diagonal line across the bottom corners of the fabric pouch. This creates a “boxed” bottom.
- Installation: Turn the lining right-side out and tuck it into the bag. Use clear nylon thread to hand-sew the lining to the inside of the crochet rim. This makes the stitches invisible.
💍 Section 8: Final Hardware & Handle
- Folding the Sides: The magic of this design is in the fold. Push the side seams inward so the top of the bag creates a “box” or “house” shape.
- Installing Rings: Clip your openable metal rings through the crochet fabric at the folded corners. This secures the shape and provides an anchor for your handle.
- The Handle: Snap your pre-made handle onto the rings.
Video Tutorial:
Congratulations! You have just completed the Geometric Chevron Handbag. This piece is a testament to your patience and skill. Enjoy your new, high-fashion accessory!


