

Welcome to the ultimate guide for creating a stylish and practical Retro Wristlet Smartphone Bag. This design is not only compact and chic but also incredibly functional, fitting a modern smartphone along with your daily essentials.
Using a creative combination of basic Single Crochet (SC) and Slip Stitches (Sl St), this pattern produces a unique ribbed texture that looks complex but is easy to master. The clever integration of plastic rings as handles gives it a vintage touch while making it a “wristlet” style that’s perfect for on-the-go utility.

🧶 Materials & Tools
Before we start, ensure you have the following supplies ready:
- Yarn: Medium weight yarn (8-ply/DK), used double-stranded for extra durability and structure.
- Crochet Hook: 3.5 mm hook.
- Handles: Two 8.5 cm plastic rings.
- Notions: Scissors, tapestry needle for weaving in ends, and stitch markers.
⭕ Section 1: Preparing the Ring Handles
The bag’s construction begins directly on the handles. We will encase the plastic rings in crochet to provide a soft grip and a foundation for the bag’s body.

- Take your first 8.5 cm plastic ring.
- Join your yarn with a slip knot and pull a loop through the center of the ring.
- Round 1: Work 50 SC around the ring. Ensure your stitches are tight and evenly spaced to cover the plastic completely.
- Join with a Sl St to the first SC.
- Chain 17. This chain will bridge the gap between the two handles.
- Take the second plastic ring. Join the chain to any stitch on the second ring (if already covered) or directly onto the ring with a Sl St.
- Note: You should have two rings, each covered in 50 SC, connected by a 17-stitch chain.
🧱 Section 2: Building the Main Body (Part A – Increases)
We will now work back and forth across the 17 foundation chains to grow the bag’s body. We use Back Loop Only (BLO) stitches to create a beautiful ribbed effect.
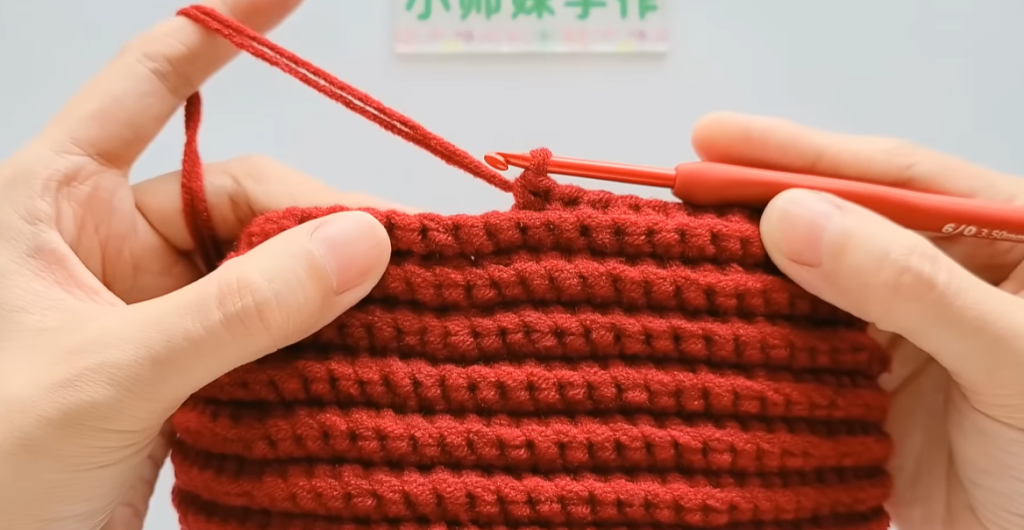
- Row 1: Turn your work. Skip the turning chain. In the “back bumps” of the 17 chains, work: 2 Sl St, 13 SC, 2 Sl St. Sl St into the next stitch on the ring handle to anchor the row.
- Row 2 (Increase Row): Chain 1, turn. Working in BLO across the row: 2 Sl St, 6 SC, 3 SC into the center stitch, 6 SC, 2 Sl St. Anchor to the ring with a Sl St.
- Row 3: Repeat the increase logic. You will always work 2 Sl St at the edges and 3 SC into the very middle stitch of the row.
- Growth: Continue this pattern, adding 2 stitches per row by working 3 SC in the center.
- Completion: Stop increasing once you reach Row 14, or when your stitch count is 43 stitches wide.
📏 Section 3: The Center Body (Part B – Stability)
Now that we have reached the desired width, we need to create the depth of the bag by working several rows without significant increases.
- Row 15: Work 2 Sl St, 39 SC, 2 Sl St (43 stitches). No increases.
- Row 16: Slight increase to maintain shape. 2 Sl St, 19 SC, 2 SC in the center stitch, 19 SC, 2 Sl St. (44 stitches).
- Row 17: Work even. 2 Sl St, 40 SC, 2 Sl St.
- Row 18: 2 Sl St, 19 SC, 2 SC in the center stitch, 20 SC, 2 Sl St. (45 stitches).
- The Main “Panel”: Work 18 more rows (Rows 19–36) maintaining this width: 2 Sl St, 45 SC, 2 Sl St. This forms the flat bottom and sides of the bag.

📉 Section 4: Shaping the Second Side (Part C – Decreases)
To mirror the first side, we will now begin decreasing toward the second handle.
- Row 1 (Decrease): 2 Sl St, 19 SC, SC2tog (Single Crochet 2 Together), 20 SC, 2 Sl St.
- Row 2: Work even (No decrease).
- Row 3 (Decrease): 2 Sl St, 19 SC, SC2tog, 19 SC, 2 Sl St.
- Row 4: Work even.
- The Main Taper: From here on, in the center of every row, work a SC3tog (Single Crochet 3 Together).
- Target: Continue decreasing until you are back to 17 stitches (matching your original foundation chain). This should be finished by Row 18 of the decrease section.
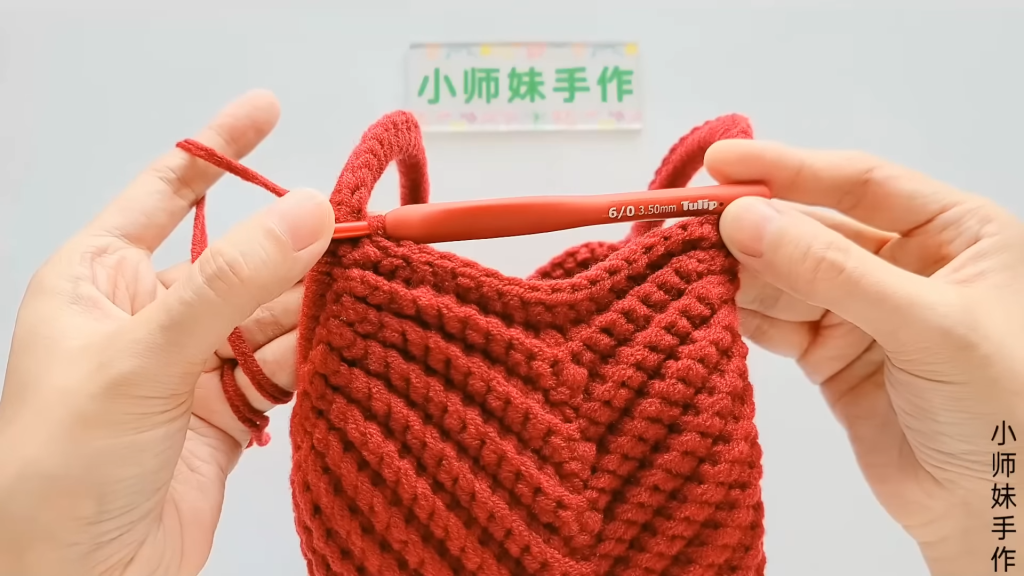
✨ Section 5: The Finishing Border
To give the bag a polished, professional look, we will add a final decorative and structural edge.
- Chain 1 and turn to the side of the bag.
- Work 17 Sl St along the side edge of the bag body.
- Continue working Sl St around the remaining 22 stitches of the plastic ring handle that were not used for the bag body.
- Repeat on the other side.
- In total, you will work approximately 78 Sl St around the entire perimeter of the bag opening and handles.
Video Tutorial:
💡 Pro-Tips for Success
- Tension: Keep your Slip Stitches at the edges of the rows slightly loose so you can easily work back into them on the return row.
- Stitch Markers: Place a marker in the center stitch of each row. This makes it much easier to find exactly where to place your increases (3 SC) or decreases (SC3tog).
- Yarn Selection: If you find the bag too “floppy,” consider using a cotton yarn which has less stretch than acrylic.
- Customization: You can easily make this bag wider for larger tablets by increasing the number of foundation chains (Section 1, Step 5) to 25 or 30.
Congratulations! You’ve finished your Retro Wristlet Smartphone Bag. It’s simple, creative, and ready to be shown off!


