🌟 Introduction
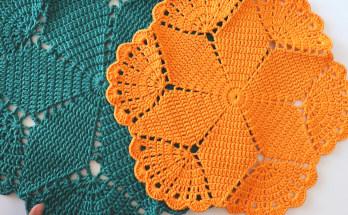
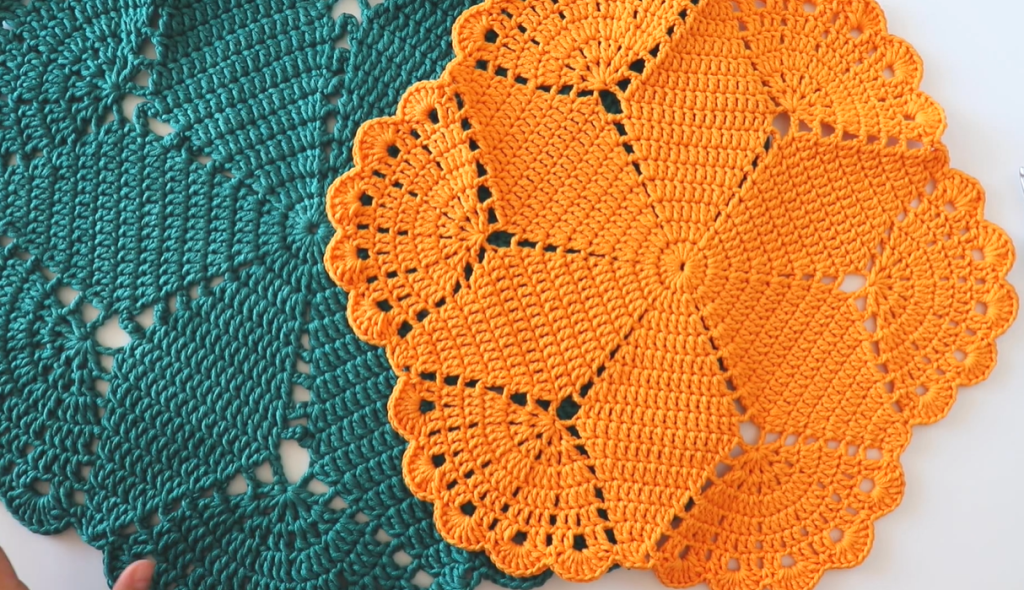
Ready to bring some vibrant, geometric style to your dining table? The Autumn Star Placemat is a stunning piece worked in the round that transforms from a central circle into a defined hexagon. It utilizes simple stitches and strategically placed chain spaces to create a beautiful, six-pointed star of lacework within the solid body. Finished with a playful scalloped edge, this placemat is perfect for cotton yarn and will stand up well to daily use.
Skill Level: Intermediate
Finished Size (approximate): 14 inches (35 cm) from point to point.
🧵 Materials & Gauge
✨ Materials Needed
- Yarn: Approximately 200-250 yards of Worsted Weight (Aran/10-ply) cotton or cotton blend yarn. Cotton is highly recommended for placemats due to its durability and washability. (The sample image uses a bright orange color.)
- Hook: Size H/8 (5.0 mm) crochet hook, or size needed to obtain gauge.
- Notions: Stitch marker (optional but helpful), yarn needle for weaving in ends, and scissors.
📏 Gauge (Check Your Tension!)
- Rounds 1-3 should measure approximately 1.5 inches (4 cm) in diameter.
- The work must lie perfectly flat. If it’s cupping, you’re crocheting too tightly or need to increase your hook size. If it’s ruffling, you need to decrease your hook size.
💡 Special Stitches & Abbreviations
📝 Pattern Abbreviations (US Terms)
| Abbreviation | Meaning | | Abbreviation | Meaning | | :—: | :— | :—: | :— | | ch | chain | | st(s) | stitch(es) | | sl st | slip stitch | | rep | repeat | | sc | single crochet | | inc | increase (work 2 sts into 1 st) | | dc | double crochet | | sk | skip | | hdc | half double crochet | | ch-sp | chain space | | MR | Magic Ring | | CC | Corner Cluster |
⭐ Special Stitch (Corner Cluster)
- CC (Corner Cluster): Work (2 dc, ch 2, 2 dc) all into the same indicated stitch or space.
🔶 The Pattern: Autumn Star Placemat
Note: The pattern is worked in joined rounds. The ch-3 at the beginning of each round counts as the first dc.
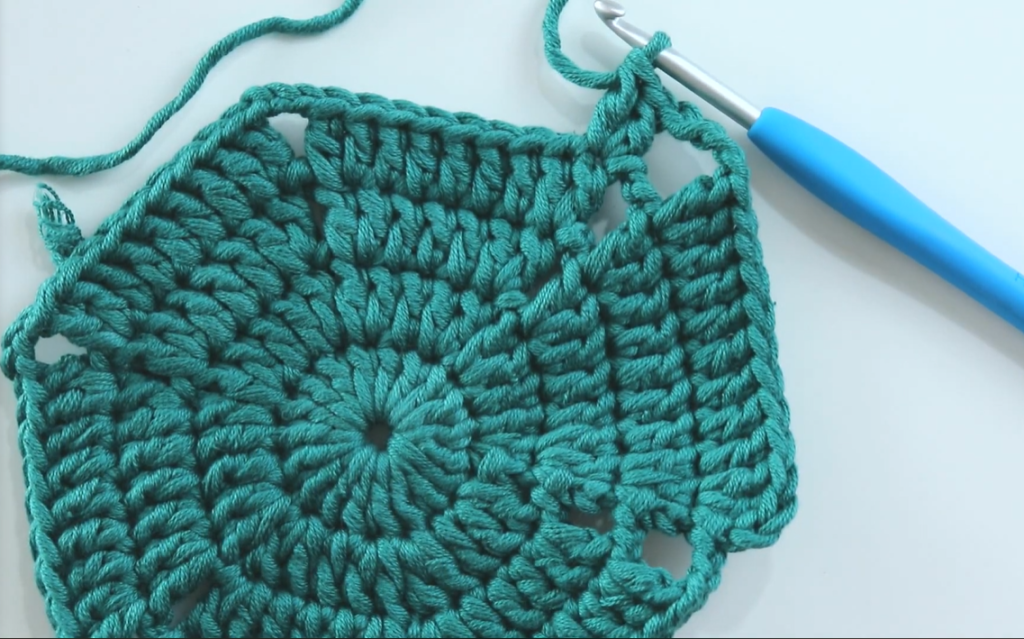
Part 1: The Hexagon Foundation
Foundation: Start with a Magic Ring (MR).
Round 1: Ch 3 (counts as 1 dc), 11 dc into MR. Sl st to the top of the starting ch-3 to join. (12 dc)
Round 2: Ch 3, dc in the same st (inc made). 2 dc in the next st (inc). Rep from * 10 more times. Sl st to the top of the starting ch-3 to join. (24 dc)
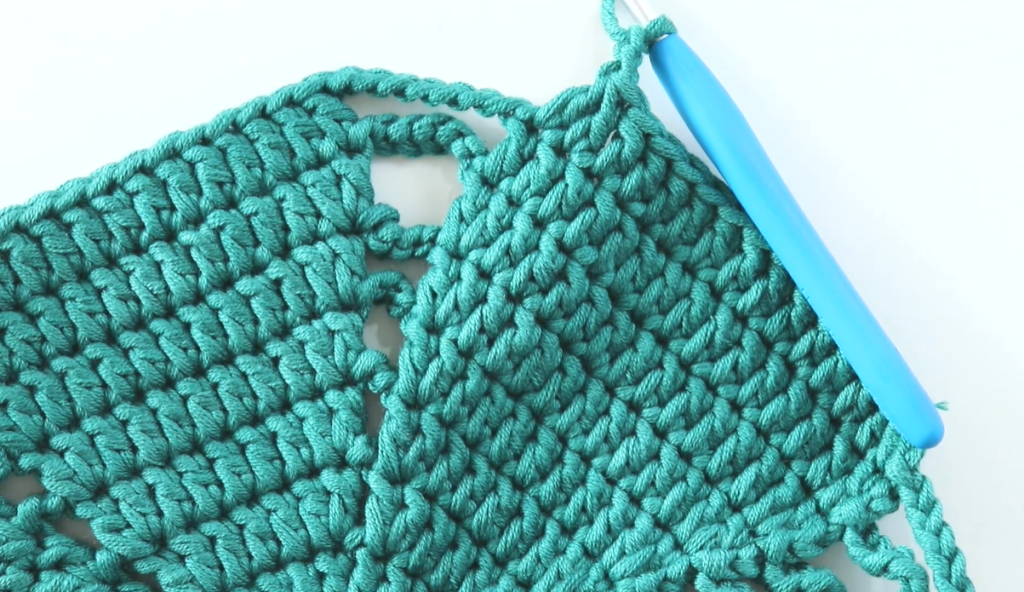
Round 3 (Establish Corners): Ch 3, dc in the next 3 sts. Work a CC (2 dc, ch 2, 2 dc) in the next st. Dc in the next 3 sts. Rep from * 5 more times. Sl st to the top of the starting ch-3 to join. (36 dc, 6 ch-2 sps)
Round 4: Sl st into the next 2 sts and into the ch-2 sp. Ch 3 (counts as 1 dc). Work a CC in the same ch-2 sp. Dc in each of the next 7 dc. Work a CC in the next ch-2 sp. Rep from * 5 more times, omitting the last CC on the final rep. Sl st to the top of the starting ch-3 to join. (54 dc, 6 ch-2 sps)
Part 2: Creating the Star Motif
In the next rounds, we will introduce the openwork, always increasing at the corners. The sides will grow by 2 stitches per side per round.
Round 5 (First Lace Row): Sl st into the next st and into the ch-2 sp. Ch 3, work a CC in the same ch-2 sp. Dc in the next 4 dc. Ch 1, sk 1 st, dc in the next 4 dc. Work a CC in the next ch-2 sp. Rep from * 5 more times, omitting the last CC on the final rep. Sl st to the top of the starting ch-3 to join. (60 dc, 6 ch-1 sps, 6 ch-2 sps)

Round 6: Sl st into the next st and into the ch-2 sp. Ch 3, work a CC in the same ch-2 sp. Dc in the next 4 dc. Ch 1, sk 1 st, dc in the next 1 st (this dc is the center of the side). Ch 1, sk 1 st, dc in the next 4 dc. Work a CC in the next ch-2 sp. Rep from * 5 more times, omitting the last CC on the final rep. Sl st to the top of the starting ch-3 to join. (66 dc, 12 ch-1 sps, 6 ch-2 sps)
Round 7: Sl st into the next st and into the ch-2 sp. Ch 3, work a CC in the same ch-2 sp. Dc in the next 5 dc. Ch 1, sk 1 st (skip the ch-1 sp), dc in the next 1 st. Ch 1, sk 1 st, dc in the next 1 st. Ch 1, sk 1 st (skip the ch-1 sp), dc in the next 5 dc. Work a CC in the next ch-2 sp. Rep from * 5 more times, omitting the last CC on the final rep. Sl st to the top of the starting ch-3 to join. (72 dc, 18 ch-1 sps, 6 ch-2 sps)
Round 8 (Closing the Triangles): Sl st into the next st and into the ch-2 sp. Ch 3, work a CC in the same ch-2 sp. Dc in each st and ch-1 sp across the side (this closes the open triangles). You should have 13 dc across the side. Work a CC in the next ch-2 sp. Rep from * 5 more times, omitting the last CC on the final rep. Sl st to the top of the starting ch-3 to join. (90 dc, 6 ch-2 sps)
Round 9 (Solid Final Base): Sl st into the next st and into the ch-2 sp. Ch 3, work a CC in the same ch-2 sp. Dc in each of the next 17 dc. Work a CC in the next ch-2 sp. Rep from * 5 more times, omitting the last CC on the final rep. Sl st to the top of the starting ch-3 to join. (114 dc, 6 ch-2 sps)
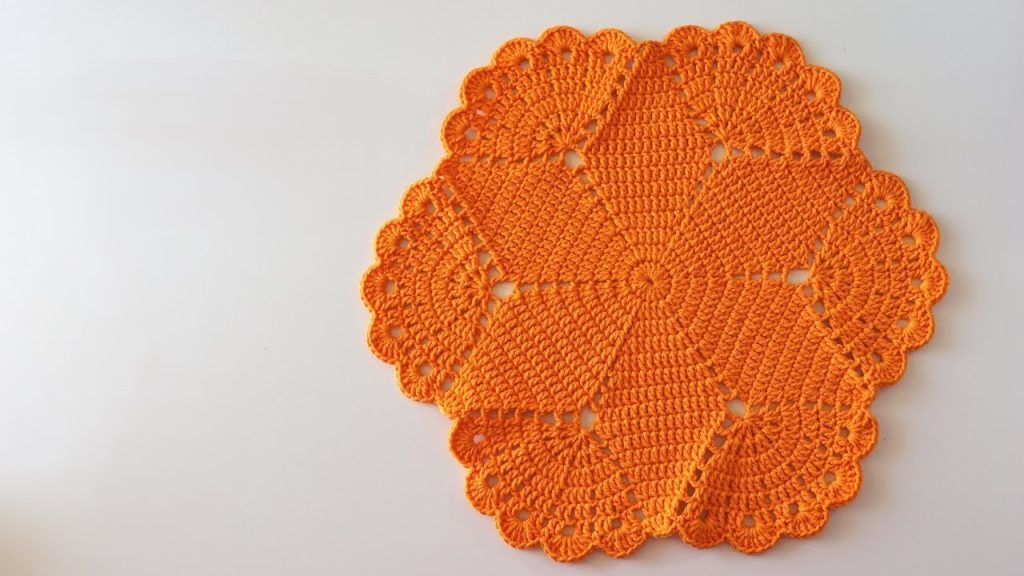
Part 3: The Scalloped Border
Round 10 (Scallop Setup): Ch 1, sc in the same st. Sc in each of the next 2 dc. In the corner ch-2 sp: (sc, ch 1, sc). Sc in each of the next 21 dc. In the corner ch-2 sp: (sc, ch 1, sc). Rep from * 5 more times, omitting the last 3 sc on the final rep. Sl st to the first sc to join. (126 sc, 6 ch-1 sps)
Round 11 (Scallops): Ch 1, sc in the same st. Sk 2 sts, work a Shell (5 dc) in the next st. Sk 2 sts, sc in the next ch-1 sp (the corner). Rep from * 6 times around. When you reach the end, skip the remaining stitches and sl st to the first sc to join. (18 Shells, 6 sc)
Fasten off and weave in the ends.
Video Tutorial:
✂️ Finishing & Blocking
🧺 Blocking is Essential!
- Wet Blocking: For a crisp, flat placemat, blocking is not optional. The hexagon shape and the openwork will truly shine after blocking.
- Wet the placemat thoroughly using cold water and a mild detergent.
- Pin the placemat out firmly onto a foam mat or towel, ensuring the six corners are sharply defined and the edges are straight. Pin each of the scallops so they are evenly spread and curved nicely.
- Allow the placemat to dry completely before unpinning.
✨ Conclusion
Congratulations on crocheting your Autumn Star Placemat! The solid texture mixed with the delicate star motif creates a stunning centerpiece for any table. Repeat this pattern in different colors to build a beautiful seasonal set!