

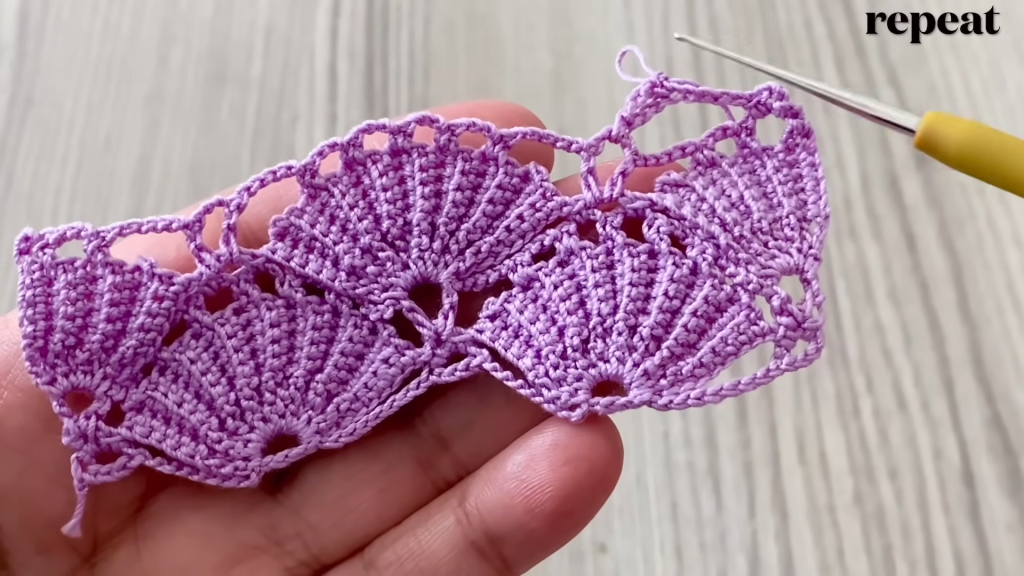
Unfurl a textile of regal elegance with this intricate fan lace. Perfect for creating heirloom pieces like luxurious table runners, altar cloths, or a truly special shawl. The pattern utilizes a rhythmic 2-row repeat of solid fans and connecting chain arches, resulting in a rich, undulating fabric that looks far more complex than it actually is. This detailed guide ensures a flawless finish, even in the smallest thread sizes.
⭐️ Project Blueprint and Advanced Techniques
| Feature | Detail |
| Skill Level | Advanced Intermediate. Requires strong concentration and proficiency with dc and tr stitches. |
| Stitch Dictionary | Chain (ch), Slip Stitch (sl st), Single Crochet (sc), Double Crochet (dc), Treble Crochet (tr). |
| Construction | Worked flat in rows. The pattern is built upon the ch-spaces created in the previous row. |
| Customization | Easily adjustable in width (initial chain) and length (number of rows). |
| Key Technique | Precise placement of stitches within the ch-spaces is essential for the structure. |
🧵 Materials Selection & Precision Gauge
Yarn: The Foundation of Lace
- Weight: For the delicate look pictured, use Crochet Thread Size 10 or a fine Lace Weight (Category 0) yarn. Using a Category 3/DK or Category 4/Worsted yarn will yield a beautiful shawl, but the scale will be much larger.
- Fiber: 100% Mercerized Cotton is the gold standard for lace—it’s strong, resistant to stretching during blocking, and gives exceptional stitch definition.
- Color: The sample’s rich purple demands a solid, saturated color.
- Yardage: Plan for 150−250 yards for a small runner (∼15×40 inches), or 600−800 yards for a large shawl.
Hook: Achieving Crisp Tension
- Steel Hook Size: 1.5 mm to 1.75 mm (US 8 or 7). The goal is to use the smallest hook you can comfortably manage to ensure the final fabric is firm and does not sag.
Notions & Blocking
- Tapestry Needle: Fine needle for weaving in ends.
- T-pins and Blocking Board: Absolutely Mandatory for lace work. Without blocking, the fans will not open and the fabric will look crumpled.
Precision Gauge
Gauge is measured across one full repeat of the pattern:
- One full motif (2 Rows): 1.5 inches wide×0.9 inches tall (using Size 10 thread).
- Starting Chain Calculation: The pattern repeats every 10 chains. To find your required starting chain, use the formula: 10×(number of fan repeats)+5 ch
| Project Type | Target Width (Approx.) | Repeats | Starting Chain |
| Small Doily/Placemat | 10 inches | 6 | ch 65 |
| Table Runner Center | 15 inches | 9 | ch 95 |
| Shawl Center Panel | 20 inches | 12 | ch 125 |
📝 Pattern Instructions: The Core Repeat
This pattern uses a simplified shell/fan stitch. The entire project is built on repeating Rows 2 and 3.
Foundation Row
Row 1 (Setting the Stage – RS): Chain the required amount (e.g., ch 95 for a runner). dc in the 5th ch from the hook (counts as dc and ch 1). dc in the same ch. (1 dc,ch 1,1 dc in one ch).
- sk 4 ch, (1 dc,ch 1)3 times,1 dc in the next ch (This is the Large Fan).
- sk 4 ch, Large Fan in the next ch. Repeat the sk 4 ch, Large Fan sequence until the end of the row. You should end with a Large Fan in the last available chain.
- Turn.
The 2-Row Repeat
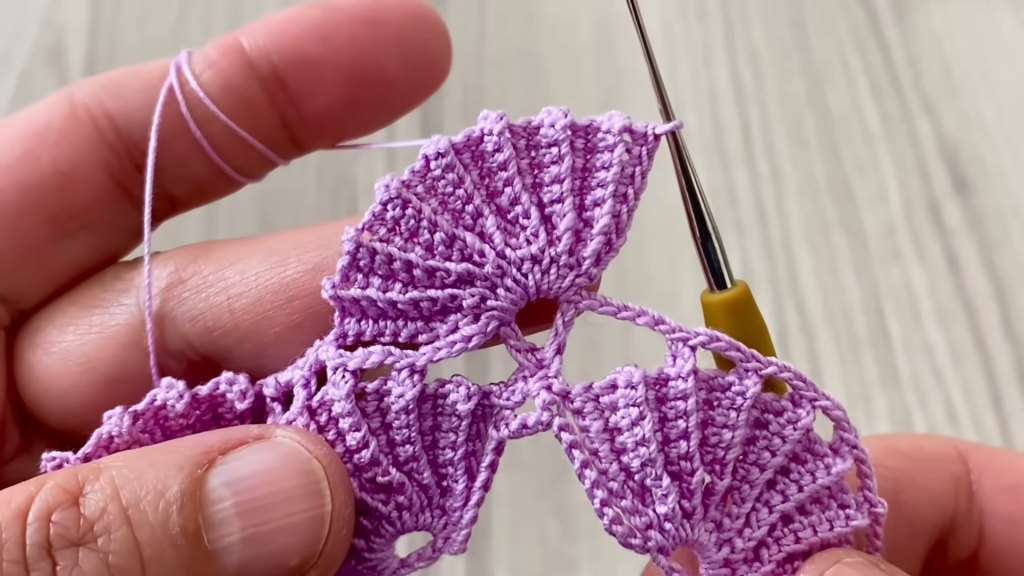
Row 2 (Connecting Arch – WS): ch 4 (counts as tr).
- sc into the exact center (3rd ch 1-space) of the next Large Fan.
- ch 7 (This forms the large connecting arch).
- sc into the exact center (3rd ch 1-space) of the next Large Fan.
- ch 7. Repeat across the row. You will end by placing sc in the center of the last Large Fan.
- ch 4, tr into the base of the last dc from the previous row (this secures the end).
- Turn.
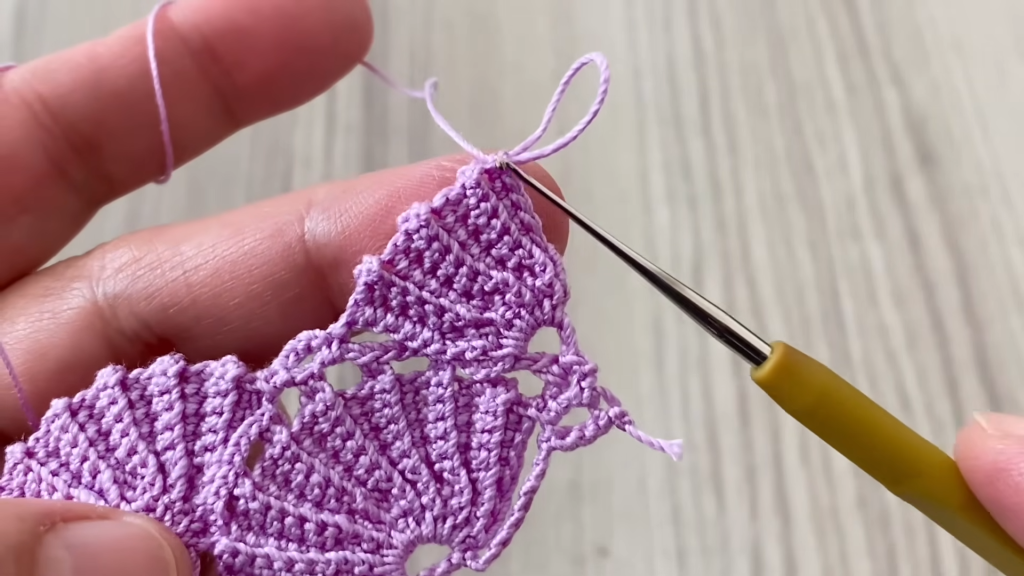
Row 3 (Building New Fans – RS): ch 3 (counts as dc). 3 dc into the space formed by the ch 4 and tr from the previous row (This builds the first half-fan for a straight side).
- Large Fan into the 4th ch of the next ch 7-space.
- Large Fan into the 4th ch of the next ch 7-space. Repeat the Large Fan in ch 7-space sequence across the row.
- End by placing 4 dc into the space formed by the ending ch 4 and tr from the previous row.
- Turn.
Continue repeating Row 2 and Row 3 until the desired length is achieved.
⚠️ Troubleshooting and Advanced Techniques
| Issue | Cause | Solution |
| Fabric ruffles/curls | Too many chains in the arch row (Row 2). | Reduce the connecting chain to ch 6 or ch 5 until it lays flat. |
| Fabric pulls/tightens | Not enough chain space, or tension is too tight. | Increase the connecting chain to ch 8 or ch 9, or use a larger hook. |
| Uneven sides | Miscounting the turning chain or end stitches. | Always confirm ch 4 is used for the start/end of Row 2. Use a stitch marker on the turning chain. |
| Joining pieces | Creating a large cloth. | Join-As-You-Go: On the final Row 3 of the second piece, replace the center ch 1 of the Large Fan with a sl st join to the center ch 1 of the corresponding Large Fan on the first piece. |
Video Tutorial:
🔨 Finishing and Legacy Blocking
Blocking is the single most important step for transforming this lace into the gorgeous textile seen in the image.
- Preparation: Weave in all loose ends using a tapestry needle. Do not trim them too close yet.
- Soak and Sizing: Submerge the piece in cool water. For a stiff heirloom finish, add a small amount of liquid starch or a traditional sugar/cornstarch sizing solution to the water. Squeeze out excess water gently—do NOT wring.
- Tension Pinning: Lay the damp lace on a blocking board or thick towel.
- Pin the straight edges first.
- Next, pin the center peak of every single fan along both edges, pulling them taut to open up the ch 7 arch spaces. Ensure the distance between the fan peaks is uniform.
- Dry: Allow the piece to dry completely (up to 48 hours if using starch).
- Trim: Once completely dry and stiff, unpin and trim all yarn ends close to the fabric.
This detailed pattern gives you all the tools to create an exquisite piece worthy of being passed down. Which of the creative uses (runner, shawl, or edging) appeals most to you for this beautiful pattern?


