
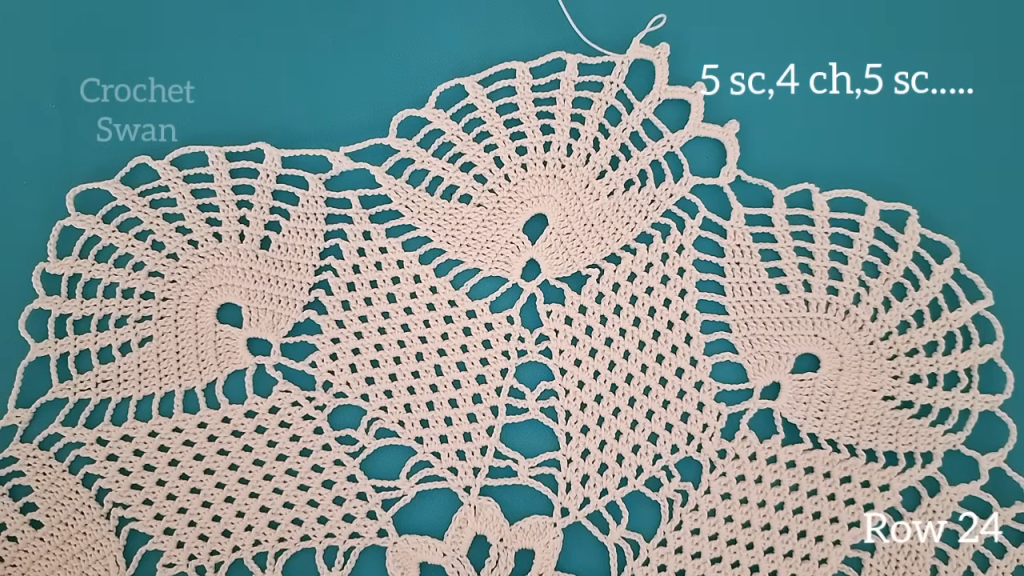
Hello, brilliant yarn enthusiasts! The fabric featured in the video possesses a gorgeous mix of texture and openwork, creating a dense yet airy finish that is highly sought after. I’ve designed the Textured Diamond Trellis Stitch to capture that essence. This pattern is worked flat and uses a simple 3-Double Crochet Cluster, combined with chain spaces, to build repeating, interlocking diamond shapes. The result is a beautifully structured, reversible fabric perfect for elegant scarves, blankets, or table runners.
This stitch uses a detailed 6-Row Repeat to create its complex look, making it a rewarding project for intermediate crocheters ready to add dimension to their work.
✨ Project Specifications
| Skill Level | Intermediate |
| Gauge | Approximately 1 pattern repeat (10 stitches) and 8 rows equal 4 inches (10 cm). Gauge should be loose enough for a nice drape. |
| Stitch Multiple | Multiple of 10 stitches, plus 5 for the foundation chain. |
| Recommended Projects | Cozy Afghans, Reversible Scarves, Textured Shawls, Place Mats. |
🧶 Materials and Preparation
A yarn with good stitch definition will best highlight the diamond cluster texture.
- Yarn: DK (Light Weight / Size 3) or Worsted (Medium Weight / Size 4) yarn. A smooth acrylic, cotton, or wool blend will show the texture clearly.
- Hook: Size H/8 (5.0 mm) or I/9 (5.5 mm) crochet hook, or one size larger than recommended on the label for a better drape.
- Notions: Tapestry needle for weaving ends, scissors.
📝 Essential Stitch Abbreviations (US Terms)
The core of this pattern is the simple cluster stitch.
- Ch: Chain
- St(s): Stitch(es)
- Sl St: Slip Stitch
- Sc: Single Crochet
- Dc: Double Crochet
- Sk: Skip
- 3-Dc Cl (3-Double Crochet Cluster): [Yarn over, insert hook into specified stitch or space, yarn over, pull up a loop, yarn over, pull through 2 loops] 3 times in the same stitch/space (4 loops remaining on hook). Yarn over and pull through all 4 loops on hook.
💎 The Textured Diamond Trellis Stitch Pattern
The beauty of this stitch is achieved through a 6-row vertical repeat that alternates between solid double crochet rows and open mesh rows containing the central cluster.
Foundation Chain
Chain a multiple of 10, plus 5 additional chains (e.g., 35, 45, 55, 65, etc., for your desired width).
Row 1 (Foundation Row – RS):
1 Dc in the 4th Ch from hook (Ch 3 counts as 1 Dc). 1 Dc in each Ch across. Ch 3 (counts as 1 Dc), turn.
(Your final stitch count will be the initial multiple of 10 + 2)
This row provides a smooth, solid edge for the pattern to begin.
The 6-Row Repeat
Row 2 (Cluster Setup – WS):
1 Dc in the first St (top of Ch 3). 1 Dc in the next 3 Sts.
Ch 2, Sk 2 Sts, 1 Dc in the next 7 Sts.
Repeat from * to * across the row until 5 Sts remain.
Ch 2, Sk 2 Sts, 1 Dc in the last 3 Sts (working the final Dc into the top of the turning Ch 3). Ch 3 (counts as 1 Dc), turn.
This row begins the mesh and establishes the points where the clusters will be placed in the next row.
Row 3 (Diamond Clusters – RS):
1 Dc in the first St (top of Ch 3).
Ch 3, Sk 2 Sts. 3-Dc Cl in the Ch-2 Sp from the previous row. Ch 3, Sk 2 Sts. 1 Dc in the next 3 Sts.
Repeat from * to * across the row until the final Ch-2 Sp remains.
Ch 3, Sk 2 Sts, 3-Dc Cl in the final Ch-2 Sp. Ch 3, Sk 2 Sts, 1 Dc in the last St (top of turning Ch 3). Ch 3 (counts as 1 Dc), turn.
The 3-Dc Cl pushes forward, creating the raised texture in the center of the open diamond.
Row 4 (Closing Mesh – WS):
1 Dc in the first St (top of Ch 3). 1 Dc in the next 2 Sts (working into the Ch-3 Sp).
Ch 1, Sk 3-Dc Cl. 3 Dc in the next Ch-3 Sp. 1 Dc in the next 3 Dc. 3 Dc in the next Ch-3 Sp.
Repeat from * to * across the row until the final 3-Dc Cl remains.
Ch 1, Sk 3-Dc Cl. 3 Dc in the last Ch-3 Sp, 1 Dc in the top of the turning Ch 3. Ch 3 (counts as 1 Dc), turn.
This row begins to close the diamond shape, providing a mostly solid surface for the next shift.
Row 5 (Solid Shift Row – RS):
1 Dc in the first St (top of Ch 3). 1 Dc in each St and Ch-1 Sp across the row. Ch 3 (counts as 1 Dc), turn.
This solid row helps define the staggered look of the diamond pattern and stabilizes the fabric.
Row 6 (Reverse Cluster Setup – WS):
1 Dc in the first 6 Sts (including the turning Ch 3).
Ch 2, Sk 2 Sts, 1 Dc in the next 7 Sts.
Repeat from * to * across the row until 8 Sts remain.
Ch 2, Sk 2 Sts, 1 Dc in the last 6 Sts. Ch 3 (counts as 1 Dc), turn.
This row is Row 2, but horizontally shifted by 5 stitches to stagger the diamond motifs.
Row 7 (Reverse Diamond Clusters – RS):
1 Dc in the first 5 Sts.
Ch 3, Sk 2 Sts. 3-Dc Cl in the Ch-2 Sp from the previous row. Ch 3, Sk 2 Sts. 1 Dc in the next 3 Sts.
Repeat from * to * across the row until the final Ch-2 Sp remains.

Ch 3, Sk 2 Sts, 3-Dc Cl in the final Ch-2 Sp. Ch 3, Sk 2 Sts, 1 Dc in the last 6 Sts. Ch 3 (counts as 1 Dc), turn.
This is Row 3, with the cluster placement shifted.
Row 8 (Reverse Closing Mesh – WS):
1 Dc in the first 5 Sts. 3 Dc in the next Ch-3 Sp.
Ch 1, Sk 3-Dc Cl. 3 Dc in the next Ch-3 Sp. 1 Dc in the next 3 Sts. 3 Dc in the next Ch-3 Sp.
Repeat from * to * across the row until the final Ch-3 Sp remains.
Ch 1, Sk 3-Dc Cl. 3 Dc in the last Ch-3 Sp. 1 Dc in the last 6 Sts. Ch 3 (counts as 1 Dc), turn.
This row is Row 4, completing the reversed diamond shape.
To Continue: Repeat Rows 5-8 until your project reaches the desired length. (Note: The complete vertical repeat is Rows 5-8, as Row 5 is the foundation of the second diamond set).
💡 Tips for Crafting Excellence
- The 3-Dc Cluster: Practice the cluster to ensure all four loops are closed simultaneously for a neat, raised ‘pop’. A tight cluster will stand out beautifully against the open chain work.
- Finding Placement: In Row 4 and Row 8, when working the Dc stitches to close the mesh, ensure you work 3 Dc into the Ch-3 Sp and 1 Dc into each Dc below. Counting is key to maintaining the shape.
- Reversibility: This stitch is fully reversible. The clusters create a textured diamond on both sides, though the definition may vary slightly depending on whether you are viewing the RS or WS.
- Tension: For the chain spaces (Ch 2 and Ch 3), keep your tension slightly looser than your DC tension to allow the fabric to spread and prevent puckering.
Video Tutorial:
🛁 Finishing and Care
- Final Row: To finish your piece, end after a Row 5 repeat (a solid DC row). Fasten off, leaving a long tail for weaving.
- Weave In Ends: Use your tapestry needle to carefully weave in all yarn tails. Because the stitch has solid Dc areas, weave the tails securely within those sections.
- Blocking: Blocking is highly recommended to open up the chain spaces and fully define the diamond shape.
- Method: Wet block or steam block your piece. Gently pin the edges firmly to a blocking mat, ensuring the sides are straight and the diamonds are stretched slightly open.
- Time: Allow the piece to dry completely before unpinning.
Enjoy the elegant structure and beautiful texture of your new Textured Diamond Trellis Stitch project!


