
Hello, wonderful members of the crafting world! The square motif showcased in the video is a beautiful demonstration of texture and dimension, featuring a deeply ridged center that radiates outwards. I have translated this intricate look into the Sunburst Square motif. This design uses clever combinations of post stitches and treble crochets to create a thick, sturdy, and highly textural square, perfect for cozy afghans, warm cushion covers, or durable bags.
This pattern is worked in the round and relies heavily on mastering front and back post stitches to create its signature 3D sunburst effect, making it an excellent project for intermediate to advanced crocheters.
✨ Project At a Glance
| Skill Level | Advanced Intermediate |
| Finished Size | Approximately 5.5 x 5.5 inches (14 x 14 cm) after blocking (using recommended materials) |
| Construction | Worked in the round from the center out |
| Stitches Used | Double Crochet, Treble Crochet, Front Post Treble Crochet |
| Project Ideas | Afghans, Throws, Cushion Covers, Bags. |
🧶 Materials and Preparation
Due to its density and high texture, a smooth yarn is best to allow the ridges to stand out crisply.
- Yarn: Worsted (Medium Weight / Size 4) yarn. A smooth acrylic or wool blend is ideal. Using two contrasting colors (Color A for the center, Color B for the frame) will really emphasize the sunburst effect, but a solid color works beautifully too.
- Color A (Center/Starburst): Approx. 15 yards
- Color B (Frame/Squaring): Approx. 15 yards
- Hook: Size H/8 (5.0 mm) or I/9 (5.5 mm) crochet hook, or size needed to obtain gauge.
- Notions: Yarn needle for weaving in ends, scissors, stitch markers (optional, for corner Ch-2 Sps).
📝 Essential Stitch Abbreviations (US Terms)
The use of Treble Crochet (Tr) and Front Post Treble Crochet (FpTr) gives this motif its height and texture.
- Ch: Chain
- St(s): Stitch(es)
- Sl St: Slip Stitch
- Dc: Double Crochet
- Tr: Treble Crochet (Yarn over twice)
- FpTr (Front Post Treble Crochet): Yarn over twice, insert hook from front to back around the post of the specified stitch, yarn over, pull up a loop, [yarn over, pull through 2 loops] 3 times. (Pushes the stitch forward, creating the sun rays)
- BpTr (Back Post Treble Crochet): Yarn over twice, insert hook from back to front around the post of the specified stitch, yarn over, pull up a loop, [yarn over, pull through 2 loops] 3 times. (Pushes the stitch backward, creating the recessed frame)
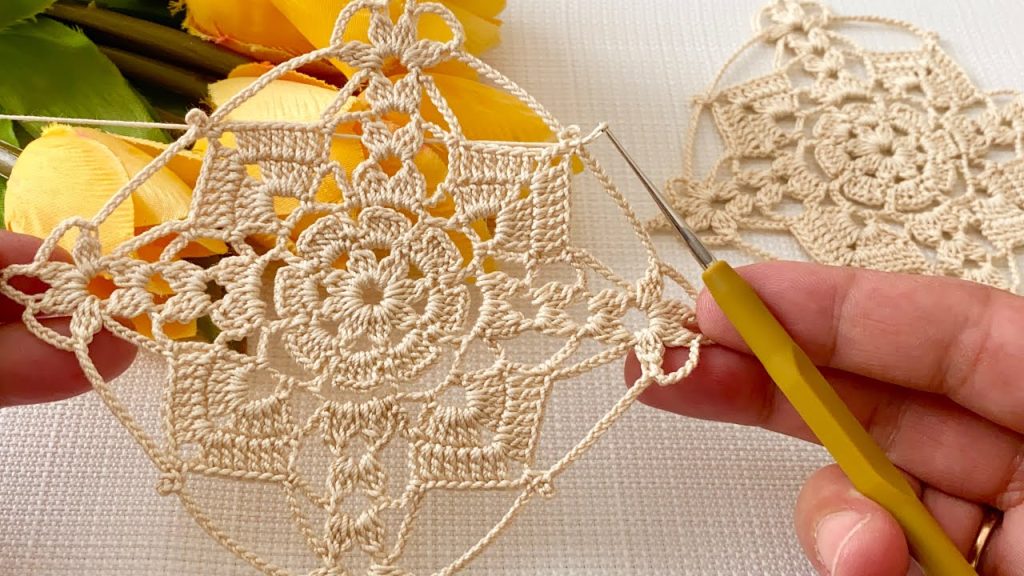
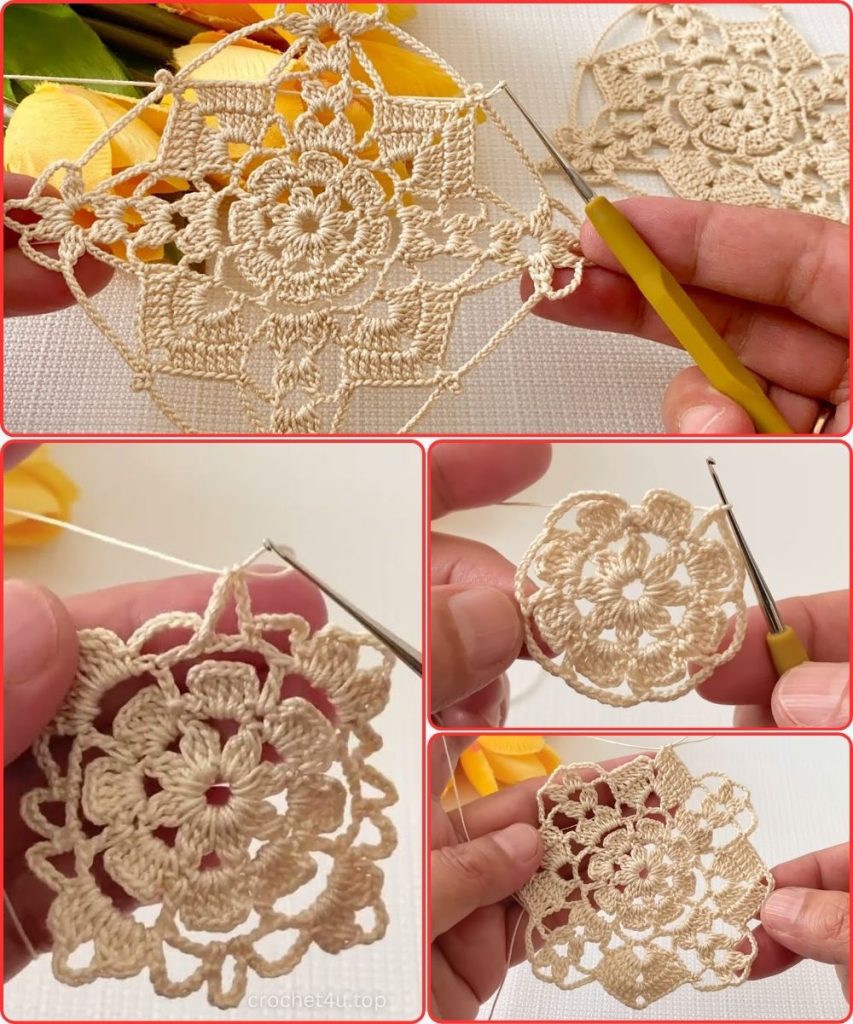
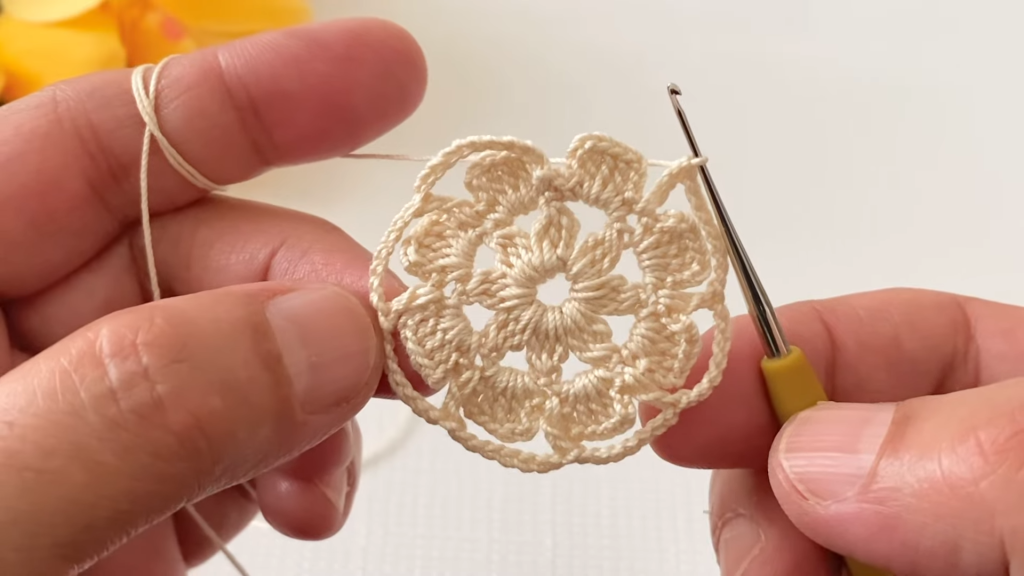
☀️ The Sunburst Square Pattern
The square is worked in 8 rounds, starting with the dense, circular center and transitioning to a squared border.

Center Starburst (Color A)
Start: Using Color A.
Make a Magic Ring (or Ch 4, Sl St to first Ch to form a ring).
Round 1: Initial Spikes
Ch 4 (counts as 1 Tr), work 15 Tr into the ring. Join with a Sl St to the top of the beginning Ch 4. (16 Tr)
Gently pull the tail of the magic ring to tighten the center.
Round 2: Defining the Rays
Ch 1 (does not count as a St). 1 Sc in the first St.
Ch 3, Sk 1 St, 1 Sc in the next St.
Repeat from * to * 7 more times. After the final Ch 3, join with a Sl St to the first Sc. (8 Sc, 8 Ch-3 Sps)
These chain loops create the anchor points for the next layer of texture.
Round 3: Raised Treble Layer
Sl St into the first Ch-3 Sp.
Ch 4 (counts as 1 Tr). Work 3 Tr into the same Ch-3 Sp.
Ch 1, Sk Sc. Work 4 Tr into the next Ch-3 Sp.
Repeat from * to * 6 more times. Ch 1, join with a Sl St to the top of the beginning Ch 4. (8 x 4-Tr groups, 8 Ch-1 Sps)
Round 4: Creating the Starburst Ridge
Ch 1 (does not count as a St).
- FpTr around the next 4 posts (the group of 4 Tr from the previous round).In the next Ch-1 Sp, work (1 Dc, Ch 1, 1 Dc).Repeat from * to * 7 more times. Join with a Sl St to the first FpTr. (8 FpTr groups, 8 Dc pairs, 8 Ch-1 Sps)Fasten off Color A.This row defines the radiating, 3D texture that makes up the sunburst center.
Squaring Frame (Color B)
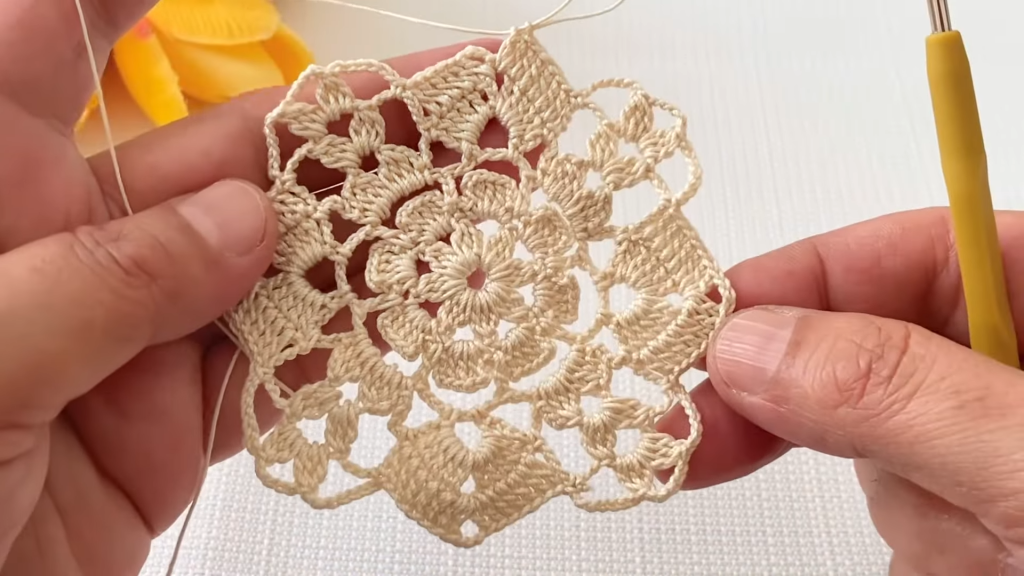
Round 5: First Squaring Row
Join Color B with a Sl St into the central Ch-1 Sp of any side.
Ch 3 (counts as 1 Dc). Work 2 Dc in the same Ch-1 Sp. (3 Dc in the side center).
- Side: 1 BpTr around the next 2 FpTr, 1 Tr in the next 2 FpTr.
- Corner: In the next Ch-1 Sp, work (3 Tr, Ch 2, 3 Tr) (Corner made).
- Side: 1 Tr in the next 2 FpTr, 1 BpTr around the next 2 FpTr.
- Middle: In the next Ch-1 Sp, work 3 Dc.*Repeat from * to * 3 more times for the remaining sides. Join with a Sl St to the top of the beginning Ch 3. (4 Corners, 72 Sts total)The corners are introduced with Treble Crochet to match the height of the FpTrs.
Round 6: Defining the Square
Ch 3 (counts as 1 Dc). 1 Dc in each of the next 2 Dc.
- Corner: In the corner Ch-2 Sp, work (2 Dc, Ch 2, 2 Dc) (Corner made).
- Side: 1 Dc in the next 3 Tr, 1 FpTr around the next 2 BpTr (pushes the frame forward). 1 Dc in the next 2 Tr, 1 Dc in the next 3 Dc (the center of the side).*Repeat from * to * 3 more times for the remaining sides. 1 Dc in the remaining Sts. Join with a Sl St to the top of the beginning Ch 3. (88 Sts total, 4 Ch-2 Sps)
Round 7: Final Post Stitch Frame
Ch 3 (counts as 1 Dc). 1 Dc in each Dc across the side until the corner Ch-2 Sp.
- Corner: In the corner Ch-2 Sp, work (2 Dc, Ch 2, 2 Dc) (Corner made).
- Side: Work 1 BpTr around each Dc from the previous round across the side, skipping over the corner Dc/BpTr. (This creates a continuous, textured edge).*Repeat from * to * 3 more times for the remaining sides. Join with a Sl St to the top of the beginning Ch 3. (104 Sts total, 4 Ch-2 Sps)This BpTr row creates a deep, firm border, securing the final shape.

Round 8: Neatening Edge
Ch 1 (does not count as a St). 1 Sc in the first St. 1 Sc in each BpTr across the side until the corner Ch-2 Sp.
In the corner Ch-2 Sp, work (1 Sc, Ch 1, 1 Sc) (Corner made).
Repeat from * to * 3 more times. 1 Sc in the remaining Sts. Join with a Sl St to the first Sc.
Fasten off Color B.
🤝 Joining Your Motifs
- Seaming Method: Since this square is thick and textured, the Single Crochet Join worked through the back loops of the final Sc row (Round 8) will create the most robust and attractive seam. Alternatively, the Whipstitch is quick and reliable.
- Alignment: Always join corner-to-corner using the Ch-1 space from the final row, ensuring you have the same number of single crochet stitches along the entire joining side.
Video Tutorial:
🛁 Finishing and Care
- Weaving Ends: Securely weave in all yarn tails on the back side of the work using your yarn needle. The thickness of the square makes hiding ends easy, particularly within the post stitch sections.
- Blocking (Highly Recommended): Blocking is crucial for flattening the dense texture and ensuring the square is perfectly square, which is vital for joining.
- Method: Wet block or steam block the motifs. Gently stretch and pin the square to a blocking mat, ensuring the corners are pulled tightly to a 90-degree angle. Press lightly to flatten the background stitches, but allow the FpTr ridges to retain their height.
- Drying: Allow the pieces to dry completely before unpinning.
Enjoy the luxurious texture and impressive structure of your new Sunburst Square project!


