
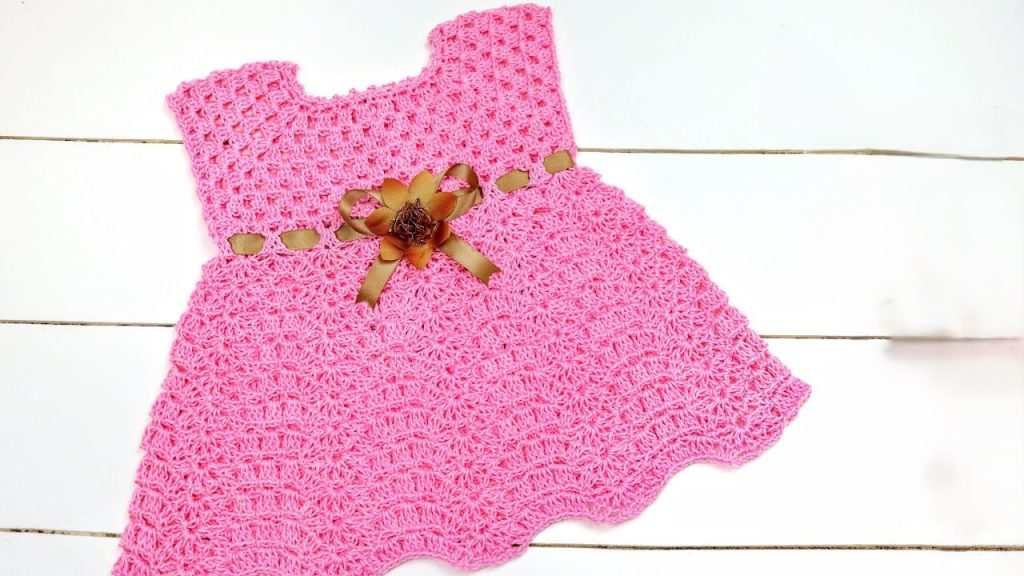
Hello, lovely makers! Are you ready to crochet a dress that’s as sweet as candy? The Bubblegum Blossom Dress features a beautiful, repeating Dense Shell Stitch that provides a lovely texture and drape throughout. The simple cap sleeves and integrated belt loops (perfect for that ribbon accent!) make this a wonderful project for creating a quick yet elegant garment.
This pattern is written for an Intermediate crocheter who is comfortable with increasing within a stitch pattern. The payoff is a beautifully textured dress that will be adored!
🛍️ Section 1: Materials & Gauge
🧶 Supplies You’ll Need
- Yarn: Approximately 350 – 450 yards of DK weight (Category 3) yarn. The sample uses a vibrant, solid pink. A cotton or acrylic blend works well for baby clothes.
- Hook: 4.0 mm (G/6) crochet hook, or size needed to obtain gauge.
- Buttons: 3 small buttons (approx. 0.5 inches / 1.25 cm) for the back neck closure.
- Ribbon: About 1 yard (1 meter) of 1/2 inch wide ribbon for the waist belt and bow.
- Tools: Stitch markers (for the yoke corners!), a tapestry needle, and scissors.
📏 Gauge Check
Work in Double Crochet (DC): 16 DC and 8 rows = 4 inches (10 cm).
- Your yoke sizing depends on this, so check your swatch carefully!
📝 Key Abbreviations
| Abbreviation | Meaning | Abbreviation | Meaning | |
| Ch | Chain | Dc | Double Crochet | |
| Sl St | Slip Stitch | V-st | V-Stitch (Dc, Ch 1, Dc in the same space) | |
| Sc | Single Crochet | Shell | 5 Dc in the same stitch/space | |
| Hdc | Half Double Crochet | Dc Cl | Dc Cluster (3 Dc in space) | |
| Sk | Skip | Sp | Space |
Export to Sheets
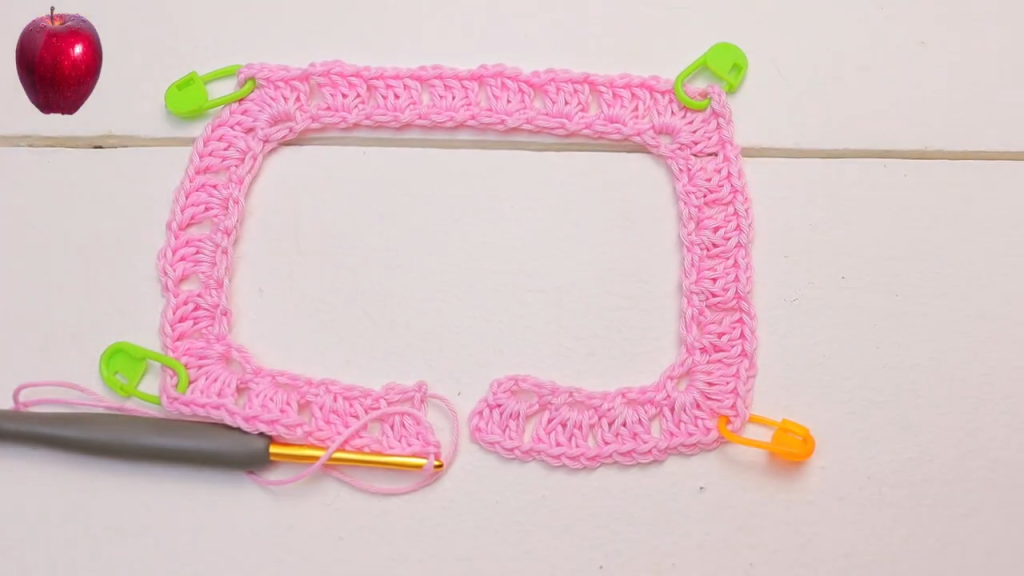
🌸 Section 2: The Yoke (Top & Sleeves)
The yoke is worked flat in rows to create the back opening. This size is for 6-12 months.

Foundation & Initial Rows
Row 1 (Foundation): Ch 76. Dc in the 4th Ch from the hook and in each Ch across. (74 Dc). Ch 3 (counts as 1st Dc throughout), turn.
Yoke Shaping & Division
We will divide the 74 stitches for the yoke corners. Use stitch markers to mark your corner points.
- 12 sts (Back Right) | 1 st (Corner)
- 12 sts (Sleeve Right) | 1 st (Corner)
- 24 sts (Front) | 1 st (Corner)
- 12 sts (Sleeve Left) | 1 st (Corner)
- 12 sts (Back Left) (Total: 12+1+12+1+24+1+12+1+12=76 st. We use 4 corner sts from the total count.)
Row 2: Dc in the first 12 sts. (Dc, Ch 2, Dc) in the next st (corner). Dc in the next 12 sts. (Dc, Ch 2, Dc) in the next st (corner). Dc in the next 24 sts. (Dc, Ch 2, Dc) in the next st (corner). Dc in the next 12 sts. (Dc, Ch 2, Dc) in the next st (corner). Dc in the last 12 sts. Ch 3, turn. (82 Dc + 4 Ch-2 sps).
Row 3: Dc in each Dc to the first Ch-2 corner sp. (Dc, Ch 2, Dc) in the Ch-2 sp. Rep this pattern around. Ch 3, turn. (90 Dc + 4 Ch-2 sps).
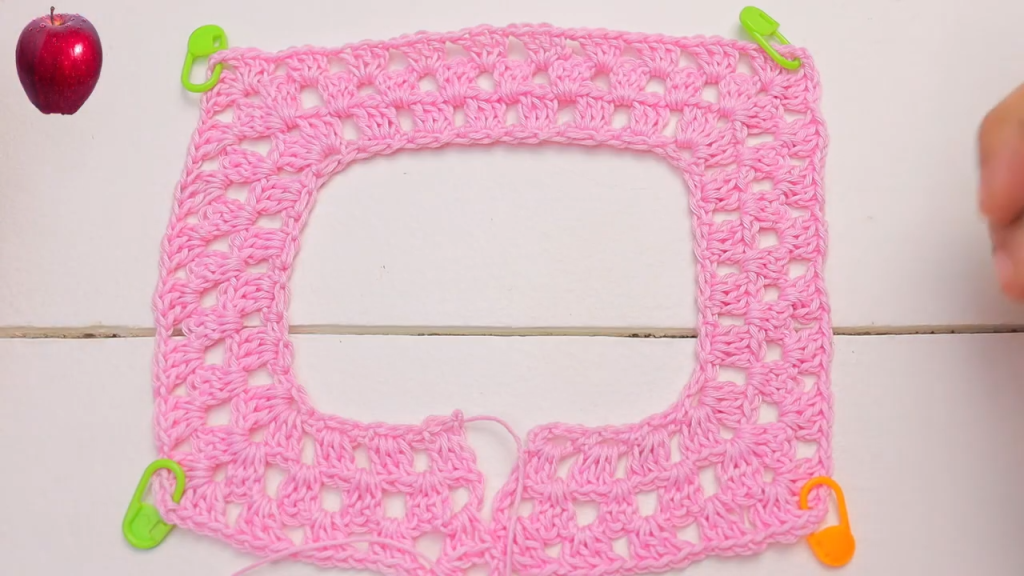
Integrating the Shell Stitch
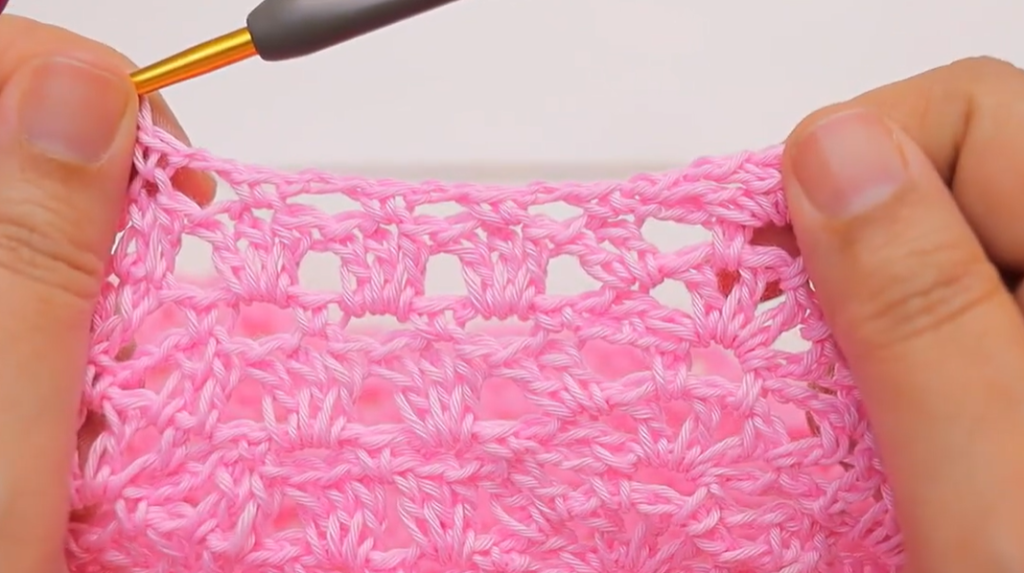
Row 4 (Shell Row): Dc in the first st. Sk 2 sts, 5 Dc Shell in the next st. Rep until the Ch-2 sp. Work (5 Dc Shell, Ch 1, 5 Dc Shell) into the corner Ch-2 sp (This is your increase corner). Continue the shell pattern across the panel, placing (5 Dc Shell, Ch 1, 5 Dc Shell) in the remaining three corner spaces. End with a Dc in the last st (the top of the Ch 3). Ch 3, turn. (Increases shell count by 8).
Row 5 (Solid Row): Dc in each Dc, working 1 Dc into the Ch-1 sp of each corner. Ch 3, turn. (This converts the shell row back to a base for the next row of shells.)
Row 6: Rep Row 4.
Row 7: Rep Row 5.
Continue alternating Rows 4 and 5 until the yoke measures approximately 5-5.5 inches (12.5-14 cm) from the top.
Joining for Armholes
- Next Row (Armhole Row – Shells): Work the shell pattern across the first Back Panel. When you reach the first corner Ch-1 sp, work a 5 Dc Shell into the corner sp. Ch 2 (underarm chain). Sk all stitches across the Sleeve Panel up to the next corner Ch-1 sp. Work a 5 Dc Shell into that corner Ch-1 sp. Continue the shell pattern across the Front Panel. Repeat the Ch 2, Sk Sleeve step for the second armhole. Work the shell pattern across the last Back Panel. Join with Sl St to the beg Ch 3 to form a circle. FO.
🌼 Section 3: The Skirt (Ribbon & Shells)
The skirt is worked in the round in the established shell pattern, continuing the texture seamlessly.
Ribbon Row & Shell Start
- Round 1 (Ribbon/Solid Row): Join yarn in any st. Ch 3 (counts as 1st Dc). Dc in each Dc and Ch of the Ch-2 sps around. (110-130 Dc total, depending on yoke size). Join with Sl St to top of Ch 3.
- Round 2 (Belt Loop Row): Ch 3 (counts as 1st Dc). Dc in the next 2 sts. (Ch 1, Sk 1 st. Dc in the next 3 sts). Rep from the parentheses around, ending with Ch 1, Sk 1 st. Join with Sl St to top of Ch 3. (This creates the small loops for the ribbon to be woven through).
Shell Skirt Repeats
- Round 3 (Shell Setup): Ch 3 (counts as 1st Dc), 2 Dc in the Ch-1 sp. Sk 2 sts, Sc in the next st. Sk 2 sts, 5 Dc Shell in the next Ch-1 sp. Rep from the parentheses around. End with Sk 2 sts, Sc in the last st. Work 2 Dc in the beg Ch-1 sp. Join with Sl St to top of Ch 3. (A multiple of 5 shells).
- Round 4 (Solid Row): Ch 3. Dc in the next 2 Dc, Dc in the Sc, Dc in the next 2 Dc. Rep this pattern around. Join with Sl St to top of Ch 3. (This is your increase row, as you convert the Shell/Sc back to a DC base, naturally widening the skirt).
- Round 5 (Shell Row): Ch 3, Dc in the next 2 sts. Sk 2 sts, 5 Dc Shell in the next st. Rep from the parentheses around. Sk 2 sts, Dc in the last st. Join with Sl St to top of Ch 3.
- Continue repeating Rounds 4 and 5 until the skirt reaches the desired length, approximately 8-10 inches (20-25 cm) from the ribbon row. The increase from the Shell-to-DC conversion will give the skirt its perfect flare.
Final Scallop Hem
- Final Round: End on a Shell Row (Round 5). FO. The alternating shells and skips naturally create the wavy scalloped edge.
Video Tutorial:
✨ Section 4: Finishing Touches
🎀 Ribbon Belt & Embellishment
- Weave Ribbon: Using the tapestry needle, carefully weave the ribbon through the Ch-1 spaces of the Ribbon/Solid Row (Round 2 of the Skirt).
- Tie: Tie the ribbon into a bow at the center front.
- Attach Flower: Securely stitch the decorative flower (crocheted or purchased, as shown in the image) over the center knot of the ribbon. Use the beads on the flower for extra stability if you like.
✂️ Edging & Closure
- Neckline & Back Slit: Join yarn at the bottom of the back opening. Ch 1, Sc evenly up the edge, around the entire neckline, and back down the other side of the slit. FO.
- Sleeve Edging: Join yarn at the center bottom of the armhole. Ch 1, Sc evenly around the edge. FO. Repeat for the second sleeve.
- Button Closure:
- Button Band: Use one side of the back slit. Sc evenly up the edge.
- Buttonhole Band: Use the opposite side. Work one row of Sc. In the next row, create the 3 buttonholes (Ch 1, Sk 1 st) evenly spaced. FO.
- Sew Buttons: Sew the 3 buttons onto the solid button band.
💖 Final Assembly
- Weave in all loose yarn ends securely.
Your beautiful Bubblegum Blossom Dress is complete! This stunning piece is ready for its little fashionista.


