
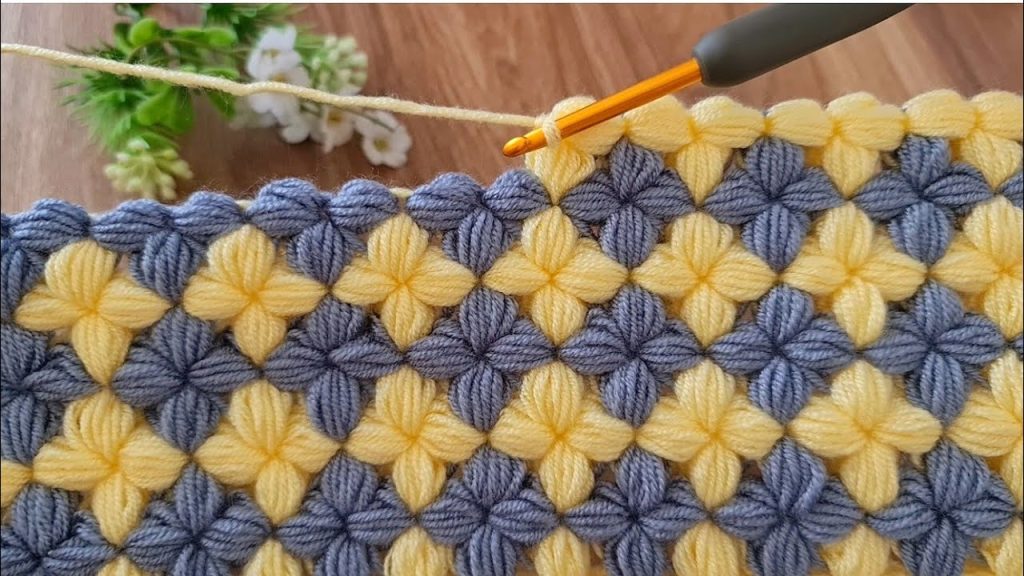
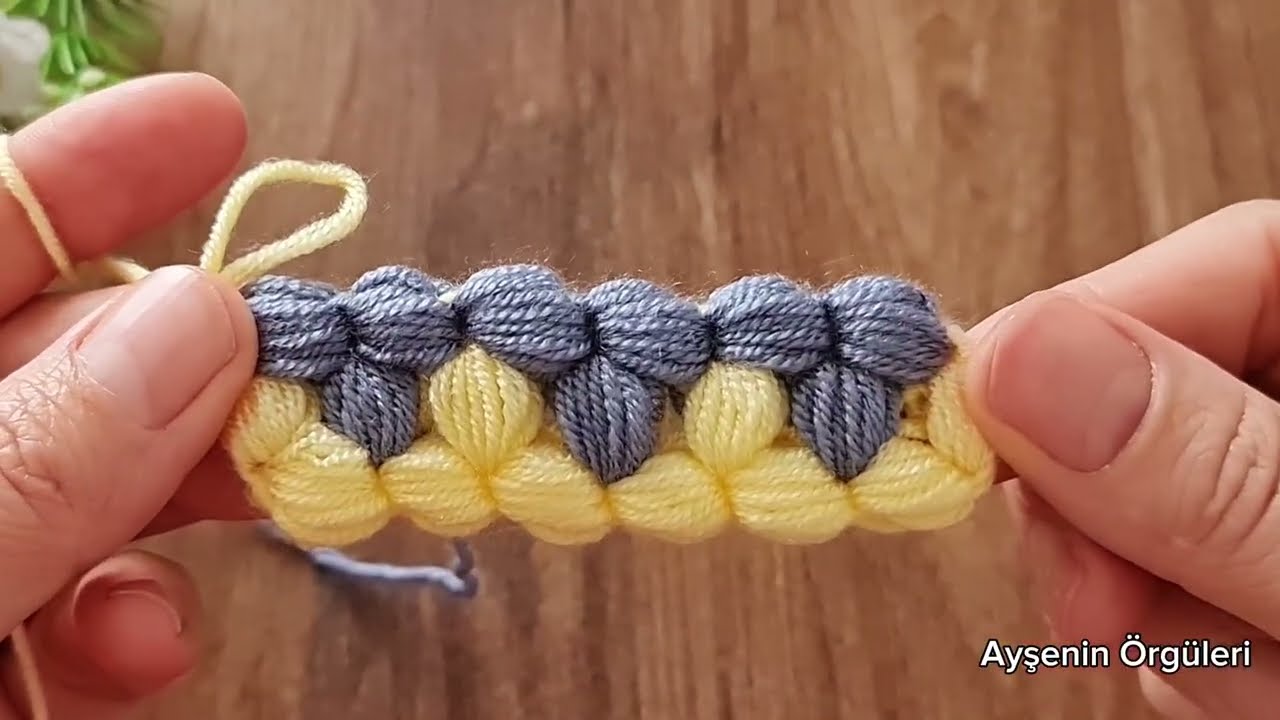
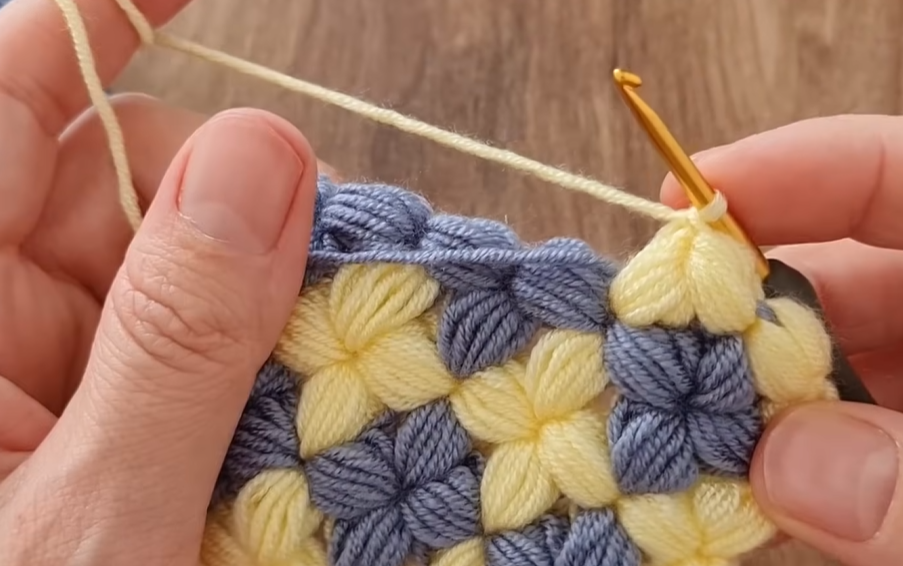
Welcome, texture enthusiasts! If you love dimensional crochet and vibrant colorwork, you are in for a treat. Today, we’re diving into the Diamond Puff Stitch, a gorgeous, two-color pattern that creates interlocking, puffy “flowers” or diamonds, just like the beautiful fabric you see in the image.
This stitch is fantastic for cozy blankets, thick scarves, and robust cushion covers. It requires a bit of counting and careful color changes, but the resulting fabric is worth every moment of effort!
🛍️ Materials & Setup
Choosing Your Tools
- Yarn: You will need two contrasting colors of yarn. A Worsted Weight (Aran/10-ply) or Bulky Weight (12-ply) is recommended to maximize the puffiness.
- Color A (CA): The dominant color that forms the diamond outline (Dark Blue/Gray in the photo).
- Color B (CB): The accent color that forms the center of the flowers (Yellow in the photo).
- Hook: A crochet hook size appropriate for your yarn. A 5.5 mm (I-9 US) or 6.0 mm (J-10 US) hook works well for worsted weight to accommodate the puff stitches.
- Notions: Scissors and a tapestry needle. You will need a way to track your row count, as this pattern repeats over four rows.
Gauge and Multiple
- Pattern Multiple: This pattern is worked over a multiple of 4 stitches, plus 3 for the foundation chain.
- Example Chain (for a swatch): Ch 27 (4 x 6 = 24, plus 3 = 27).
📌 Stitch Abbreviations & Technical Definitions (US Terms)
Standard Abbreviations
- ch: Chain
- st(s): Stitch(es)
- sk: Skip
- sc: Single Crochet
- dc: Double Crochet
- sl st: Slip Stitch
- CA: Color A (Dark Blue/Gray)
- CB: Color B (Yellow)
- FO: Fasten Off
The Key Stitch: Puff Stitch (PS)
The PS is the heart of this pattern. It’s a cluster of half-double crochet (hdc) loops worked into the same stitch before being pulled through.
Puff Stitch (PS) Definition:
- Yarn Over (YO).
- Insert hook into the designated stitch/space.
- YO and pull up a loop (3 loops on hook).
- YO, insert hook into the same stitch/space.
- YO and pull up a loop (5 loops on hook).
- Repeat steps 4 and 5 one more time (7 loops on hook).
- YO and pull through all 7 loops on the hook.
- Ch 1 to close the puff stitch (this ch-1 often counts as the top of the stitch).
🎨 Phase 1: Establishing the Foundation (Color A)
The foundation sets up the grid for the puffy diamonds.

Row 1 (CA): Foundation Single Crochet
- Using CA, Ch the required number (a multiple of 4, plus 3).
- Sc into the 2nd ch from the hook and in every ch across.
- Ch 1 (does not count as a stitch). Turn.
Row 2 (CA): Foundation Sc & Ch-1 Spaces
This row creates the base for the first row of accent-colored puffs.
- Using CA, sc into the first st.
- *Ch 1, sk 1 st, sc into the next st.*
- Repeat from * to * across the row. You should end with a sc in the last st.
- Before finishing the last sc, change to CB. Insert hook into the last st, YO with CA, pull through 2 loops (2 loops on hook). Drop CA, YO with CB, pull through the last 2 loops to complete the sc.
- Ch 3 (counts as first dc). Turn.
🌸 Phase 2: The Puff Row (Color B)
The first row of puff stitches forms the initial set of half-flowers along the top edge and full flowers in the middle.
Row 3 (CB): The Half and Full Flowers
- Using CB, dc into the first ch-1 space of Row 2 (this creates a V-shape with the starting Ch 3).
- Ch 1.
- PS into the next ch-1 space. Ch 1. (This forms the center of the first full flower).
- *PS into the next ch-1 space. Ch 1. PS into the next ch-1 space. Ch 1.*
- Repeat from * to * across the row.
- You will end with one ch-1 space remaining before the last sc of Row 2.
- PS into that final ch-1 space. Ch 1.
- Dc into the last sc (the first sc of Row 2).
- Before finishing the last dc, change back to CA. Insert hook into the last st, YO with CB, pull through 2 loops (2 loops on hook). Drop CB, YO with CA, pull through the last 2 loops to complete the dc.
- Ch 1 (does not count as a stitch). Turn.
🧐 Detailed Tip: In this pattern, the puff stitches themselves are never worked directly next to each other; they are always separated by a ch-1 space, which is where the joining scs will go in the next row.
💠 Phase 3: The Joining & Shifting Row (Color A)
This row uses CA to join the puff stitches together and set up the foundation for the next row of contrasting color puffs, which will be offset (staggered).
Row 4 (CA): The Diamond Grid
- Using CA, sc into the first dc.
- Sc into the ch-1 space before the first PS.
- *Ch 1, sk the PS.
- Sc into the ch-1 space after the PS.
- Sc into the ch-1 space before the next PS.*
- Repeat from * to * across the row.
- End by working sc into the last ch-1 space and sc into the 3rd ch of the starting Ch 3 from Row 3.
- Ch 3 (counts as first dc). Turn.
💖 Phase 4: The Staggered Repeat (Color A & B)
To get the beautiful interlocking diamond look, you now repeat the pattern, shifting the puff stitches over by two stitches (one ch-1 space).

Row 5 (CA): Setting Up the Staggered Puffs
This is essentially a repeat of Row 2, but you need to offset the first ch-1 space.
- Using CA, dc into the first st (this creates a dc-dc grouping at the edge).
- *Ch 1, sk 1 st, sc into the next st.*
- Repeat from * to * across the row.
- You should end with a sc in the last st.
- Before finishing the last sc, change to CB.
- Ch 3 (counts as first dc). Turn.
Row 6 (CB): The Staggered Full Flowers
This row starts and ends with a full puff flower, centering the yellow diamonds in the negative space of the previous row.
- Using CB, PS into the first ch-1 space. Ch 1.
- *PS into the next ch-1 space. Ch 1. PS into the next ch-1 space. Ch 1.*
- Repeat from * to * across the row.
- You will end with one ch-1 space remaining before the last st.
- PS into that final ch-1 space. Ch 1.
- Dc into the last sc.
- Before finishing the last dc, change back to CA.
- Ch 1 (does not count as a stitch). Turn.
Row 7 (CA): The Staggered Grid
This is essentially a repeat of Row 4.
- Using CA, sc into the first dc.
- *Sc into the ch-1 space before the PS.
- Ch 1, sk the PS.
- Sc into the ch-1 space after the PS.*
- Repeat from * to * across the row.
- End by working sc into the last ch-1 space and sc into the 3rd ch of the starting Ch 3 from Row 6.
- Ch 3 (counts as first dc). Turn.
🧵 The Complete Pattern Repeat
To continue this beautiful texture, you will repeat the four key rows:
- Repeat Row A: Repeat Row 2 (CA: Sc and Ch-1 spaces).
- Repeat Row B: Repeat Row 3 (CB: Half and Full Flowers).
- Repeat Row C: Repeat Row 4 (CA: Joining Grid).
- Repeat Row D: Repeat Row 5 (CA: Sc and Ch-1 spaces, staggered).
- Repeat Row E: Repeat Row 6 (CB: Staggered Full Flowers).
- Repeat Row F: Repeat Row 7 (CA: Joining Grid, staggered).
The full sequence is: Rows 2-7, then repeat Rows 4-7 for the remainder of the project.
Video Tutorial:
✂️ Finishing Touches
Securing the Yarn
- Carrying Yarn: For small projects, you can carry the non-working color loosely up the edge of the fabric. Since the fabric is thick, this edge will be mostly hidden in a border.
- Cutting Yarn: For larger projects (like blankets), you may want to cut the yarn after each color change row and weave in the ends later.
The Final Edge
The final row of the pattern will be a Joining Grid row (CA). To create a crisp, finished edge, simply add one more row using CA:
- Final Row: Ch 1, sc into every stitch and ch-1 space across the entire row. Fasten off.
This Diamond Puff Stitch creates a thick, cozy, and luxurious fabric that is a true work of art. Enjoy your beautiful new project!


