
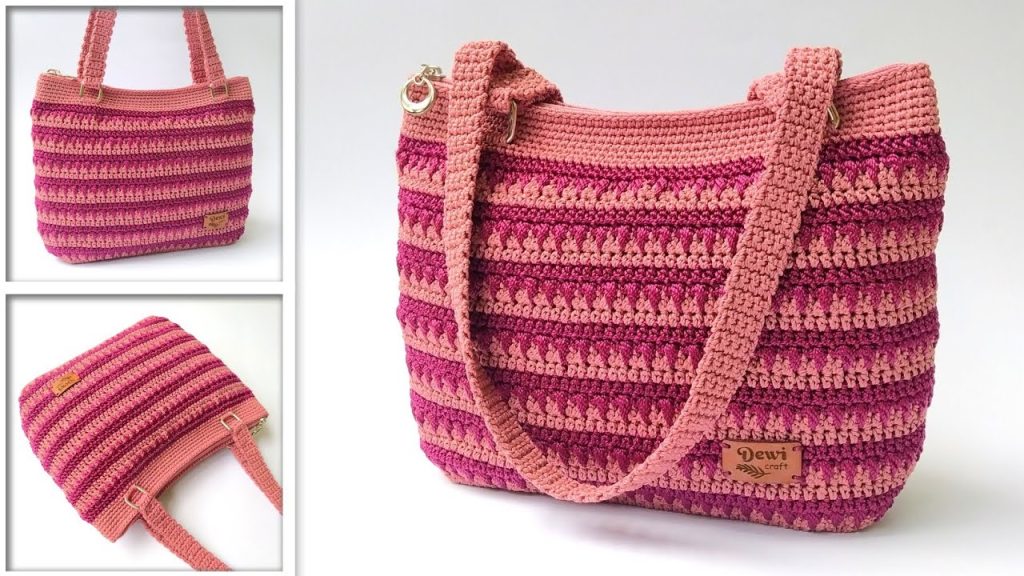
💖 Introduction: Elevate Your Style with the “Modern Wave” Crochet Bag!
Welcome, fellow yarn enthusiasts! Are you ready to dive into a project that combines classic texture with a sleek, contemporary design? Inspired by the stunning “TAS RAJUT TERBARU MODEL MODERN” from SANG DEWI CRAFT, we’ve broken down this gorgeous bag into a detailed, step-by-step pattern that is perfect for intermediate crocheters looking to create a durable, fashionable accessory.
This tote features a solid, stable base, a beautifully textured body created by alternating rows of half-double crochet and a unique spike-stitch variation, and sturdy straps attached with elegant square rings. The pattern is designed to be highly customizable—feel free to experiment with vibrant color combinations to make a statement piece that is uniquely yours! This comprehensive guide will ensure you have all the details you need to successfully crochet a bag with the final dimensions of approximately 31 cm (length) x 21 cm (height), weighing around 340 grams. Let’s get hooking!
🧶 Materials & Tools
To create this robust and stylish bag, you will need the following:
- Hook: Crochet Hook size 4.0 mm (or size needed to achieve firm tension).
- Yarn: Durable yarn is recommended for bags. The original design uses Nylon yarn, but any medium-weight (Aran/Worsted, US 4) bag-friendly yarn like cotton, rope, or high-quality polyester cord will work beautifully.
- Color A (Main Color): Approximately 250-300 grams.
- Color B (Contrast Color): Approximately 50-100 grams.
- Notions:
- Scissors
- Yarn Needle for weaving in ends
- Stitch Markers
- 4 x Square Metal Rings (approx. 2 cm in size)
- Optional: Fabric lining and a zipper (as mentioned in the original tutorial for a finished look).
📝 Key Abbreviations
Before starting, familiarize yourself with these standard U.S. crochet terms:
| Abbreviation | U.S. Terminology |
| ch | Chain |
| sl st | Slip Stitch |
| sc | Single Crochet |
| hdc | Half Double Crochet |
| st(s) | Stitch(es) |
| rep | Repeat |
| RS | Right Side |
| WS | Wrong Side |
👜 Pattern: The Foundation Base (Alas)
The base is worked in back-and-forth rows to create a firm, flat rectangle before being edged and worked in the round. The finished size is approximately 22 cm (length) x 8 cm (width).
Initial Chain:
Using Color A, make a slip knot and ch 45.
Row 1 (Foundation Row – RS):
Ch 1 (does not count as a st), turn. Sc into the 2nd ch from the hook. Sc in each ch across. (45 sc).
Row 2:
Ch 1, turn. Sc in the first st and in each st across. (45 sc).
Rows 3 – 16:
Repeat Row 2 until you have completed a total of 16 rows.
Edging (Creating the Round):
After Row 16, do not turn. You will now single crochet around the entire perimeter of the rectangle.
- First Corner: Work 2 sc into the very last stitch of Row 16 (this is your first corner increase).
- Long Side: Working down the side edge (the rows), sc evenly along the edge. Place 1 sc per row end. (16 sc total on this side).
- Second Corner: Work 2 sc into the next corner space (the end of the initial chain).
- Bottom Edge: Sc across the bottom of the initial chain stitches. (45 sc).
- Third Corner: Work 2 sc into the next corner space.
- Second Long Side: Sc evenly along the other side edge, placing 1 sc per row end. (16 sc total on this side).
- Fourth Corner: Work 2 sc into the final corner space.
- Top Edge Completion: Sc across the remaining stitches of the top edge to meet the starting st.
- Join: Sl st to the first sc of the round.
Crucial Check: Before proceeding, count your total stitches. The motif for the body is a multiple of 2, so ensure your final stitch count for the base is an even number. Adjust the corner increases if needed, but the recommended pattern should result in an even count.
✨ Pattern: The Modern Body Motif
The bag body is worked in continuous rounds using a two-color striping sequence.

Color A Rounds (Half Double Crochet)
Round 1 (Transition Round):
Ch 1 (does not count as a st). Hdc in the same st and in each st around. Sl st to the first hdc to join.
Round 2:
Ch 1. Hdc in the same st and in each st around. Sl st to the first hdc to join.
Fasten off Color A.
Color B Rounds (Motif Sequence)
Round 3 (Single Crochet Setup):
Join Color B in the same st where you finished Round 2. Ch 1. Sc in the same st and in each st around. Sl st to the first sc to join.
Round 4 (The Signature Motif Round):
Ch 1 (does not count as a st). This round alternates a textured stitch (The Motif) and a single crochet (sc). The Motif Stitch works down into the stitches of the previous round to create a textured spike.
Motif Stitch Instructions (Worked over the next st):
- Insert hook into the top loop of the designated stitch, yarn over and pull up a loop.
- Insert hook into the middle space of the half-double crochet stitch (from Round 2), yarn over and pull up a loop.
- Insert hook into the bottom space of the single crochet stitch (from Round 3, two rounds below), yarn over and pull up a loop.
- You should have 4 loops on your hook. Yarn over and pull through all 4 loops. (This completes one Motif Stitch).
Working the Round:
*Work 1 Motif Stitch in the next st, sc in the st after that*. Rep from * to * around. Sl st to the first Motif Stitch to join.
Fasten off Color B.
The Body Repeat Sequence:
The main body of the bag is created by repeating a 4-Round Block. The original design uses a total of 7 repetitions of this block for the desired height.

Repeat Block:
- Round 1 (HDC): Join Color A. Ch 1. Hdc in each st around. Sl st to join.
- Round 2 (HDC): Ch 1. Hdc in each st around. Sl st to join. (Fasten off Color A).
- Round 3 (SC Setup): Join Color B. Ch 1. Sc in each st around. Sl st to join.
- Round 4 (Motif): Ch 1. *Motif St in the next st, sc in the st after that*. Rep from * to * around. Sl st to join. (Fasten off Color B).
Continue repeating this 4-round block until you have completed your desired height (recommended 7 times, or 28 motif rounds).
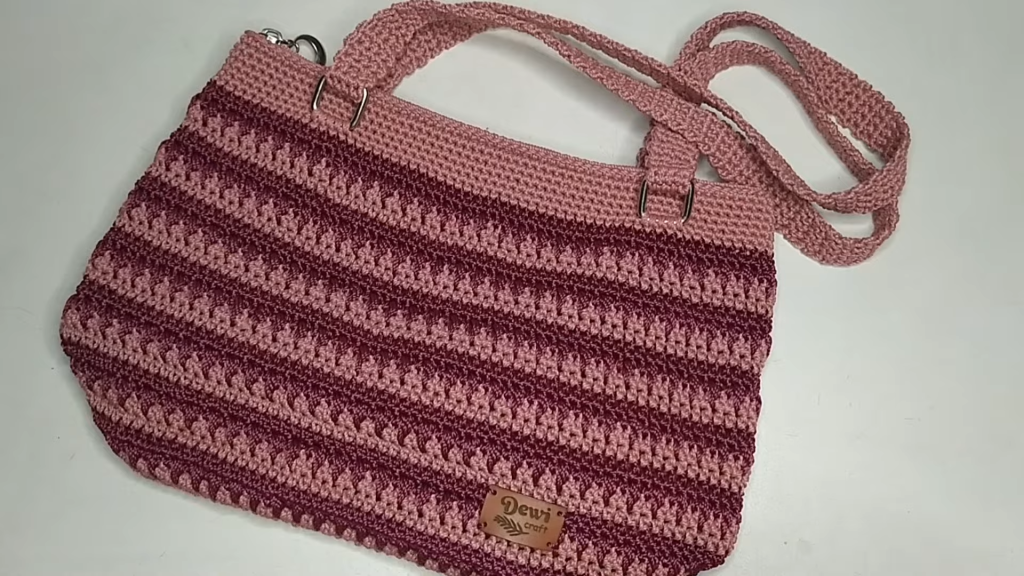
🔗 Pattern: The Top Border & Hardware
Once the motif section is complete, you will switch to a final color (usually Color A) to create a solid top border and attach the hardware rings.
Solid Single Crochet Rounds:
- Join Color A in any stitch. Ch 1. Sc in the same st and in each st around. Sl st to join.
- Rep Round 1 four more times for a total of 5 rounds of sc. This creates a sturdy, clean border.
Ring Placement:
The bag requires 4 attachment points for the square rings (2 on the front, 2 on the back/sides). The rings should be spaced approximately 6 cm apart. Use stitch markers to identify the center stitch for each of the four attachment points.
Attaching the Ring (Work one at a time):
- You will work 5 single crochet stitches over the ring to secure it. These 5 stitches are centered on your marked st: 2 sts before the marked st, the marked st itself, and 2 sts after the marked st.
- Work sc until you reach 2 sts before the marker.
- Secure Ring: Place the square ring flat against the current round. Insert your hook into the next stitch, passing it through the center of the metal ring, and complete a single crochet.
- Repeat this process for the next 4 stitches (totaling 5 sc worked over the ring).
- Continue sc in the following stitches until you reach the next marked position.
- Repeat the Ring Attachment process for the remaining 3 rings.
- Complete the round with sc and sl st to join.
Final Border Rounds:
Ch 1. Sc in each st around, ensuring you work into the stitches above the ring to secure them fully. Work 2 more rounds of sc in Color A to complete the top edge. Fasten off and weave in ends.
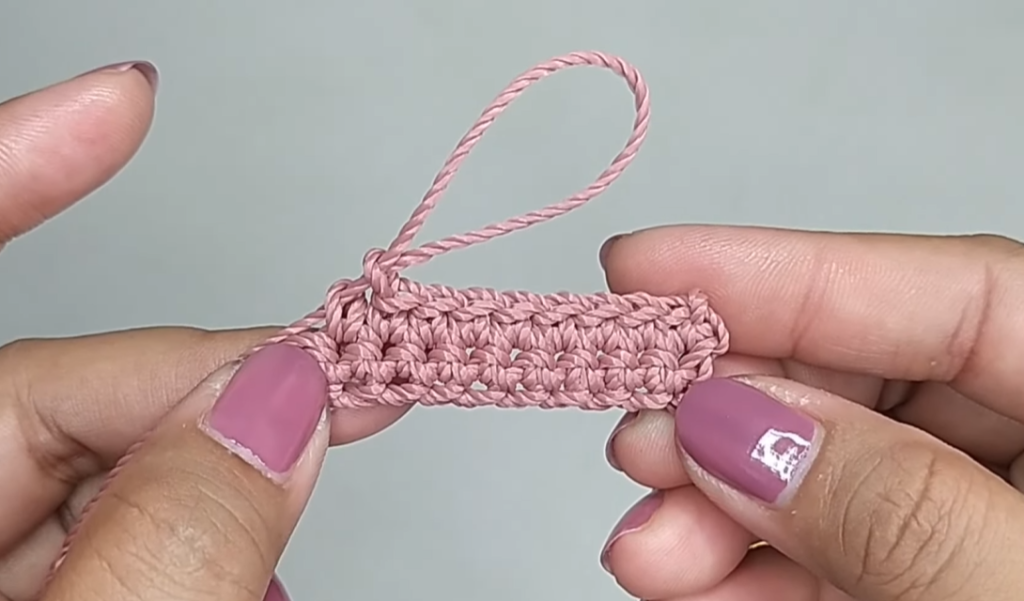
🧵 Pattern: The Strap (Make 2)
The original straps are flat, durable, and measure 60 cm in length.
Strap Construction:
Using Color A (or your preferred color), make a slip knot and ch 5.
Row 1:
Sc into the 2nd ch from the hook, and sc in each remaining ch across. (4 sc).
Row 2:
Ch 1, turn. Sc in the first st and in each st across. (4 sc).
Rows 3 – End:
Repeat Row 2 until the strap measures 60 cm long (or your desired length). The original tutorial uses 5 rows of sc, but this typically results in a very short strap. Continue until you achieve the 60 cm length.
Finishing:
Leave a long tail for sewing. Make a second identical strap.
✅ Finishing Touches
- Weave in Ends: Use your yarn needle to securely weave in all remaining yarn tails from your color changes and rounds.
- Attach Straps: Lay the bag flat. Position one strap end on top of the square ring. Use the long tail to securely sew the strap end to the ring using neat, strong stitches. Repeat for the other three attachment points.
- Block (Optional but Recommended): Lightly steam or wet-block your finished bag to help the base flatten and the stitches set evenly.
- Lining (Highly Recommended): For a professional and long-lasting finish, consider sewing a simple fabric lining and zipper into your bag.
Video Tutorial:
💡 Conclusion
Congratulations! You have successfully crocheted the beautiful Modern Wave Bag. This detailed pattern transforms simple stitches into a sophisticated, textured fabric, perfect for a chic everyday accessory. The combination of the solid base and the eye-catching motif ensures your bag is both functional and stylish.
We hope you enjoyed following along! If you’re looking for tutorials on how to install the lining and zipper, be sure to check the description of the original video for a separate link, as those steps are typically performed by hand-stitching after the crochet work is complete. Happy hooking, and enjoy your stunning new bag!


