
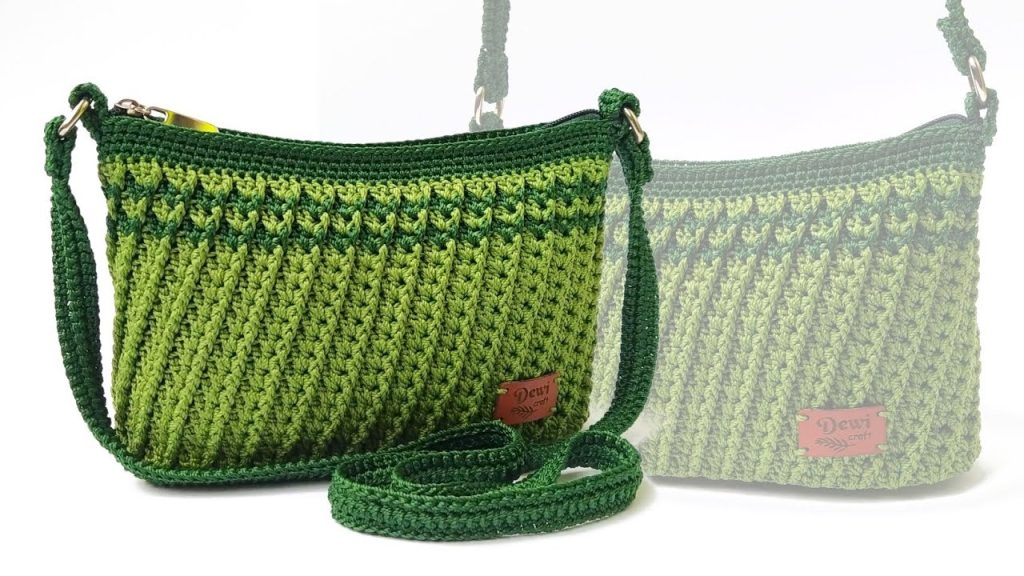
Hello, amazing crocheters! Are you ready for your next must-make project? We’re taking inspiration from SANG DEWI CRAFT’s incredible tutorial, “METODE TERBARU MEMBUAT TAS RAJUT”, and transforming it into a luxurious, highly-detailed pattern for a chic, structured clutch. We’ve named this design “The Stella” for its star-like, repeating texture that is both sophisticated and fun to create!
This pattern is an intermediate-level project that utilizes an elongated double crochet oval base for a sturdy foundation, followed by a mesmerizing, compact shell motif. The result is a bag with beautiful drape and structure, finished with a sturdy rope handle and elegant D-ring attachments. The finished bag is perfect for everyday use or a night out, measuring approximately 23 cm long and 15 cm tall. Let’s gather our supplies and begin creating this modern masterpiece!
🧶 Materials & Tools
To craft the “Stella” Clutch, you will need:
| Item | Details |
| Yarn | Durable medium-weight (Aran/Worsted, US 4) yarn. The original uses Nylon, but high-quality polyester cord, T-shirt yarn, or thick cotton are excellent alternatives for structure. |
| Hook | 4.0 mm Crochet Hook (or size needed to achieve firm, tight fabric). |
| Notions | Stitch Markers (essential for marking increase stitches and pattern repeats) |
| Yarn Needle | |
| Scissors | |
| 2 x D-Rings (2 cm size) for strap attachment | |
| Optional: Fabric for lining and a zipper for a professional finish. |
📝 Key Abbreviations (US Terminology)
| Abbreviation | U.S. Terminology | Description |
| ch | Chain | |
| sl st | Slip Stitch | |
| sc | Single Crochet | |
| dc | Double Crochet | |
| fpdc | Front Post Double Crochet | Yarn over, insert hook from front to back around the post of the specified stitch, yarn over, pull up a loop, complete dc. |
| st(s) | Stitch(es) | |
| sk | Skip | Skip the indicated number of stitches. |
| rep | Repeat |
🧱 Part 1: The Durable Oval Base (Alas)
The foundation is worked in rounds of Double Crochet (dc) to create a flat, firm oval. We will start with a chain of 35.

Initial Chain: Ch 35.
Round 1 (Foundation):
- Ch 3 (counts as 1 dc). In the 4th ch from the hook, make 2 dc. (This makes the first corner cluster: Ch-3 + 2 dc). Place marker in the top of the Ch-3.
- Dc in the next 30 chains across.
- In the last chain, work 6 dc. (This forms the second corner). Place markers in the first and 6th dc of this cluster.
- Working on the opposite side of the chain, dc in the next 30 stitches across.
- In the very first stitch (where you placed the initial 2 dc), work 3 dc. (Total of 6 stitches in the starting ch space).
- Sl st to the top of the beginning Ch-3 to join the round.
Round 2 (Increase Round 1):
- Ch 3 (counts as 1 dc). Dc in the same st.
- Work 2 dc in each of the next 2 stitches. (Total 6 stitches increased on the first end). Move markers to the first and last of these increase stitches.
- Dc in the next 30 stitches across.
- Side Corner: Work 2 dc in each of the next 6 stitches (the stitches between the corner markers from Round 1). (12 stitches increased on the corner). Mark the first and 12th stitch.
- Dc in the next 30 stitches across.
- End Corner: Work 2 dc in each of the next 3 stitches. (This completes the 6-stitch increase cluster for this end).
- Sl st to the top of the beginning Ch-3 to join.
Round 3 (Increase Round 2):
- Ch 3 (counts as 1 dc).
- Increase Sequence: *Dc in the next st, 2 dc in the next st*. Rep from * to * until you reach the straight section. (Repeat this sequence 6 times on each end). Move markers to the first and last stitches of the increase section.
- Dc across the straight section until you reach the side corner marker.
- Repeat the Increase Sequence *(Dc in the next st, 2 dc in the next st)* 6 times.
- Dc across the straight section until you reach the next corner marker.
- Repeat the Increase Sequence *(Dc in the next st, 2 dc in the next st)* 3 times. (This completes the round).
- Sl st to the top of the beginning Ch-3 to join.
Round 4 (Single Crochet Border):
- Ch 1 (does not count as a st). Sc in the same st and in each st around.
- Sl st to the first sc to join.
- Count Check: Your total stitch count must be a multiple of 3 for the body motif to work correctly. Adjust the final count in the straight sections if needed to ensure divisibility by 3.
- Fasten off if changing color, or continue with the same color.

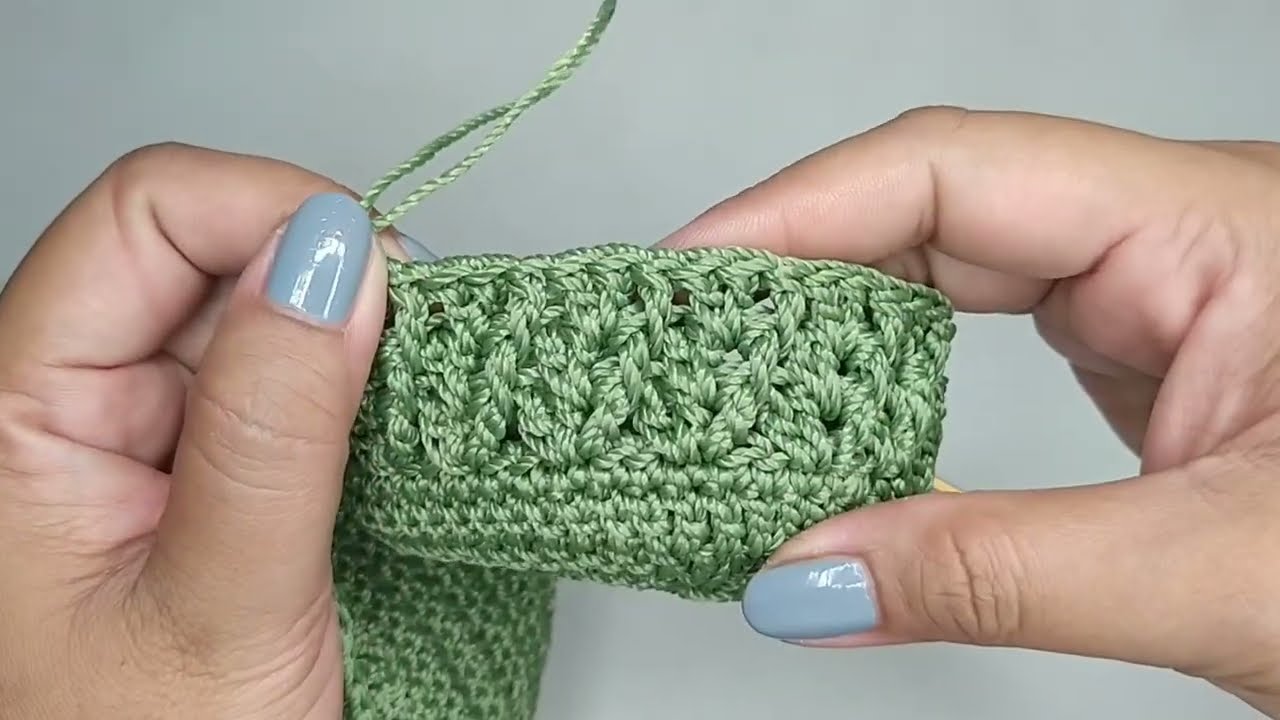
✨ Part 2: The Textured Body (The Fan Shell Motif)
The body is created using a 2-round repeat that alternates between a shell cluster and a textured front post double crochet (fpdc) for a woven effect. The pattern is worked in a spiral or closed rounds (closed rounds are easier to manage).
Round 1 (Cluster Shell Setup):
- Ch 3 (counts as 1 dc). Work 2 dc in the same stitch. (This is your first 3-dc cluster).
- *Sk 2 sts, work 3 dc in the next st (cluster)*.
- Rep from * to * around.
- Sl st to the top of the beginning Ch-3 to join.
Round 2 (Textured Shell):
- Ch 1 (does not count as a st).
- Working in the first cluster from the previous round: Work fpdc around the post of the first dc of the cluster below.
- Work 2 dc in the space (the top of the second/middle dc) of the cluster below.
- *Work fpdc around the post of the first dc of the next cluster. Work 2 dc in the next space (the top of the middle dc) of that cluster.*
- Rep from * to * around.
- Sl st to the top of the first fpdc to join.
Body Repeat Sequence:
The textured motif is created by simply repeating Round 2 until the bag reaches your desired height. The motif naturally shifts slightly, creating a staggered texture.
- Repeat Round 2 a total of 14 times (or until the bag measures 15 cm tall).
- Optional Color Change: The video shows a color change near the top. To replicate, change to a contrast color (Color B) after Round 14 and continue repeating Round 2 for an additional 2-4 rounds.
🔗 Part 3: Top Border & Hardware Tabs
After achieving the desired height (e.g., 18 rounds total), you will create a simple, strong border using single crochet.
Top Edge Rounds:
- Ch 1. Sc in the same st and in each st around. Sl st to join.
- Repeat Round 1 three more times for a total of 4 rounds of single crochet. This provides a clean, stable edge.
Hardware Attachment Tabs (Make 2):
The strap is attached to the bag using two small tabs that are sewn to the D-rings. The tabs are centered on the side edges of the bag.
- Marking: Flatten the bag and locate the center stitch on one side edge. Optional: Use a stitch marker.
- Tab Row 1: Counting back one stitch from the center marker, sl st to join yarn (Color A). Ch 1. Sc in that st, and sc in the next 3 sts. (4 sc).
- Tab Row 2: Ch 1, turn. Sc in each of the 4 sts.
- Tab Rows 3-7: Repeat Row 2 five more times. (Total 7 rows of 4 sc).
- Fasten off, leaving a long tail for sewing.
- Repeat steps 1-5 on the opposite side of the bag.

🎗️ Part 4: The Rope Strap (Tali Tas)
The final strap is a long, thin, cord-like handle, finished with an edge of single crochet. The total length is 100 cm.
Core Rope Construction:
- Sl knot. Ch 2.
- Sc in the 2nd ch from the hook. (1 st).
- Next Row: Do not turn. Insert hook into the single horizontal bar on the back of the sc just made, yarn over, pull up a loop, yarn over, pull through both loops (sc).
- Repeat: For every row after, you will insert your hook into the single horizontal bar on the side of the stitch you just worked to create a dense, vertical cord.
- Continue repeating step 4 until the cord measures 100 cm long.
- Do not fasten off.
Strap Border (Optional):
To give the cord a neat edge and more durability, you will now single crochet around the entire perimeter of the rope.
- Ch 1. Working down the side of the cord, sc evenly into the ends of the rows. Aim for a consistent tension to prevent rippling.
- When you reach the end, sc 3 times in the corner stitch.
- Sc along the bottom of the foundation chain. Sc 3 times in the corner.
- Sc up the other side of the rope. Sc 3 times in the corner.
- Sc across the top edge.
- Sl st to the first sc to join.
- Repeat this sc border round for a total of 4 rounds (as shown in the video for thickness).
- Fasten off, leaving a long tail for sewing.
Video Tutorial:
✅ Finishing Touches
- Attach D-Rings: Thread one end of the finished strap through a D-ring. Use the long tail from the strap to securely whipstitch the strap end back onto itself, just above the D-ring. Repeat for the other end.
- Attach Tabs to Bag: Use the long tail left on the hardware tabs (Part 3). Loop the D-ring through the opening of the crocheted tab. Fold the tab over the top edge of the D-ring. Use the tail to securely sew the tab edges down onto the bag’s top border. Repeat for the second tab.
- Weave in Ends: Use your yarn needle to securely weave in all remaining yarn tails.
- Lining & Zipper: The final steps in the original video include installing a fabric lining and a zipper, which is highly recommended to give your bag shape and keep contents secure. If needed, consult the original video’s description for a link to a separate lining/zipper tutorial.
Congratulations! Your beautiful, textured “Stella” Clutch is now complete. Enjoy your stunning new handmade accessory!


