

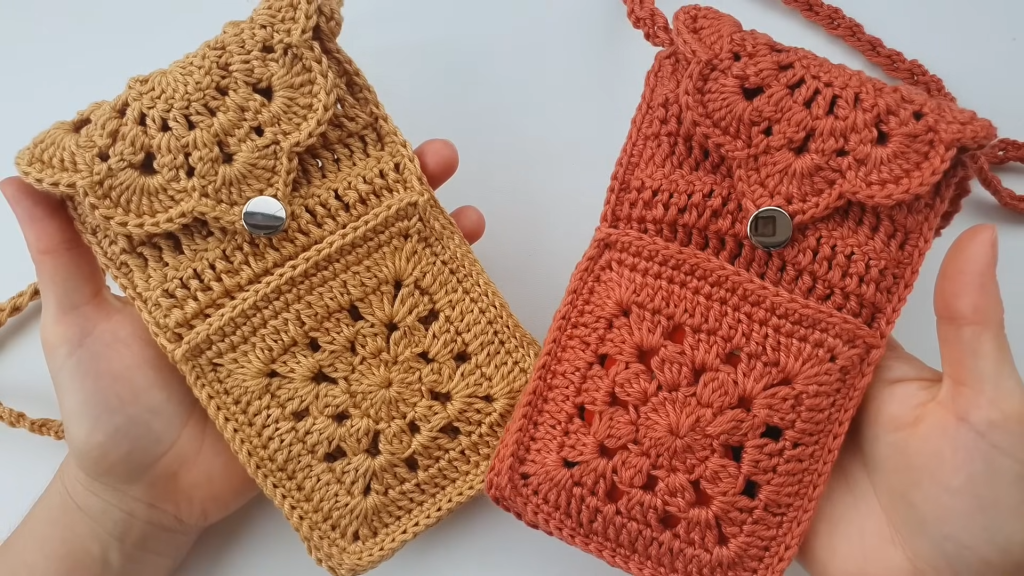
Welcome, crocheters, to a revolutionary pattern for a functional and fashionable accessory! Inspired by the brilliant, seamless, and pocket-integrated design from Deisi Cardoso, this “Infinity Stitch” Phone Bag pattern offers a sleek, structured body with a distinctive scalloped flap and a functional front pocket—all constructed with minimal sewing. The unique continuous construction of the pouch from the flap base gives it its “Infinity Stitch” name.
This is a comprehensive, long, and detailed guide perfect for an intermediate crocheter ready to tackle textured stitches and clever construction techniques.
🧶 Materials & Key Tools
The success of this design relies on using a yarn that offers some structure to maintain the bag’s vertical shape.
| Icon | Item | Details |
| Hook | Crochet Hook | 3.0 mm (or size needed to achieve firm gauge). |
| Yarn | Main Color (MC) | Approximately 120-150g of Amigurumi yarn (suggesting a cotton or cotton blend medium weight cord) or similar fine cord yarn. |
| Hardware | Button | One decorative button (e.g., ~2.5 cm wide) for the flap closure. |
| Notions | Markers & Needle | Stitch Markers (essential for placement), Scissors, and a Tapestry Needle for weaving in ends. |
| Size | Finished Bag | Approx. 17 cm (Height) x 10 cm (Width). |
| Weight | Finished Weight | Approx. 120-150 grams. |
📝 Abbreviations & Special Stitches (U.S. Terms)
Pay close attention to the definition of the Treble Crochet (TR), as it is the main stitch used for the body structure.
| Abbreviation | U.S. Terminology | Description |
| ch | Chain | |
| sl st | Slip Stitch | |
| sc | Single Crochet | |
| dc | Double Crochet | |
| tr | Treble Crochet | Yarn over twice, insert hook, [yarn over, pull through 2 loops] three times. |
| st(s) | Stitch(es) | |
| rep | Repeat | |
| MR | Magic Ring |
Special Stitch: 3-TR Cluster
A cluster of three incomplete Treble Crochet stitches worked together.
- Incomplete TR: [Yo twice, insert hook into st/space, yo, pull through 2 loops, yo, pull through 2 loops]. (2 loops remain on hook).
- Repeat Incomplete TR two more times into the same st/space. (4 loops remain on hook).
- Yo, pull through all 4 loops to close the cluster.
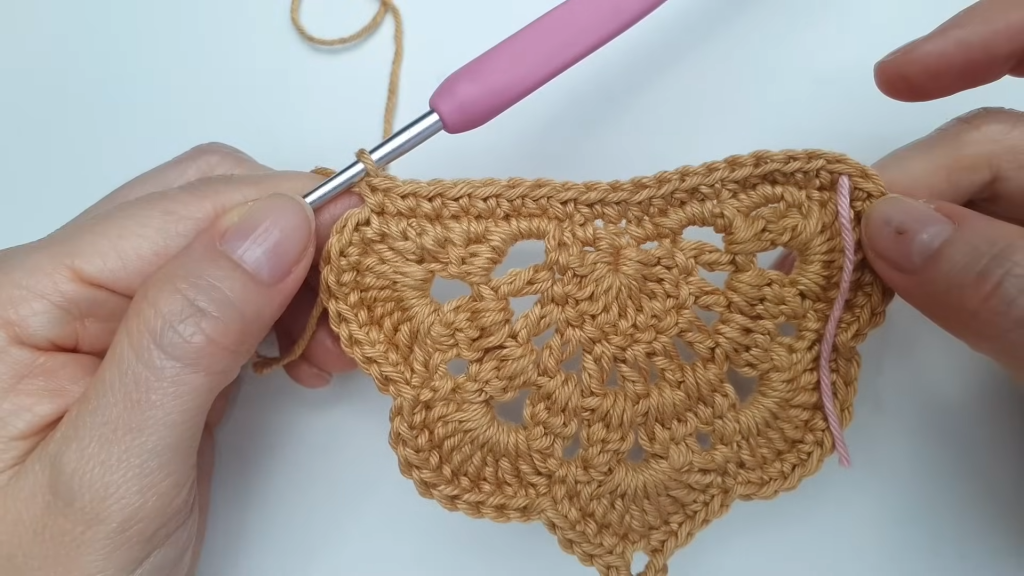
✨ Part 1: The Scalloped Flap (Back Panel & Foundation)
This section creates the decorative flap, which is the starting point for the entire bag.
Round 1 (DC Foundation):
- Start with a MR. Ch 3 (counts as 1 DC).
- Work 10 dc into the MR. (Total 11 sts, including the starting ch-3).
- Pull tail to close the MR. Do not join, but turn the work.
Row 2 (Mesh Setup):
- Ch 4 (counts as 1 DC + ch 1), turn.
- Dc in the next st.
- *Ch 1, sk 1 st, dc in the next st*.
- Repeat from * to * across the row. The final DC should be in the top of the starting ch-3 from R1. (10 ch-1 spaces created).
Row 3 (Cluster Setup):
- Ch 1, turn. Sc into the first ch-1 space.
- Ch 2. Work a 3-TR Cluster into the same ch-1 space.
- *Ch 2, work a 3-TR Cluster into the next ch-1 space*.
- Repeat from * to * across the row. (10 Clusters created).
- Ch 2, sl st into the last ch-1 space to finish the row.
Row 4 (Scallop Edge):
- Ch 1, turn. Sc into the first cluster space.
- *Work 8 dc into the next cluster space. Sc into the next cluster space*.
- Repeat from * to * across the row. (5 scallops of 8 DC created).
- Sl st to the last stitch. Do not fasten off.
📏 Part 2: Establishing the Pouch Body
Now we transition from the flap to working down the sides to create the body’s foundation, working along the raw edge of the flap (R1-R4).
- Body Foundation (SC): Continue working without turning. Work sc stitches evenly along the curved side edge of the flap (the raw edges of R1-R4).
- Work 3 sc into the space between the scallops and the DC mesh row (R2).
- Work 3 sc into the next side space.
- Work 1 sc into the next side space (between R1 and R2).
- Work 1 hdc into the MR opening (center base).
- Work 1 sc into the next side space.
- Work 3 sc into the next side space.
- Work 3 sc into the final side space.
- The Buttonhole Loop: When you reach the second 8-DC scallop from the edge, find the center point (between the 4th and 5th DC).
- Ch 4 (adjust based on your button size). Sl st back into the original starting SC point for the loop.
- Sl st back down the remaining side stitches until you reach the base edge where the body will be worked.
- Marking the Body Base: Place markers at the points that define the desired width of the pouch body, which should align with the DC base (R1).
- Identify the working sts: The foundation for the body will be worked across the 11 DC stitches of the original Round 1.
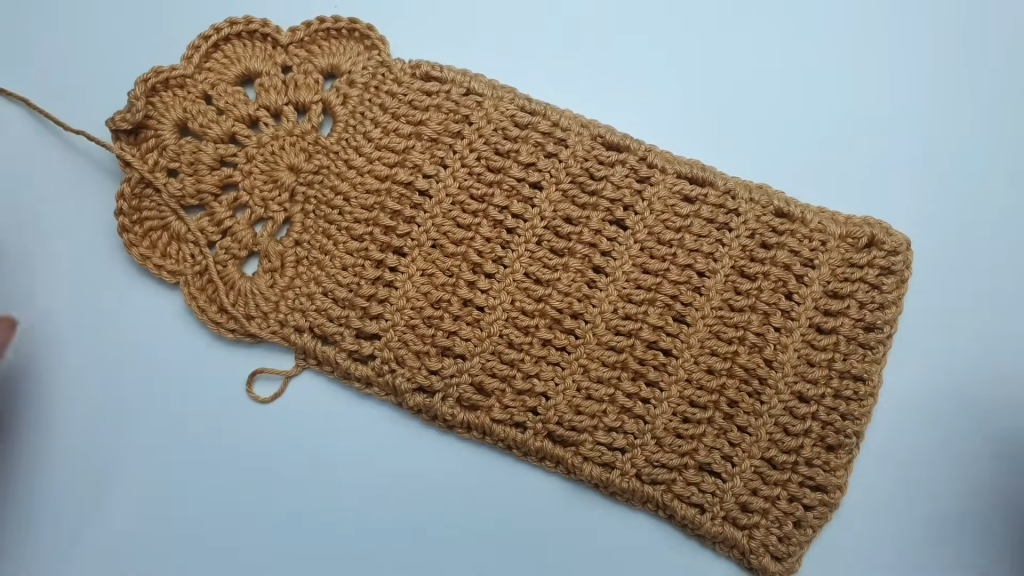
🧱 Part 3: The Structured Pouch Body (TR Rows)
The body is now worked in vertical rows of Treble Crochet (TR), joining back to the side edges of the back panel (the finished flap/scallop section) to create the pouch shape seamlessly.
Pouch Rows 1 – 23 (or desired length):
- Row 1: Sl st into the first marked stitch of the 11-st base. Ch 2 (counts as 1/2 TR). TR in the next 10 sts. (11 TR).
- Joining: Sl st into the corresponding side stitch of the back panel/flap piece. Sl st once more into the next side stitch for turning.
- Row 2: Ch 2, turn. TR in the next 10 TR. The last TR should be in the top of the ch-2 from R1. (11 TR).
- Joining: Sl st into the corresponding side stitch of the back panel/flap piece. Sl st once more into the next side stitch for turning.
- Repeat Rows 2-4 until the pouch section has completed 23 rows of Treble Crochet, or until the panel is long enough to cover the front of the bag and reach the bottom edge of the flap.
Pouch Seaming:
- Do not fasten off after the last row.
- Bottom Seam: Fold the work. The last TR row should align with the starting 11-st base of the flap.
- Working through both the loop of the last TR row and the corresponding stitch of the base, sl st across the bottom seam to close the pouch.
- Fasten off and weave in the tail. The main bag structure is now complete!
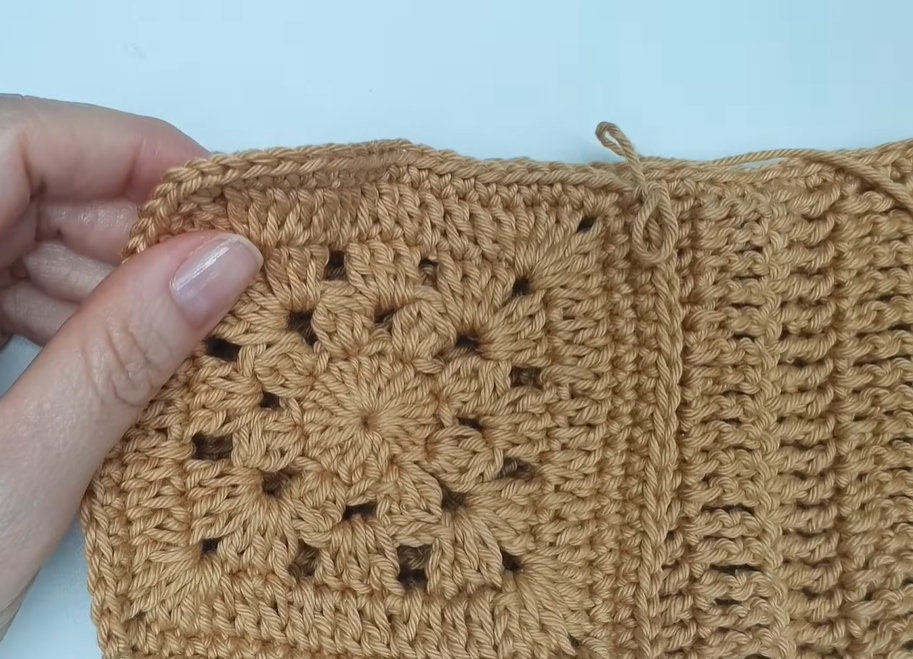
👝 Part 4: The Integrated Front Pocket
The integrated pocket is a separate piece that is later slip-stitched onto the front of the pouch body.
Round 1 (Pocket Foundation):
- Start with a MR. Ch 3 (counts as 1 DC). Work 15 dc into the MR. (Total 16 sts).
- Sl st to the top of ch-3 to join.
Round 2 (Cluster Mesh):
- Ch 3 (counts as 1 DC). Work 2 dc into the same st. Ch 2.
- *Sk 1 st. Work 3-DC Cluster (3 incomplete DC together) into the next st. Ch 2*.
- Repeat from * to * around. (8 clusters created).
- Sl st to the top of the ch-3 to join.
Round 3 (Shell/Corner Increases):
- Sl st into the next DC and into the ch-2 space. Ch 3 (counts as 1 DC). Work 2 dc, ch 1, 3 dc into the ch-2 space (creating the first Corner Shell).
- Ch 1. Work 3 dc into the next ch-2 space. Ch 1.
- Work 3 dc, ch 1, 3 dc into the next ch-2 space (creating the second Corner Shell).
- Continue around, working the Corner Shells at the four corners and 3 DC in the side spaces, until the piece forms a square shape.
- Sl st to join.
Round 4 (SC Border for Attachment):
- Ch 1, sc in each DC and ch-1 space around. Ensure the corners are well-defined.
- Sl st to join. Fasten off, leaving a long tail for attachment.
Pocket Attachment:
- Position the pocket on the front of the pouch body (the TR section). Use stitch markers to secure the perimeter, ensuring the opening is at the top.
- Using the long tail and a yarn needle, or by sl st with the crochet hook, attach the pocket to the pouch body along the bottom and side edges. Leave the top edge open for the pocket opening.
- Weave in the attachment tail securely.
🔗 Part 5: Finishing and Strap
The final step is to create the adjustable shoulder strap and attach the button.
The Shoulder Strap (Adjustable Mesh)
The strap uses a simple mesh pattern that is durable and less bulky.
- Strap Foundation (MC): Ch 4. Tr in the 4th ch from hook. (First block created).
- Strap Rows (Length): Ch 2, turn. Tr into the top of the previous TR.
- Repeat Row 2 until the strap measures the desired length (e.g., 102 cm for an average crossbody fit).
Strap Attachment:
- Align the ends of the strap with the sides of the bag, near the top corner where the flap begins.
- Using a yarn needle, securely sew the strap ends to the dense fabric of the bag’s top side seam. Ensure the strap is not twisted before sewing.
Button Closure
- Determine the location of the button on the main bag body so that the loop on the flap closes the bag neatly.
- Securely sew the button to the front of the pouch body, ensuring it lines up perfectly with the buttonhole loop on the flap.
- Weave in all remaining ends.
Video Tutorial:
✅ Final Dimensions & Notes
Your finished “Infinity Stitch” Seamless Phone Bag is now complete!
- Final Dimensions: Approximately 17 cm tall x 10 cm wide.
- Weight: Approximately 140 grams (depending on yarn choice).
- Lining: While the structure is sound, adding a thin fabric lining is highly recommended for securely holding small items and providing a smooth interior for your phone.
Enjoy your uniquely structured, functional, and seamless new bag!


