
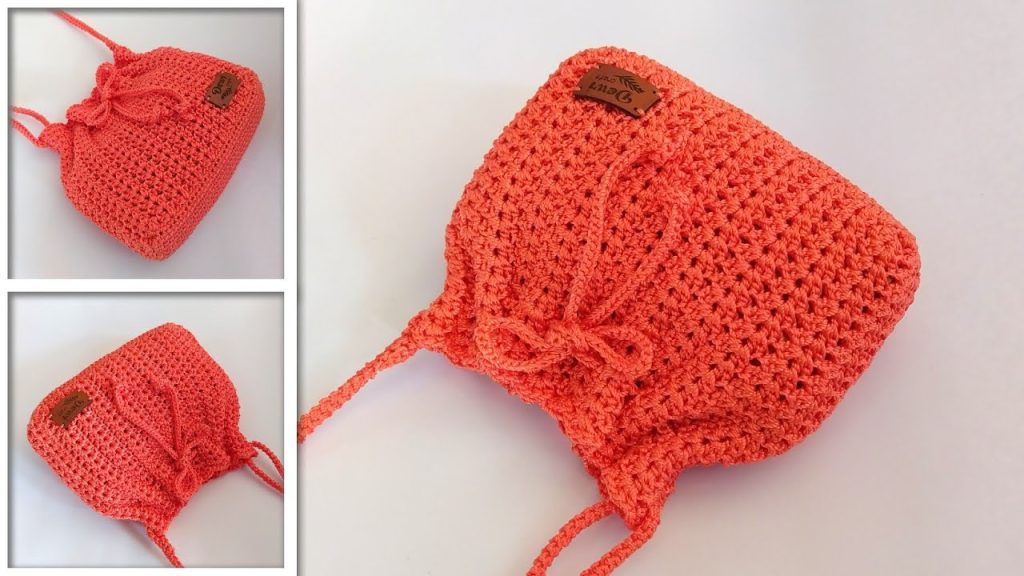
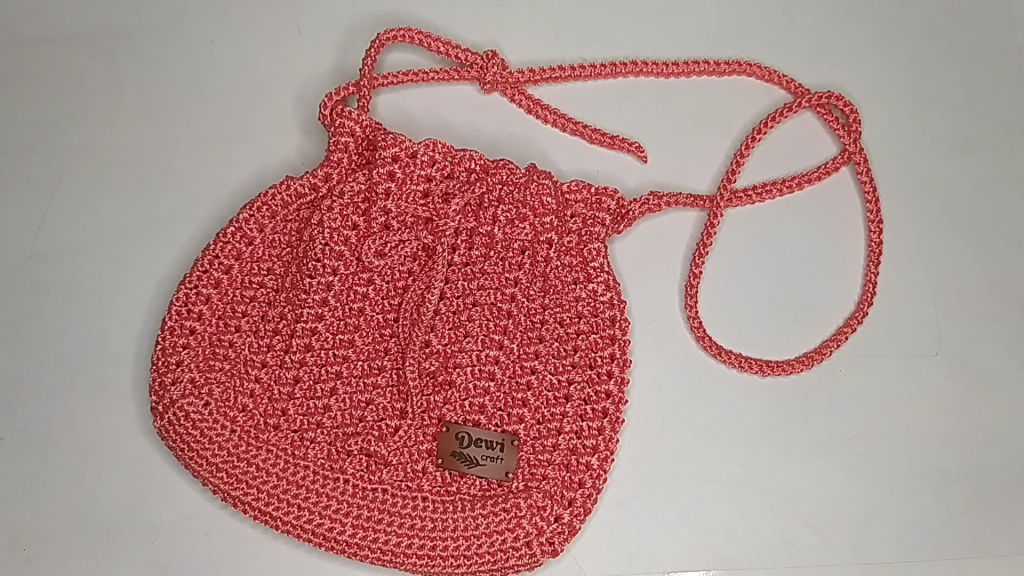
Welcome to a detailed and luxurious pattern for crocheting the beautiful “Ripple Shell” Drawstring Bucket Bag! Inspired by the sophisticated shell texture and functional design from SANG DEWI CRAFT, this bag features a sturdy rectangular base, a gorgeous repeating shell motif, and a braided drawstring closure. It’s an ideal project for intermediate crocheters or confident beginners ready to master working in the round with the popular shell stitch.
This detailed pattern is designed to create a structured, slightly tapered bucket bag, finishing at approximately 21 cm wide by 15 cm high.
🧶 Materials & Key Tools
The success of this structured bag relies on using a durable, non-stretchy cord yarn to maintain its defined shape.
| Icon | Item | Details |
| Hook | Crochet Hook | 4.0 mm (or size needed to achieve very firm tension). |
| Yarn | Main Color (MC) | Approximately 140g of sturdy cord yarn (Nylon or Polyester cord) for the entire bag. |
| Hardware | Shoulder Strap | A separate crocheted cord or thin strap (approx. 100 cm long). |
| Hardware | Drawstring Cord | A separate crocheted I-cord or braided cord (approx. 75 cm long). |
| Notions | Markers & Needle | Stitch Markers (especially for the base and strap placement), Scissors, and a Yarn Needle. |
| Size | Finished Bag | Approx. 21 cm (Length) x 15 cm (Height) x 7 cm (Depth). |
| Weight | Finished Weight | Approx. 140 grams. |
📝 Abbreviations & Special Stitches (U.S. Terms)
Familiarize yourself with these terms. Note that the body rounds are not turned, as the shell stitch works best when worked consistently on the right side.
| Abbreviation | U.S. Terminology | Description |
| ch | Chain | |
| sl st | Slip Stitch | |
| sc | Single Crochet | |
| hdc | Half Double Crochet | |
| st(s) | Stitch(es) | |
| rep | Repeat | |
| 4-HDC Shell | 4 Half Double Crochet Shell | Four half double crochets worked into the same stitch or space, separated by a chain. |
| MC | Main Color |
Special Stitch: 4-HDC Shell (4HDC-Shell)
The core motif of this pattern, creating a fan shape.
- Work 2 hdc into the designated stitch or space.
- Ch 1.
- Work 2 hdc into the same stitch or space. (Total: 2 hdc, ch 1, 2 hdc).
📐 Part 1: The Rigid Foundation Base
We start with a flat, rigid base worked in rows of Single Crochet, then edged in the round to set up the body’s stitch count. The final stitch count must be a multiple of 4 for the motif pattern.
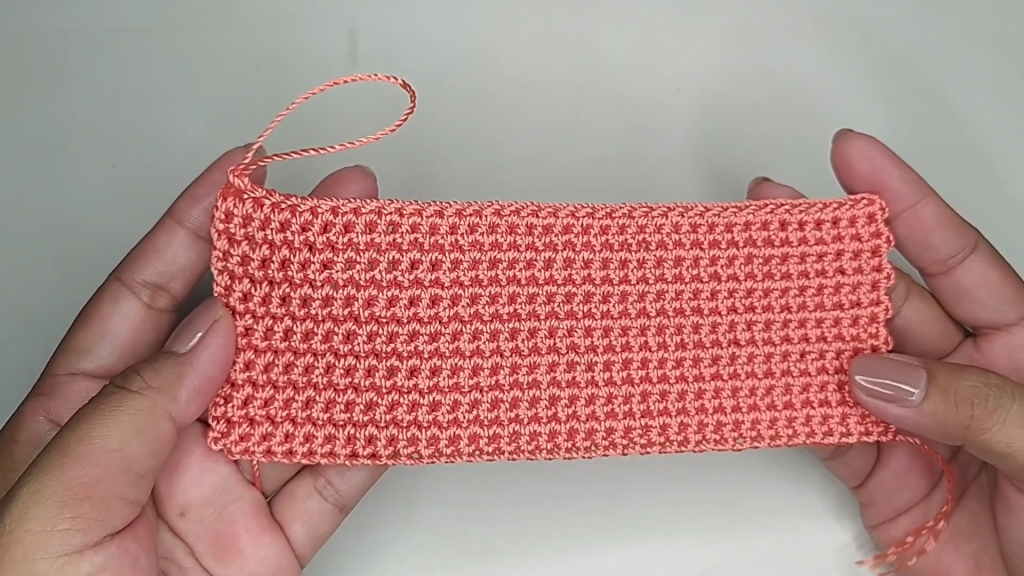
Initial Chain (MC):
Make a slip knot and ch 35. Chain 1 more for turning.
Rows 1 – 14 (Base Core):
- Sc in the 2nd ch from the hook, and sc in each ch across. (35 sc).
- Ch 1 (does not count as st), turn. Sc in the first st and in each st across. (35 sc).
- Repeat Row 2 until you have completed a total of 14 rows.
Edging (SC in the Round):
After Row 14, do not turn. We work SC around the entire perimeter.
- Corners: Work 2 sc into the four corner stitches.
- Long Sides (Row Ends): Sc evenly down the side edge, placing 1 sc per row end. (14 sc total per side).
- Top/Bottom Edges: Sc across the 35 SC of the top and bottom rows.
- Count & Adjust: Count your total stitches (e.g., approximately 98 sts). If necessary, adjust the count evenly on the straight side edges to ensure your final count is a multiple of 4 (e.g., 96 or 100 sts).
- Sl st to the first sc to join.
🌟 Part 2: The Ripple Shell Body Motif
The main body of the bag is created using the 4HDC-Shell stitch, worked in unturned rounds (always on the right side) to emphasize the texture.
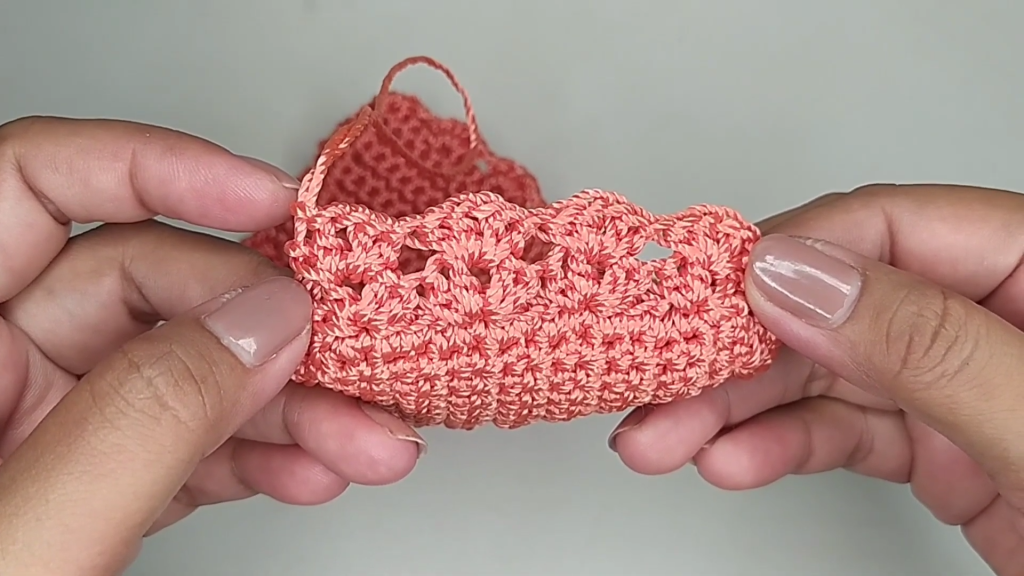
Round 1 (Shell Setup – MC):
- Ch 2 (does not count as st), sl st to the next st to move to the first available stitch.
- Work 4HDC-Shell (2 hdc, ch 1, 2 hdc) in the first st.
- *Sk 3 sts, work 4HDC-Shell (2 hdc, ch 1, 2 hdc) in the next st*.
- Repeat from * to * around the entire round.
- Sl st to the top of the first hdc (not the ch-2) to join. (This ensures a cleaner join).
Round 2 (Shell Repeat – MC):
- Ch 2 (does not count as st). Sl st across the top of the shell cluster (2 hdc, 1 ch, 1 hdc) to move to the center ch-1 space of the shell below.
- Work 4HDC-Shell (2 hdc, ch 1, 2 hdc) into the ch-1 space.
- *Work 4HDC-Shell (2 hdc, ch 1, 2 hdc) into the center ch-1 space of the next shell below*.
- Repeat from * to * around.
- Sl st to the top of the first hdc to join.
Motif Repetition:
- Repeat Round 2 for a total of 20 rounds or until the bag reaches the desired height of 15 cm.
- Fasten off MC.
⛓️ Part 3: Top Border and Drawstring Casing
The top of the bag is secured with a final border and a casing for the drawstring and strap attachment.
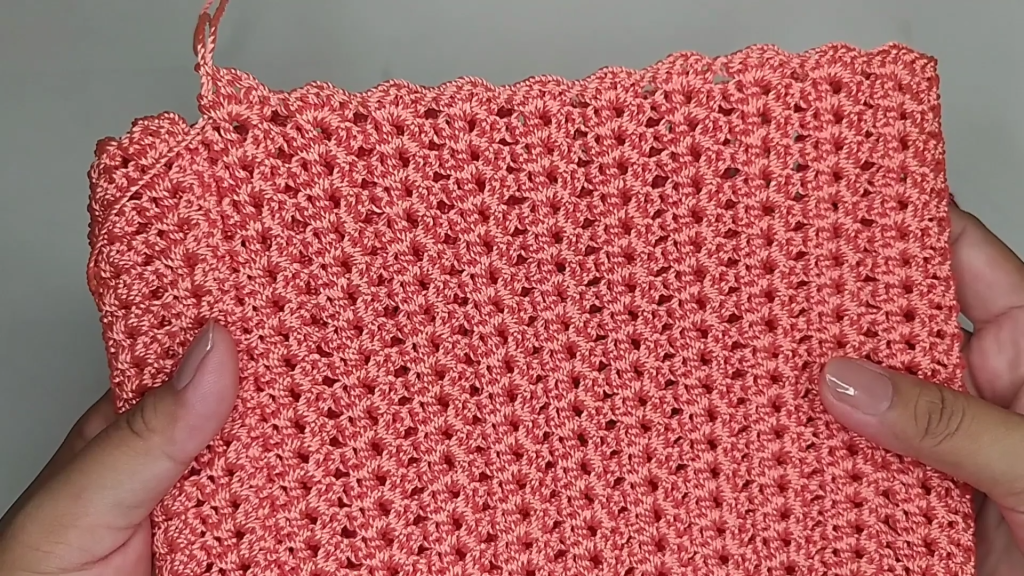
SC Transition Rounds (MC):
Join MC, if needed.
- Ch 1 (does not count as st). Sc in each hdc and ch-1 space around. (Note: Work 1 sc over each of the 4 hdc stitches, and 1 sc into the ch-1 space, for a total of 5 sc per shell segment. Total count should be consistent with the base multiple).
- Sl st to the first sc to join.
- Repeat Round 1 for a total of 2 rounds of SC border.
Drawstring Casing Round:
This is the round where the drawstring will be woven.
- Ch 3 (counts as 1 dc). Dc in the next 3 sts.
- *Ch 1, sk 1 st, dc in the next 4 sts*.
- Repeat from * to * around. (Ensure the chain-1 spaces are evenly spaced).
- Sl st to the top of the starting ch-3 to join.
Final SC Border Round:
- Ch 1 (does not count as st). Sc in each dc and ch-1 space around.
- Sl st to the first sc to join.
- Fasten off MC, leaving a long tail for securing the strap.
✂️ Part 4: Drawstring and Strap Assembly
We create the two cords needed for the bag’s functionality.
A. Wristlet Strap (Braided Cord – Optional)
The video shows a unique braided cord used as the drawstring, but we will adapt the flat cord technique for the longer shoulder strap.
- Strap Foundation (MC): Ch 2. Sc in the 2nd ch from the hook.
- Strap Rows: Ch 1, turn. Sc in the stitch.
- Repeat Row 2 until the desired length of 100 cm is reached.
- Fasten off, leaving a long tail for sewing.
Strap Attachment:
- Locate the center of the narrow sides (the depth of the base).
- Sew the strap ends securely to the bag’s body at approximately the second SC round from the top. Ensure they are attached firmly to the dense SC fabric.
B. Drawstring Cord (Braided/Knitted)
The video uses a non-crochet method that creates a tight, rope-like cord (often called a spool-knit, or simple finger-braid technique with two strands). For a crochet solution, an I-cord works best.
- I-Cord (MC): Ch 3. Insert hook into 2nd ch, pu a lp (2 lps on hook). Insert hook into 3rd ch, pu a lp (3 lps on hook). Drop the 2nd and 3rd loops. Yo, pull through 1st lp. Pick up 2nd lp, yo, pull through 1. Pick up 3rd lp, yo, pull through 1.
- Repeat step 1 until the cord measures 75 cm.
- Fasten off.
Drawstring Insertion:
- Using a yarn needle, weave the drawstring cord through the ch-1 spaces created in the Drawstring Casing Round (Part 3).
- Weave it in and out, starting and ending at the center front of the bag, allowing the two tails to hang for cinching.
- Knot the two ends of the cord together to finish.
Video Tutorial:
✅ Final Touches & Dimensions
- Weave in Ends: Ensure all yarn tails are neatly and securely woven into the dense fabric.
- Lining (Recommended): To ensure small items don’t slip through the shell texture and for a professional finish, it is highly recommended to sew a custom fabric lining into the purse.
Your finished “Ripple Shell” Drawstring Bucket Bag should measure:
- Length: 21 cm
- Height: 15 cm
- Weight: Approximately 140 grams.
Enjoy your durable and beautifully textured bag!


