
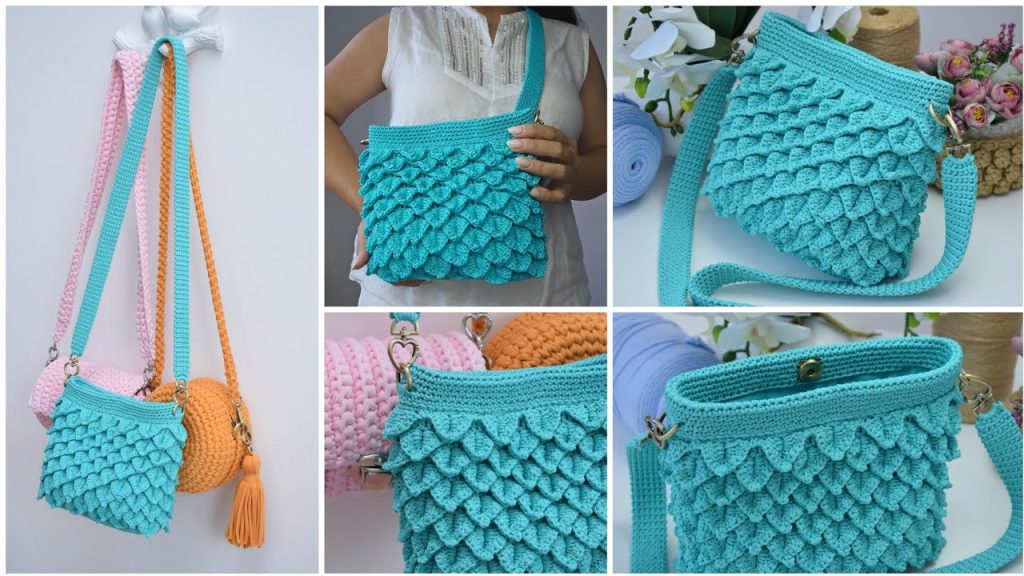
Welcome, crocheters, to the detailed pattern for the “Mermaid Scales” Crossbody Bag! This structured bag utilizes a variation of the beautiful Fish Scale (or Crocodile) Stitch, creating a unique, textured fabric that is both modern and elegant. Designed to be made from polyester cord, this bag offers excellent durability and shape retention, making it perfect for everyday use.
Follow this long-form, step-by-step guide to create your own stunning accessory!
📏 Finished Dimensions & Gauge
| Icon | Measurement | Result |
| Height | Finished Bag Height | Approx. 19 cm (7.5 in) |
| Width | Finished Bag Width | Approx. 24 cm (9.5 in) |
| Base | Finished Base Size | Approx. 20 cm x 7 cm (8 in x 2.75 in) |
| Strap | Recommended Length | 115 cm (45 in) |
Gauge Note: Gauge is not critical for this project, but tension must be very firm to ensure the bag holds its shape, especially when using cord yarn. The final stitch count of the base should be 84 Double Crochet (DC) stitches after Round 3.
🛠️ Materials & Supplies
| Icon | Item | Details |
| Yarn | Main Yarn | 500 meters of 2mm Polyester Cord or a similar stiff cord/T-shirt yarn alternative. |
| Hook | Crochet Hook | 3.0 mm (or size necessary to achieve a tight gauge). |
| Hardware | Half-Rings/D-Rings | Two 20mm Half-Rings or D-Rings for strap attachment. |
| Hardware | Magnetic Snap | One 18mm sew-on magnetic snap closure. |
| Hardware | Carabiner Clasps | Two carabiner clasps for the strap ends. |
| Notions | Tapestry Needle | For weaving ends and final joins. |
| Notions | Stitch Markers | Essential for marking the start/end of rounds and increase points. |
| Notions | Monofilament Thread | Clear nylon thread for sewing the magnetic snap. |
📝 Abbreviations & Notes
| Abbreviation | U.S. Terminology | Description |
| ch | Chain | |
| sl st | Slip Stitch | |
| sc | Single Crochet | |
| dc | Double Crochet | |
| inc | Increase | Work 2 DC into the same stitch. |
| st(s) | Stitch(es) | |
| rep | Repeat | |
| sk | Skip | |
| WS/RS | Wrong Side/Right Side |
Construction Note: The bag is worked bottom-up. The base is worked in closed rounds of DC. The body is worked in an alternating pattern of DC rounds (structural rows) and Fish Scale motif rounds (textured rows).
🥚 Part 1: The Oval Base (DC)
The base is created using the standard method for a flat oval, worked in Double Crochet (DC).
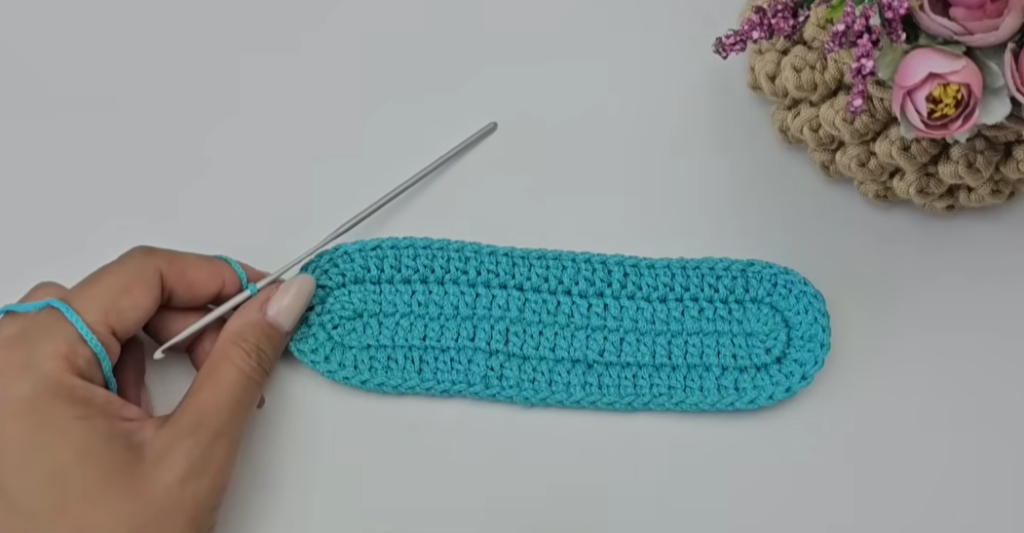
- Foundation: Ch 29.
- Round 1: Sk 3 ch (counts as 1 DC). Inc (2 DC) into the 4th ch from the hook. DC in the next 24 chains. In the last chain, work 6 DC (corner). Working up the opposite side of the chain, DC in the next 24 stitches. In the first chain (where the starting ch-3 began), work 3 DC (last corner). Sl st to the top of the beginning ch-3 to join. (60 stitches total).
- Round 2: Ch 3 (counts as 1 DC). Inc into the next 3 stitches. DC in the next 24 stitches. Inc into the next 6 stitches. DC in the next 24 stitches. Inc into the next 3 stitches. Sl st to the top of the beginning ch-3 to join. (72 stitches total).
- Round 3: Ch 3 (counts as 1 DC). [Inc, DC 1] three times. DC in the next 24 stitches. [Inc, DC 1] six times. DC in the next 24 stitches. [Inc, DC 1] three times. Sl st to the top of the beginning ch-3 to join. (84 stitches total).
🧱 Part 2: Establishing the Walls (DC)
These two rounds create the initial height of the bag and prepare the fabric for the textured pattern.
- Round 4 (First Wall Row): Ch 3 (counts as 1 DC). Work 1 DC in each of the 83 remaining stitches around. Sl st to the top of the beginning ch-3 to join. (84 DC).
- Round 5 (Second Wall Row): Ch 3 (counts as 1 DC). Work 1 DC in each of the 83 remaining stitches around. Sl st to the top of the beginning ch-3 to join. (84 DC).

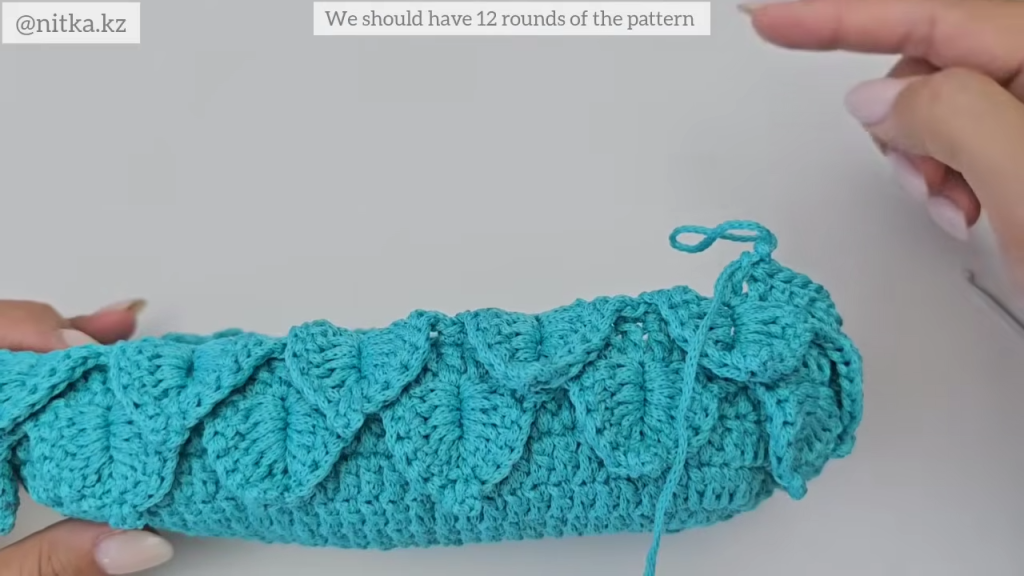
🐠 Part 3: The Fish Scale Stitch Pattern
The Fish Scale (or Scallop) motif requires a 7-stitch repeat. Since you have 84 stitches, you will have exactly 12 repeats.
Pattern Row 1 (Motif Set-up):
- Ch 1. Turn your work (you will now work on the WS).
- First Motif: Sk the next 3 DC. Work 6 DC into the side post of the 4th DC from the previous row (working downwards into the post).
- Ch 3. Sl st into the top of the last DC made.
- Now, work 6 DC into the side post of the same 4th DC (working upwards, on the opposite side of the post).
- Ch 1.
- Connecting Stitch: Sk the next 2 DC. Sc into the 3rd DC. Ch 1.
- Next Motif: Sk the next 3 DC. Work 6 DC into the side post of the 4th DC from the previous row. Ch 3. Sl st into the top of the last DC. Work 6 DC into the side post of the same 4th DC. Ch 1.
- Repeat steps 6 & 7 until you complete the 12th motif and reach the end of the row.
- Sl st into the first Sc of the row to join.
Structural Row (DC Transition):
This row is worked behind the Fish Scale motifs and connects the pattern rows.
- Sl st into the motif to bring your yarn to the center of the first motif’s shell.
- Ch 3 (counts as 1 DC). Turn your work (you will now work on the RS).
- Work 1 DC into the top of each stitch from the previous structural row (Round 5), working behind the motifs. Ensure you capture the correct stitch count (84 DC).
- Tip: Remember to work DC stitches into the SC and the chain spaces between the motifs to maintain the 84-stitch count.
- Sl st to the top of the beginning ch-3 to join. (84 DC).
Repeating the Pattern:
- Repeat Pattern Row 1 (Motif Set-up) and the Structural Row (DC Transition).
- Staggering: For the second motif row and all subsequent motif rows, you must start the motif between the motifs of the row below. To do this, simply adjust your starting point with a Sl St to align the next motif in the space of the previous connecting SC.
- Continue repeating the two rows until you have worked a total of 12 Fish Scale Motif Rows (approx. 19 cm high).
🔝 Part 4: The Finishing Edge & Hardware Placement (SC)
Once the 12 motif rows are complete, we create a strong, clean top edge for the bag.
- Final Structural Row (SC Base): Ch 1 (does not count as a stitch). Work 1 SC in each of the 84 stitches around. Sl st to join. (84 SC).
- Next 3 Rows: Ch 1. Work 1 SC in each of the 84 stitches around. Sl st to join. (84 SC).
- Hardware Row (Attaching D-Rings):
- Find the exact center of the two long sides of the bag.
- Prorate 5 stitches for the D-ring on each side. There should be 37 stitches between the center points.
- SC to the first marker.
- D-Ring Attachment: Hold the D-ring against the edge. Work 5 SC by inserting the hook through the stitch and over the ring. Ensure the stitches are tight.
- SC in the next 37 stitches.
- D-Ring Attachment: Work 5 SC through the stitch and over the second D-ring.
- SC in the remaining 37 stitches. Sl st to join.
- Next 7 Rows: Ch 1. Work 1 SC in each of the 84 stitches around. Sl st to join. (84 SC).
Creating the Folded Top Edge:
- Fold: Fold the top section (the 12 SC rows) to the inside of the bag, aligning the first SC row (Row 1 of Part 4) with the final row (Row 12 of Part 4).
- Seaming: Using a Sl St, join the inner layer (Row 1) to the outer layer (Row 12) all the way around the top edge. This creates a dense, reinforced finish.
- Fasten off, weave the tail securely into the seam.
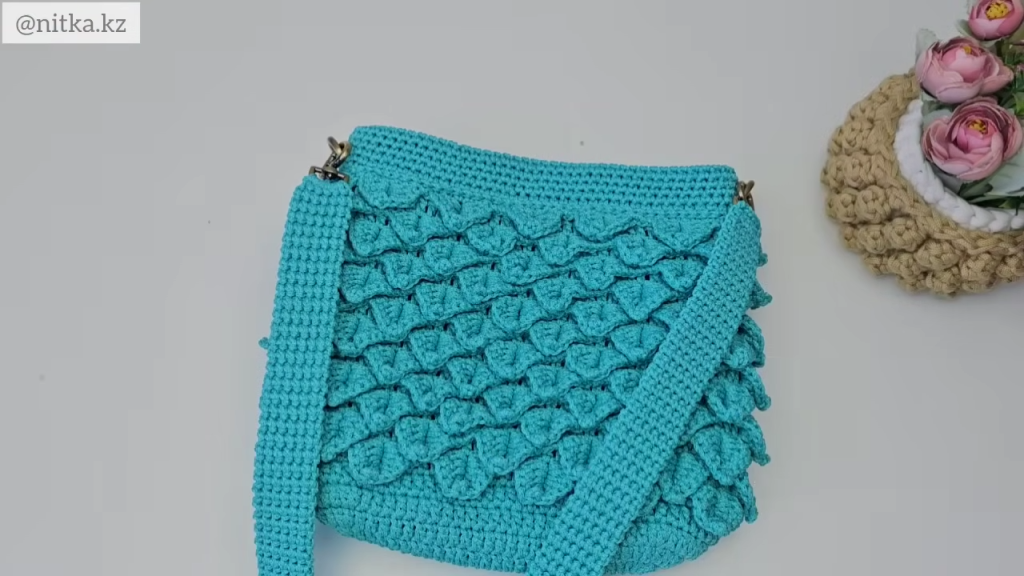
🏷️ Part 5: The Crossbody Strap
The strap is worked in a Waistcoat Stitch variation for a dense, cord-like effect.
- Attachment to Carabiner 1: Attach yarn directly to the opening of the first carabiner clasp. Ch 1. Work 6 SC around the clasp ring.
- Row 1 (SC): Ch 1, turn. SC in each of the 6 stitches. (6 SC).
- Row 2 (Waistcoat Style): Ch 1, turn. Insert hook into the space between the V of the stitch from the row before last (Row 1) to pick up the loop. Work 6 SC, ensuring you work into the stitch from the previous two rows for maximum thickness.
- Repeat Row 2 until the strap measures 115 cm (45 inches) or desired length.
- Attachment to Carabiner 2: Place the second carabiner clasp against the end of the strap. Insert the hook through the stitch and over the clasp ring. Work 6 SC to securely attach the strap to the second clasp.
- Fasten off and secure all ends.
Video Tutorial:
✨ Final Assembly & Care
- Magnetic Snap: Sew the 18mm magnetic snap closure onto the inside of the top edge. Ensure it is centered both vertically and horizontally. Use the nylon thread for an invisible and secure application.
- Lining: While optional, adding a sewn lining will protect the cord yarn and prevent items from slipping through the stitches. (The video suggests following a separate lining tutorial for a similar bag).
- Attach Strap: Clip the carabiners onto the D-rings/Half-rings.
Enjoy your beautifully textured and sturdy “Mermaid Scales” Crossbody Bag!


