
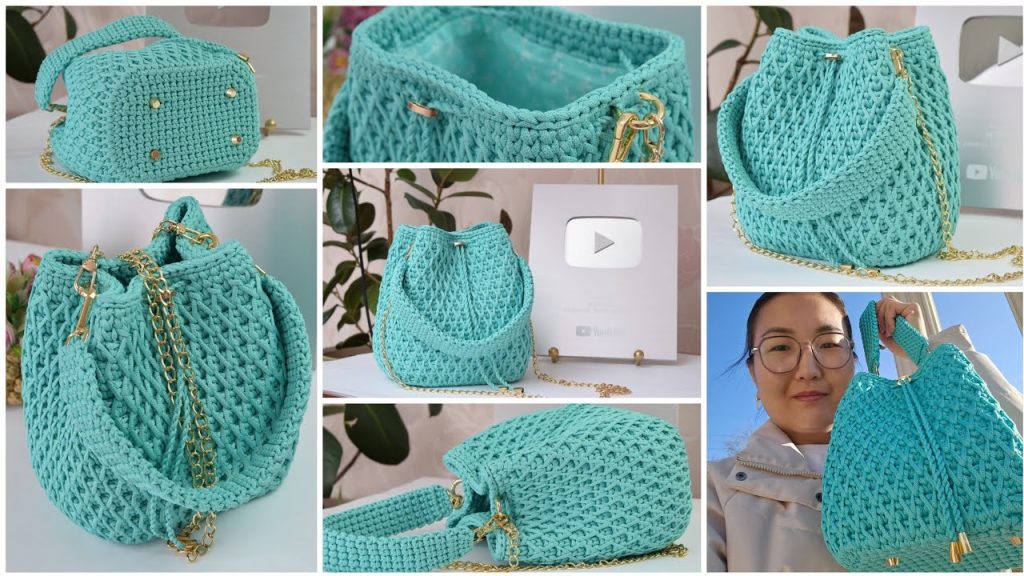
Welcome to a truly detailed pattern for crocheting the Honeycomb Hexagon Drawstring Bag (or “Torba” bag). This design stands out for its unique, sturdy construction featuring a rigid, flat, oval base and a striking all-over texture created by the “Honeycomb” (or “Bobble-Stitch”) pattern.
This guide will take you through the precise shaping of the base, the texture stitch, the drawstring casing, and the final assembly, including the creation of the decorative closure cord and optional feet.
🧶 Materials & Tools
| Icon | Item | Details |
| Yarn | Main Yarn (MC) | Approximately 300 meters of 3 mm Polyester Cord (or similar, firm cord like Polypropylene or stiff Cotton). |
| Hook | Main Hook | 4.0 mm (or size needed to achieve a very firm, dense fabric). |
| Hook | Sl St Hook | 3.5 mm (optional, for final edge sl sts). |
| Hardware | Drawstring | 1 Plastic Cord Stopper, 2 Cord End Caps. |
| Hardware | Strap Attachments | 2 20 mm Carabiner Clips, 2 20 mm Small Rings. |
| Hardware | Feet (Optional) | 4 Screw-on Bag Feet (Mushroom/Cone style). |
| Notions | Markers & Needle | Stitch Markers, Scissors, and Tapestry Needle (sized for the cord). |
| Lining Fabric | Fabric | Approximately 60 cm x 40 cm of Cotton Poplin or similar lining material. |
📐 Sizing & Gauge
| Icon | Measurement | Result |
| Base | Finished Base Dimensions | Approx. 18 cm (Length) x 12 cm (Width). |
| Body | Finished Bag Height | Approx. 22 cm (measured before the final casing). |
| Stitch Count | Final Stitch Count | 74 stitches around the edge (required for the Honeycomb pattern). |
| Strap | Short Strap Length | Approx. 40 cm. |
📚 Stitch Guide & Abbreviations
| Abbreviation | U.S. Terminology | Description |
| ch | Chain | |
| sl st | Slip Stitch | |
| sc | Single Crochet | |
| inc | Increase | Work 2 SC into the same stitch. |
| dec | Decrease | SC2tog (Single Crochet Two Together). |
| st(s) | Stitch(es) | |
| rep | Repeat | |
| BLO | Back Loop Only |
Special Stitch: Honeycomb Texture (Long SC)
This pattern alternates a standard SC with a Long SC, worked into the row below. The Long SC is worked into the ‘V’ of the previous row’s SC, creating a dense, raised texture.
- Long SC (LSC): Insert hook into the center of the V-stitch (the V created by inserting the hook between the legs of the SC in the row below, or two rows below, depending on the row). Pull the loop up to the height of the current row, YO, and pull through both loops.
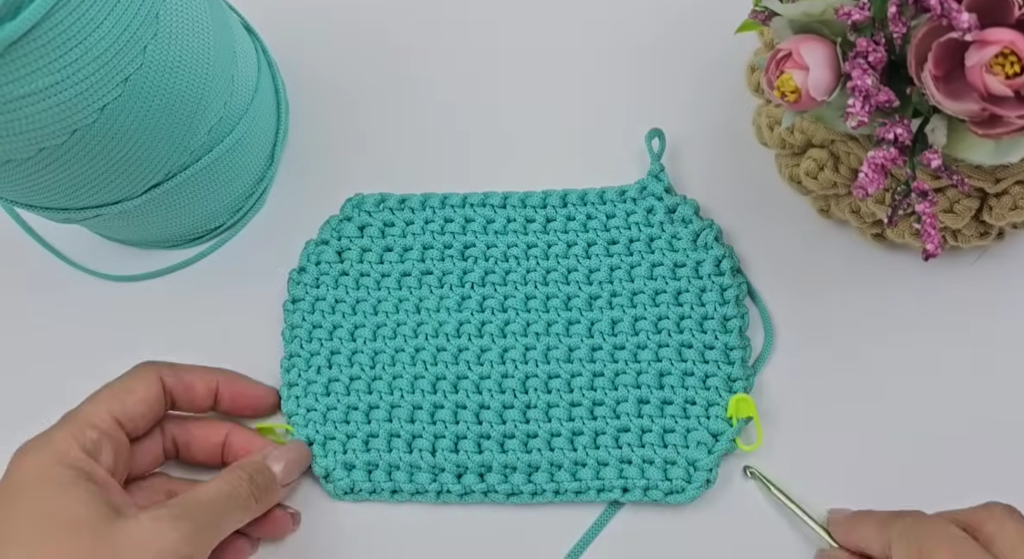
🕳️ Part 1: The Rigid Oval Base (Flat Construction)
This base is worked in back-and-forth rows using a combination of SC and increasing/decreasing in a specific way to create a very stiff, hexagonal-like oval shape. The total row count is 21.
- Foundation: Ch 16.
- Row 1 (SC Inc Row): Sk 1 ch. Inc (2 SC) in the 2nd ch from hook. SC in the next 13 chs. Inc (2 SC) in the last ch. (17 SC total). Ch 1, turn.
- Row 2 (Hidden Inc): Insert hook into the back loop of the 1st st (BLO SC) and the same foundation chain loop as the previous SC. This creates the hidden increase. BLO SC in the next 15 sts. Inc (2 SC) in the last st. (19 SC total). Ch 1, turn.
- Row 3 (SC Inc Row): Inc (2 SC) in the 1st st. SC in the next 17 sts. Inc (2 SC) in the last st. (21 SC total). Ch 1, turn.
- Row 4 (Hidden Inc): Rep Row 2, using the same “V” of the foundation chain for the first hidden increase. BLO SC in the next 17 sts. Rep the hidden increase on the last st. (21 SC total). Ch 1, turn.
- Row 5 (SC Inc Row): Inc (2 SC) in the 1st st. SC in the next 19 sts. Inc (2 SC) in the last st. (23 SC total). Ch 1, turn.
- Row 6 (Hidden Inc): Rep Row 2/4 logic. BLO SC in the next 19 sts. Rep the hidden increase on the last st. (23 SC total). Ch 1, turn.
- Rows 7 – 16 (Straight Rows): SC in each of the 23 sts across. (10 rows total, maintaining 23 SC). Ch 1, turn.At this point, you have completed the increase section and the straight center section (Rows 1–16).
- Row 17 (SC Dec Row): Dec (SC2tog) over the first 2 sts. SC in the next 19 sts. Dec (SC2tog) over the last 2 sts. (21 SC total). Ch 1, turn.
- Row 18 (Hidden Dec): Dec over the first 2 sts, working the decrease stitch into the corresponding two foundation loops. SC in the next 17 sts. Dec over the last 2 sts. (19 SC total). Ch 1, turn.
- Row 19 (SC Dec Row): Dec (SC2tog) over the first 2 sts. SC in the next 15 sts. Dec (SC2tog) over the last 2 sts. (17 SC total). Ch 1, turn.
- Row 20 (Hidden Dec): Dec over the first 2 sts, working into the two foundation loops. SC in the next 13 sts. Dec over the last 2 sts. (15 SC total). Ch 1, turn.
- Row 21 (Final Dec Row): Dec (SC2tog) over the first 2 sts. SC in the next 11 sts. Dec (SC2tog) over the last 2 sts. (13 SC total). FO, leaving a short tail.
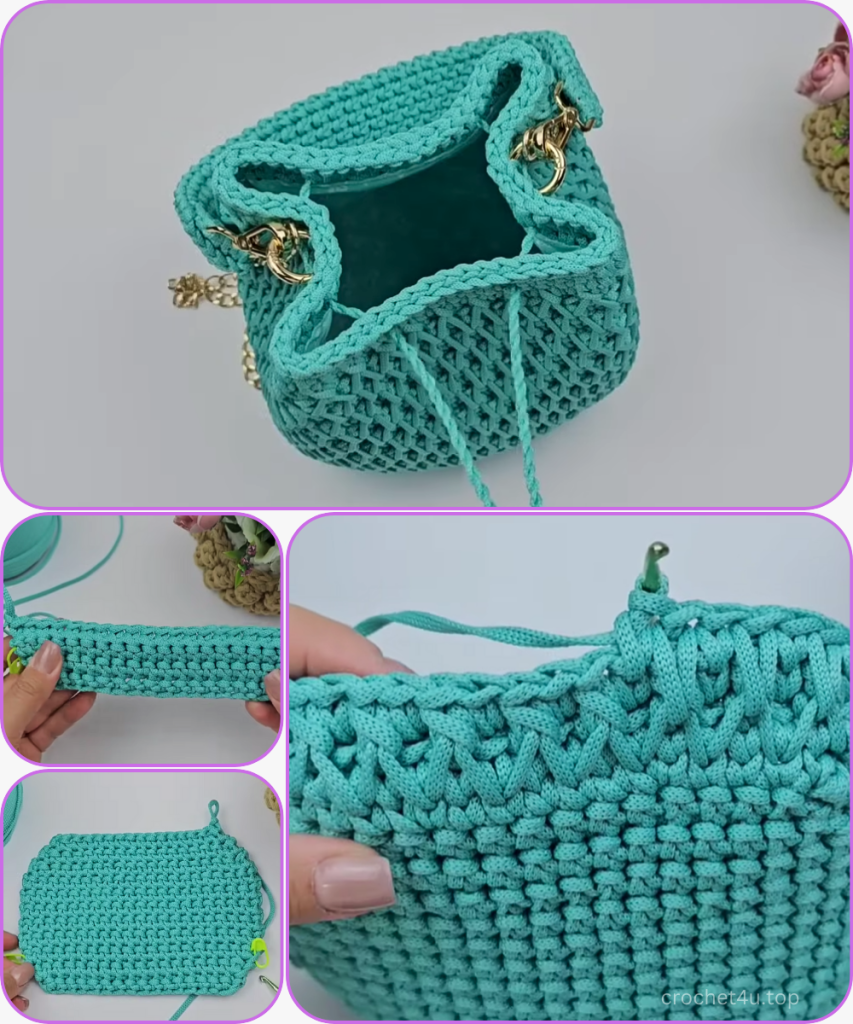
🧱 Part 2: Edging the Base & Setting the Wall Stitch Count
This round transitions from the flat base to the circular bag body and sets the final stitch count of 74 needed for the pattern.

- Round 1 (Edging): Join yarn at the corner. SC evenly around the perimeter of the base, following the increase scheme below:
- Side 1 (Long Edge): Work 4 SC, then Inc (2 SC). Repeat [SC in next 5, Inc] once. SC in the last 4 sts of the section.
- Side 2 (Vertical Edge): Work 10 Inc (2 SC in each row end).
- Side 3 (Long Edge): Work 4 SC, then Inc (2 SC). Repeat [SC in next 5, Inc] once. SC in the last 4 sts of the section.
- Side 4 (Vertical Edge): Work 10 Inc (2 SC in each row end).
- Sl st to the first SC to join. (74 SC total).
- Round 2 (Solid SC Wall Foundation): Ch 1. Working in the center of the V-stitch (the V created by inserting the hook between the legs of the SC in the row below, also known as the “tapestry stitch” or “V-stitch” method), SC in each st around. (74 SC). Do not join. Continue working in a spiral for a seamless look.You will now work in a continuous spiral for the pattern rows, placing the hook into the center of the ‘V’ of the stitch below (the “V-stitch” method).
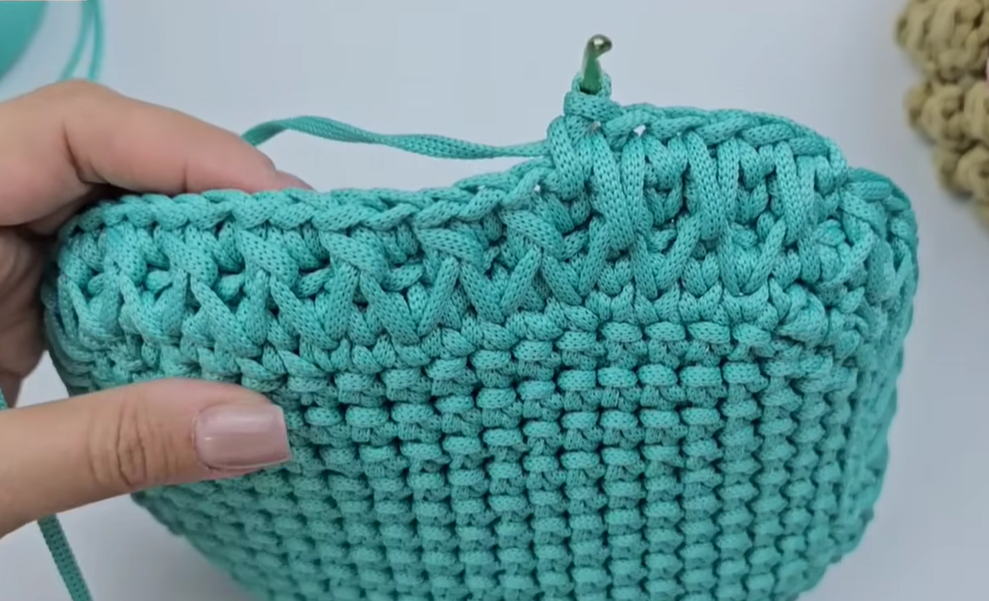
🍯 Part 3: The Honeycomb (Bobble-Stitch) Body
This pattern is worked over two rounds: one round of alternating SC and LSC, and one round of working only the raised texture stitches over the previous LSCs.
Setting the Texture:
- Round 3 (Alternating): LSC into the st two rows below (the previous round’s LSC foundation). SC in the next st. Rep [LSC in the next st two rows below, SC in the next st] around. (37 LSC, 37 SC = 74 sts total). Continue in spiral.
Honeycomb Pattern Repeat:
- Round 4 (Relief Stitch): This round uses the LSCs from the previous row to create the raised texture.
- Work a Front Post Relief Stitch over the first LSC (the long leg of the stitch).
- SC into the same stitch space (the head of the LSC).
- Rep [Front Post Relief Stitch over the next LSC, SC into the head of the LSC] around. (37 Relief St, 37 SC = 74 sts total). Continue in spiral.
- Round 5 (Alternating/Staggered): The LSCs are staggered in this round to form the honeycomb pattern.
- SC in the first st (over the previous Relief Stitch/SC pair).
- LSC into the st two rows below (the head of the previous Relief Stitch).
- Rep [SC in the next st, LSC in the st two rows below] around. (37 LSC, 37 SC = 74 sts total). Continue in spiral.
Repeat Round 4 and Round 5 until you have completed 14 total “Honeycomb” motifs vertically.
🔝 Part 4: Drawstring Casing and Edging
The final rows create the casing for the drawstring and a finished top edge.
- Round 1 (SC Transition): SC in each st around, working in the center of the V-stitch. Do not join. (74 SC).
- Round 2 (Drawstring Eyelets): This round creates 8 eyelets symmetrically placed around the bag (74/8 = approx 9.25 sts spacing).
- Start at the back center. SC in the next 10 sts.
- Rep [Ch 1, Sk 1 st, SC in the next 9 sts] around, adjusting the final SC count to meet the beginning of the round. You should have 8 Ch-1 spaces and 66 SC total.
- Round 3 (Casing Solid): SC in the next 10 sts. Rep [SC into the Ch-1 space, SC in the next 9 sts] around. (74 SC).
- Round 4 (Final Edging): Sl st in the next st. Ch 1. Rep [Sl st in the next st, Ch 1, Sk 1 st] around. Sl st to the first sl st. FO.
🔗 Part 5: Handle and Final Assembly
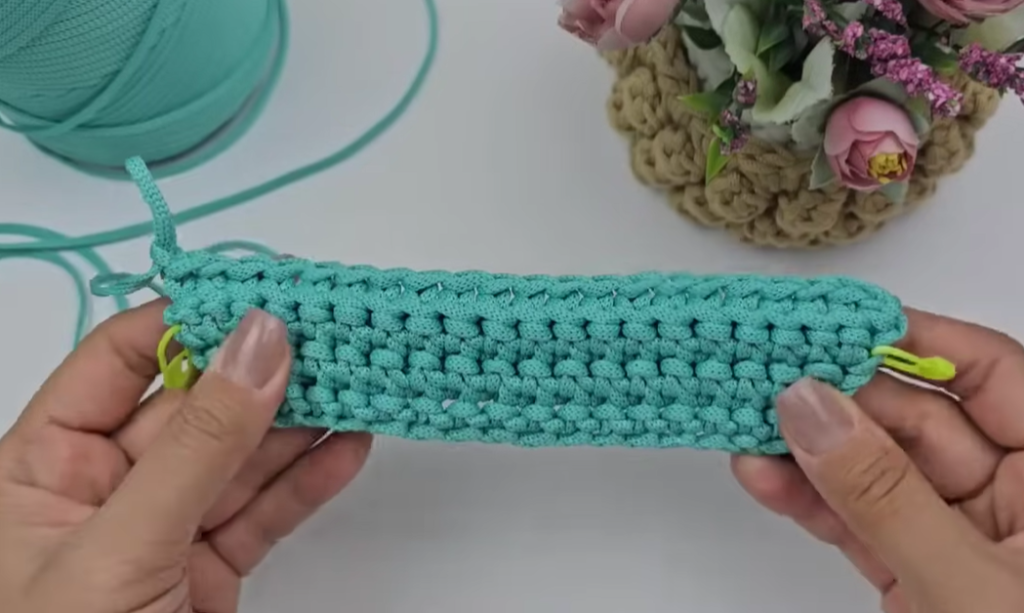
- The Short Handle (Flat Rope):
- Ch 6. Sk 1 ch. SC in the 2nd ch and in each ch across. (5 SC). Ch 1, turn.
- Repeat: SC in the BLO of each st across. Ch 1, turn.
- Continue repeating the BLO SC rows until the handle measures approximately 40 cm (or desired length). FO, leaving a long tail for sewing.
- Use the long tails to securely sew the Carabiner Clips to the ends of the handle.
- The Drawstring Cord (Twisted Rope):
- Cut two strands of cord, each about 2.5 meters long.
- Find the midpoint and attach one end to a fixed point (or have an assistant hold it).
- Twist the cord tightly by hand until it begins to coil on itself.
- Fold the twisted length in half and let it coil up naturally into a tight, robust cord.
- Drawstring Installation:
- Starting at the back, weave the twisted cord in and out of the 8 eyelet holes (Ch-1 spaces). Ensure both ends exit at the center back.
- Thread both ends through the cord stopper.
- Tie a simple knot at each end of the cord, trim excess, and secure the end caps.
- Hardware & Lining (Optional):
- Secure the Small Rings to the bag wall on the sides, slightly below the drawstring casing. Clip the short handle onto these rings.
- Install the 4 Bag Feet onto the base, using a screwdriver to tighten them securely from the inside (this is easiest before the lining).
- Sew the fabric lining to fit the bag (the lining should be shorter than the bag wall height to allow for the drawstring cinch) and hand-sew it into the bag, securing it just below the drawstring casing.


