

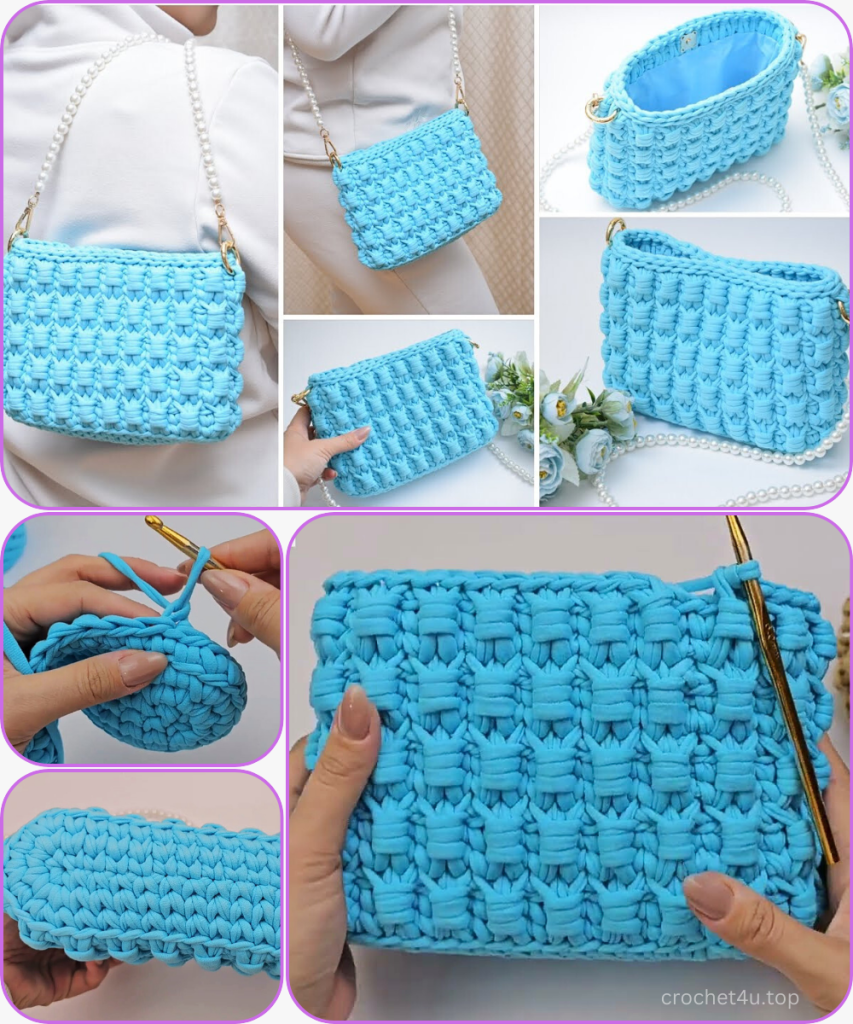
Welcome to the blog! Today, we’re diving into a project that proves you don’t need a huge stash to create a high-end accessory. This pattern, inspired by a beautiful design from Nitka KZ, uses just one single skein of T-shirt yarn to create a structured, chic clutch or small shoulder bag.
The magic lies in the dense, oval-shaped base and a striking, repeating Stacked Cluster Stitch that gives the bag an incredible, resilient texture and excellent form-holding ability. Get ready to crochet your new favorite bag!
🧶 Materials & Sizing
| Icon | Item | Details |
| Yarn | Main Yarn (MC) | One (1) Skein of T-Shirt Yarn (approx. 100 meters, 7-9 mm thickness). Ensure the yarn is slightly pre-stretched for best results. |
| Hook | Main Hook | 6.0 mm (Use this size for the body and base to maintain tightness). |
| Hook | Finishing Hook | 4.0 mm (Recommended for managing yarn ends and final sl st details). |
| Finished Size | Bag Dimensions | Approx. 16 cm (Height) x 23 cm (Width). |
| Hardware | Closure | 1 18 mm Magnetic Snap (sew-on style recommended). |
| Hardware | Strap Attachments | 2 20 mm Split Rings or D-rings. |
| Hardware | Strap (Optional) | Decorative chain or matching yarn strap. (The video uses a pearl-inlaid chain). |
| Notions | Lining & Thread | Fabric for lining (approx. 24 cm x 30 cm), monofilament (nylon) thread or matching sewing thread, sewing needle, scissors. |
📚 Stitch Guide & Abbreviations
This pattern relies heavily on the Tapestry Single Crochet (or V-Stitch SC) method, where the hook is inserted directly into the center of the ‘V’ of the stitch below, creating a dense, column-like fabric.
| Abbreviation | U.S. Terminology | Description |
| ch | Chain | |
| sl st | Slip Stitch | |
| sc | Single Crochet | |
| inc | Increase | Work 2 SC into the same stitch. |
| V-sc | V-Stitch Single Crochet | Insert hook into the center of the ‘V’ of the stitch below. |
| BLO | Back Loop Only | |
| st(s) | Stitch(es) | |
| rep | Repeat | |
| SSC | Stacked Cluster Stitch | The pattern’s main feature (see Special Stitches below). |
Special Stitch: Stacked Cluster Stitch (SSC)
The SSC is worked over 2 stitches of the previous solid row, and the foundation loop is pulled from 3 rows below.

- SC in next st.
- Pull Loop (PL): Insert hook into the st 3 rows below (often the center of the previous SSC motif). Pull up a loop to the height of the current row (medium pull). You now have 2 loops on your hook.
- Cluster: Insert hook into the next unworked st of the current row. Yarn over, pull up a loop. (3 loops on hook). Yarn over, pull through all 3 loops.
- Chain Lock: Chain 1 tightly to lock the cluster.
🟣 Part 1: The Oval Base (3 Rounds)
The base is worked in joined rounds. The SC is the standard V-Stitch SC.
- Foundation Chain: Ch 14.
- Round 1: SC in the 2nd ch from hook (working into the back bumps for a clean edge). SC in the next 11 chs. Work Inc (3 SC) in the last ch. Rotate to work along the opposite side of the foundation chain. SC in the next 12 chs. Work Inc (3 SC) in the last unworked chain space. Sl st to the first SC to join. (30 sts total).
- Round 2: V-SC in the next 12 sts. Rep [Inc (2 V-SC)] 3 times (6 stitches created). V-SC in the next 12 sts. Rep [Inc (2 V-SC)] 3 times (6 stitches created). Sl st to the first V-SC to join. (36 sts total).
- Round 3 (Final Increase Round): V-SC in the next 12 sts. Rep [Inc (2 V-SC), V-SC] 3 times. V-SC in the next 12 sts. Rep [Inc (2 V-SC), V-SC] 3 times. V-SC in the last st. Sl st to the first V-SC to join. (42 sts total).
🧱 Part 2: The Body Walls & Foundation
- Round 4 (Body Ridge/Transition): Ch 1. Insert hook into the Back Loop Only (BLO) of the stitch below, using the V-stitch technique (inserting into the center of the V while only grabbing the BLO/inner-most loop). V-SC in BLO around, creating a sharp ridge at the base of the bag. Sl st to the first V-SC to join. (42 sts).
- Round 5 (Foundation for Pattern): Ch 1. V-SC in each of the 42 sts around. Sl st to the first V-SC to join. (42 sts).
💠 Part 3: The Textured Pattern (5 Repeats High)
The pattern is worked in a 3-Round Repeat over 42 stitches (21 repeats).

Pattern Row Sequence: [Pattern Row, Solid V-SC Row, Solid V-SC Row]
Repeat 1
- Pattern Row 1 (SSC):
- Special Start: Sl st to join, then Ch 1.
- Work the first SSC sequence: SC in the 1st st, PL from 3 rows below (below the join), Cluster over the next st, Ch 1.
- Rep [SC in the next st, PL from 3 rows below (in the center of the previous motif), Cluster over the next st, Ch 1] around. The pattern should align perfectly, completing 21 total SSC motifs. Sl st to the first SC to join. (42 sts).
- Solid Row 1: Ch 1. V-SC in each of the 42 sts around, working into the tops of both the SC and the Cluster stitches. Sl st to join. (42 sts).
- Solid Row 2: Ch 1. V-SC in each of the 42 sts around. Sl st to join. (42 sts).

Repeat 2 – 5
- Pattern Row 2 (SSC Staggered): Ch 1. Now, align your SSC motifs directly above the SSC motifs from the first Pattern Row.
- Rep [SC in the next st, PL from 3 rows below (in the center of the previous motif), Cluster over the next st, Ch 1] around, ensuring alignment. Sl st to the first SC to join. (42 sts).
- Solid Row 3: Ch 1. V-SC in each of the 42 sts around. Sl st to join. (42 sts).
- Solid Row 4: Ch 1. V-SC in each of the 42 sts around. Sl st to join. (42 sts).
Continue repeating the three-row sequence (Pattern Row, Solid Row, Solid Row) until you have completed 5 total Pattern Rows in height.
✨ Part 4: The Finishing Edge
- Final Solid Row: After the 5th Pattern Row, work one final Solid Row: V-SC in each of the 42 sts. Do not chain or turn.
- Sl St Edging: Ch 1. Working with a firm tension, work Sl st into the back loop of each st around. This creates a neat, braided edge. Sl st to the first sl st.
- Finish: Cut the yarn, leaving a short tail. Use the smaller hook to pull the tail through the last stitch and weave it neatly into the inside of the last row of slip stitches to create an invisible join. FO.

🛠️ Part 5: Assembly & Hardware
- Install Magnetic Snap: Locate the center front and center back of the bag (aligning with the base seams). Use monofilament thread to securely stitch the 18 mm Magnetic Snap halves to the bag wall, approximately 3-4 rows below the final sl st edge.
- Sew the Lining:
- Cut your fabric to 24 cm wide by 30 cm long.
- Fold the fabric in half (15 cm high) and sew up the sides (1 cm seam allowance).
- To match the bag’s base shape, “box” the corners by measuring and stitching a triangle approximately 6 cm wide across the base corner. Trim the excess.
- Hem the top of the lining (fold over twice and stitch).
- Insert the lining into the bag, pin the top edge just below the magnetic snap, and hand-sew it securely to the crochet fabric using matching thread.
- Attach Rings: Attach the 20 mm Split Rings to the sides of the bag, aligning them symmetrically at the same row height as the magnetic snap.
- Attach Strap: Clip your decorative chain or matching crocheted strap onto the rings. Your One-Skein Luxe Clutch is now complete!


