
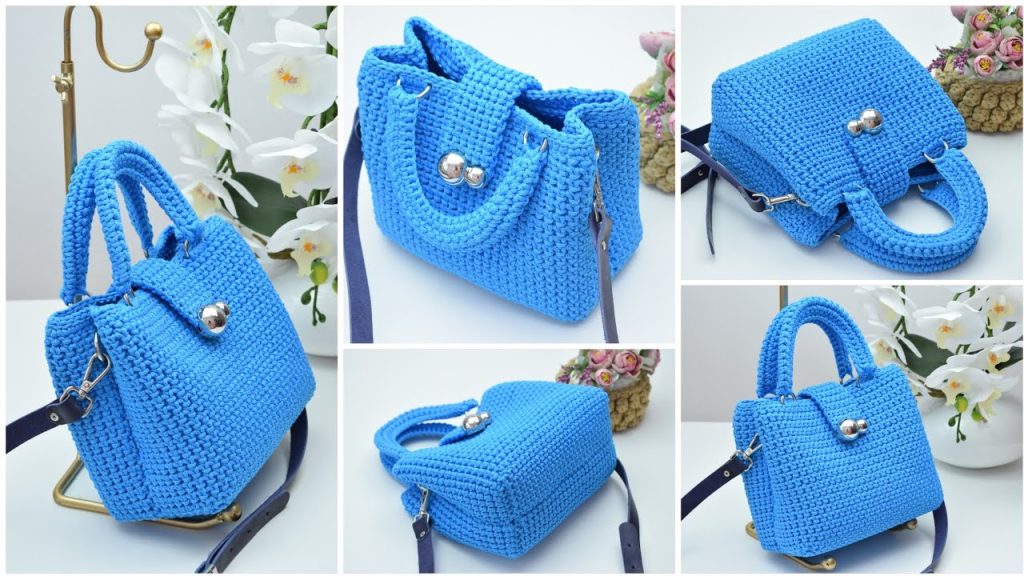
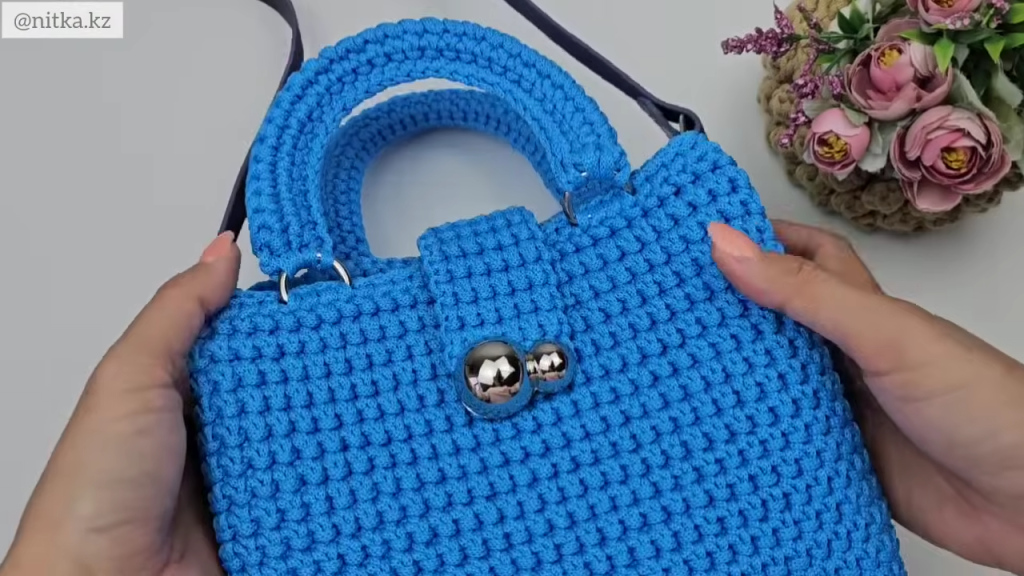
Welcome, crocheters, to a pattern that delivers high-end structure and stunning texture using simple stitches! This essential crossbody bag (or small satchel) is created using durable polyester cord and a unique stitch that produces bold horizontal ridges, ensuring the finished piece stands up beautifully on its own.
This project is worked in two flat panels, seamed together, and finished with integrated handle attachments and a sleek flap lock. Grab your cord and let’s get started on your new essential bag!
🧰 Materials & Tools
| Icon | Item | Details |
| Yarn | Main Yarn (MC) | 300 meters of 3mm Polyester Cord or similar rope-like yarn (e.g., Macrame cord or robust T-shirt yarn). |
| Hook | Main Hook | 4.0 mm (for the main body structure). |
| Hook | Finishing Hook | 3.0 mm (for sewing and delicate attachment). |
| Hardware | Lock | 1 Portfolio Lock/Magnetic Lock (the type with prongs/bolts). The video shows a magnetic bolt-type lock. |
| Hardware | Rings | 4 Half-Rings or D-rings (approx. 20 mm inner diameter). |
| Hardware | Strap | 2 x 20 mm Split Rings (for attaching the strap to the half-rings), and a pre-made Crossbody Strap (approx. 120 cm). |
| Notions | Finishing Tools | Scissors, Lighter (for sealing polyester ends), Tapestry Needle. |
📐 Sizing & Gauge
| Icon | Measurement | Result |
| Finished Bag | Height & Width | Approx. 19 cm (Height) x 22 cm (Width) (measured flat). |
| Main Panel | Length & Width | Approx. 29 cm (Length/Foundation) x 17 cm (Height/35 rows). |
| Gauge | Stitch Density | Density is paramount. The fabric should be thick, firm, and have very little stretch. If your fabric is loose, drop down a hook size. |
📚 Abbreviations & Special Stitches
This pattern uses US terminology. The core of the bag is the texture created by working into multiple loops.
| Abbreviation | U.S. Terminology | Description |
| ch | Chain | |
| sl st | Slip Stitch | |
| sc | Single Crochet | |
| BLO | Back Loop Only | |
| LR-SC | Layered Ridge Single Crochet | Insert hook under the single exposed loop/bar from the previous row AND the single exposed loop/bar from the row before that (two loops total, two rows down). SC as usual. See Step 3 for details. |
| st(s) | Stitch(es) | |
| rep | Repeat | |
| ch-sp | Chain Space |
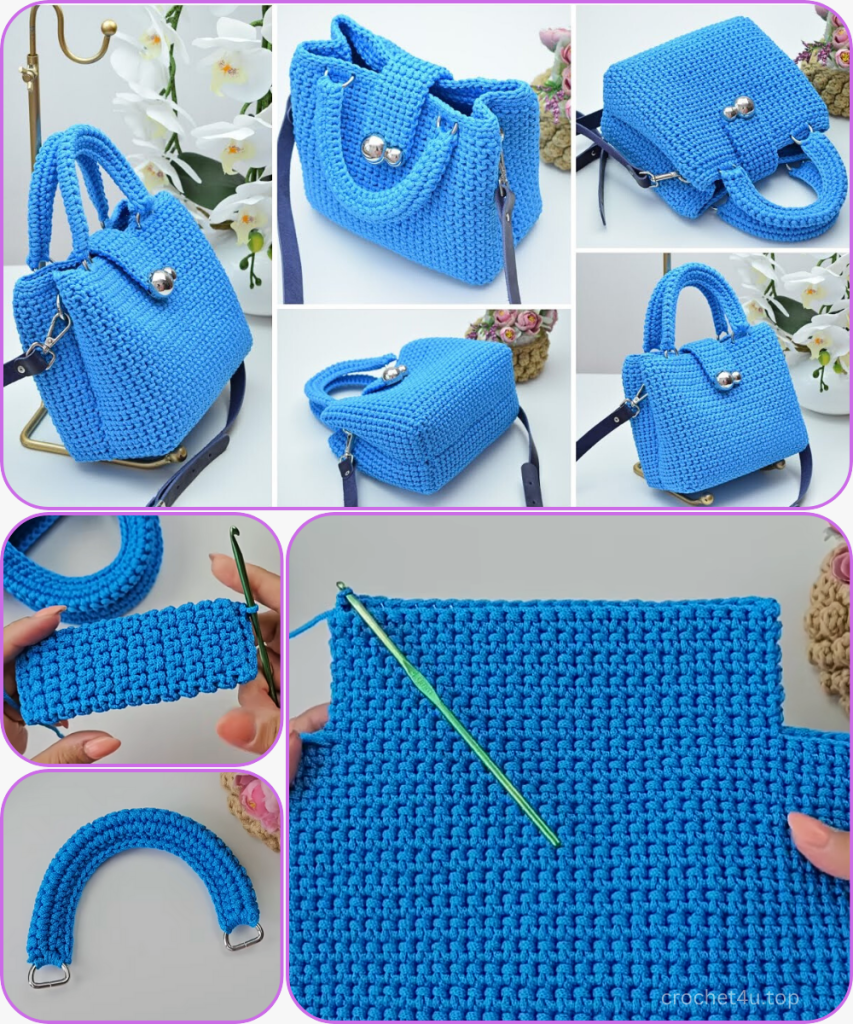
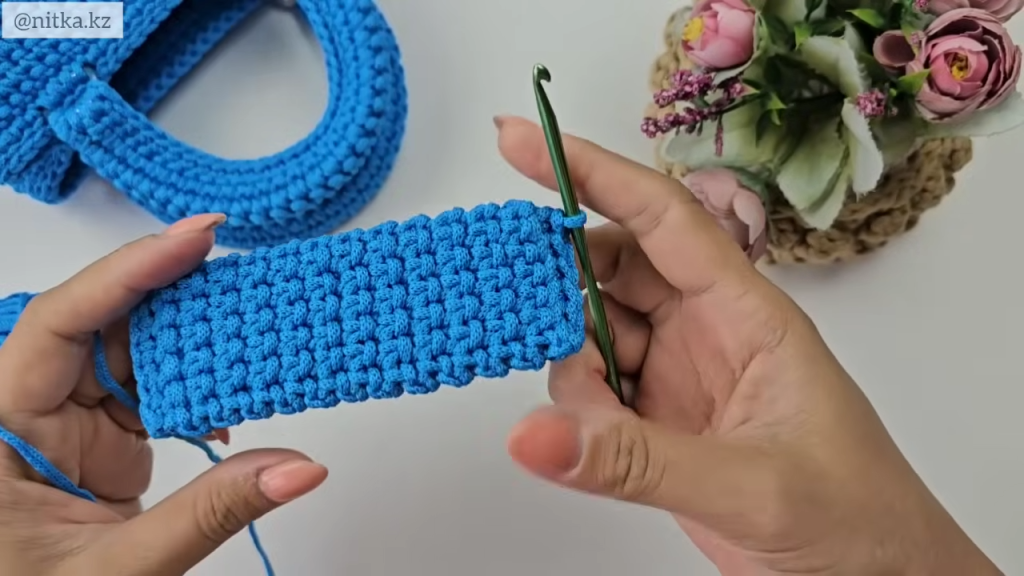
🧱 Part 1: The Main Panel (Textured Body)
You will need to create two identical panels. The texture is created by working into two back loops from the previous two rows.
- Foundation Chain: Leave a short tail (approx. 5 cm) at the start. Ch 41.
- Row 1 (SC Foundation): Sk 1 ch. SC into the back bump/back loop only (BLO) of the remaining 40 ch. (40 SC). Ch 1, turn.
- Row 2 (BLO Transition): SC into the BLO of each st across. (40 SC). Ch 1, turn.
- Row 3 (LR-SC Start): This row begins the ridge pattern.
- Insert the hook: You should see a single horizontal loop from the top of the stitch of Row 2. Insert the hook under this loop, AND continue down to insert the hook under the horizontal loop exposed from the top of the stitch of Row 1. You are catching two horizontal loops/bars, one from each of the two previous rows.
- LR-SC in each st across. (40 LR-SC). Ch 1, turn.
- Rows 4–35: Rep Row 3. Always work the LR-SC by inserting the hook under the exposed horizontal loops from the two preceding rows. This creates a dense, layered ridge effect. (Total 35 rows).
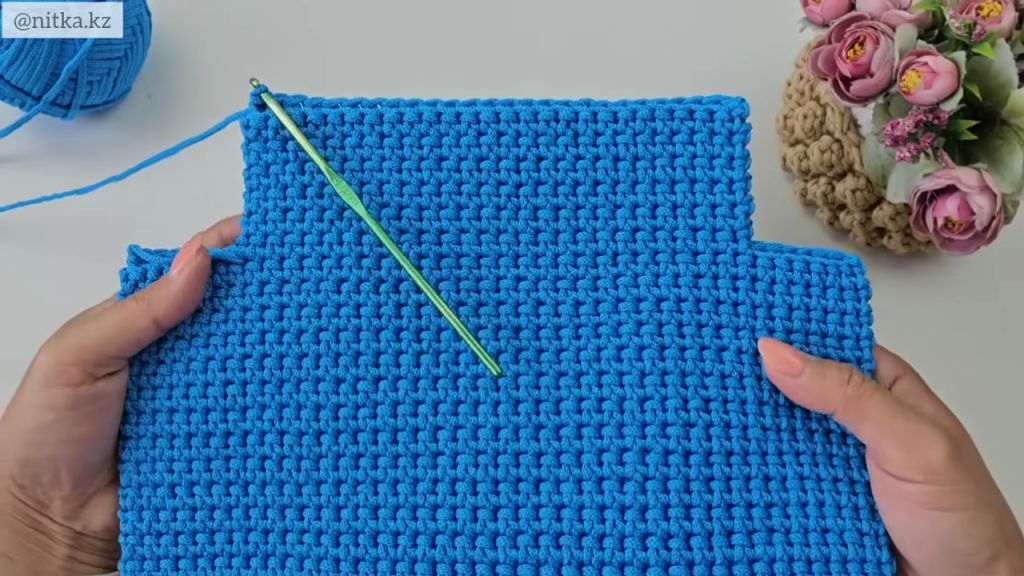
➖ Part 2: Shaping the Flap/Handle Area
After completing the main body (Row 35), you will begin working in a smaller area to create the angled corners and the opening for the bag.
- Row 36 (First Shaping Row):
- Count 7 stitches from the start of the row. Rejoin the yarn with a sl st in the 8th st.
- Ch 1. Work LR-SC in the next 26 sts. (26 LR-SC).
- You should have 7 unworked sts remaining at the end. Ch 1, turn.
- Rows 37–41: Work LR-SC in the 26 sts across, using the same technique as the main body. (Total 6 rows of 26 sts for the shaped section). Ch 1, turn.
- Finish Panel: On the final row (Row 41), cut the cord, leaving a tail (approx. 10 cm). Secure the end by pulling the working loop through and sealing the polyester end with a lighter, then weaving it in with the smaller hook.
Repeat Parts 1 and 2 to create the second identical main panel.
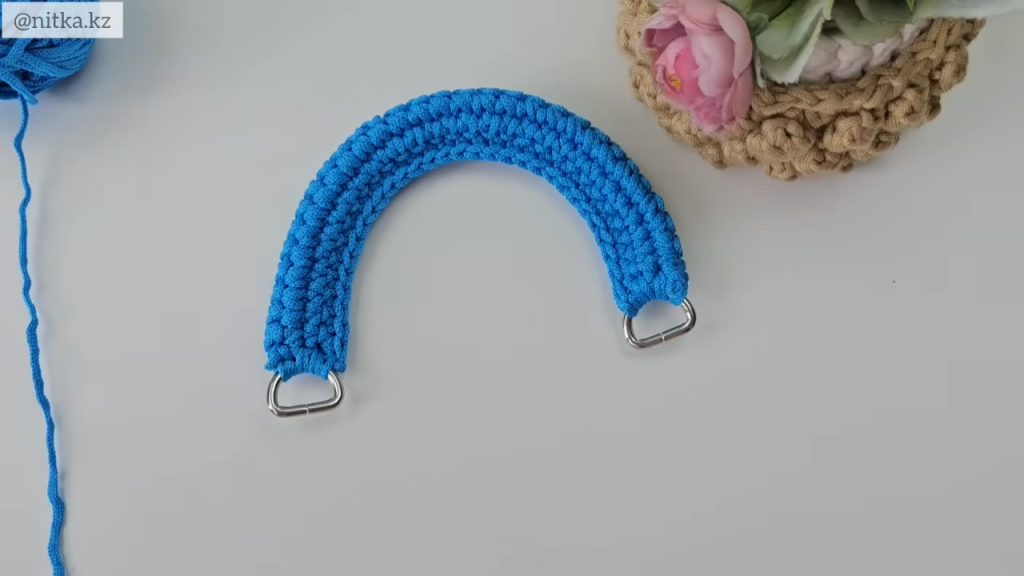
👜 Part 3: The Handles (Straps)
The top handles are small, structured, and flat. You will create two identical pieces.
- Foundation: Leave a long tail (approx. 20 cm). Ch 31.
- Row 1 (SC Foundation): Sk 1 ch. SC in each of the remaining 30 ch. (30 SC). Ch 1, turn.
- Rows 2–5 (Flat Body): SC in both loops of each st across. (30 SC). Ch 1, turn.
- Joining Row (Tubular Structure):
- Align the long edges of the strip together, wrong sides facing in.
- Ch 1. Insert the hook through the outermost loop of the bottom edge AND the top loop of the current working edge.
- SC through both layers across. (30 SC).
- Finish: Cut the cord, leaving a long tail (approx. 20 cm). Pull through to secure.
Repeat to create a second identical handle.
🧩 Part 4: Assembly & Edge Finishing
The bag is assembled by seaming the two panels with SC around the perimeter.
- Prepare for Seaming: Place the two main panels together with the outer (textured) sides facing inwards. The inner/wrong sides should face out.
- Side Seams (SC Seaming):
- Reattach a new strand of yarn at one of the bottom corners. Tie a secure knot.
- Short Side Seam: Ch 1. SC through the outermost loop of the edge of the front panel AND the outermost loop of the edge of the back panel. Work SC evenly along the side edge. (Approx. 27 SC is a good density).
- Corner/Bottom Seam: At the corner, turn. Work SC along the bottom edge, working 2 SC, then 1 Increase (2 SC in one st) repeatedly to keep the seam from pulling.
- Second Short Side Seam: Rep the SC seam along the second short side.
- Finishing Seam: On the final side seam, secure the yarn with a pull-through and cut, leaving a long tail.
- Turn Out: Carefully turn the bag right-side out. The textured, ridged sides should now be on the exterior. Gently push out the corners to define the shape.
- Top Edge Prep (Handle Placement):
- Lay the bag flat. Mark the placement points for the half-rings on the top edge of both the front and back panels:
- Count 10 stitches from the side seam corner.
- Mark the next 4 stitches for the first half-ring attachment.
- Skip the next 12 stitches (center gap).
- Mark the next 4 stitches for the second half-ring attachment.
- You should have 10 stitches remaining to the next side seam.
- Lay the bag flat. Mark the placement points for the half-rings on the top edge of both the front and back panels:
- Top Edge Round 1 (Handle Integration):
- Reattach yarn at a side seam. Ch 1.
- SC in the next 10 stitches.
- Attach Half-Ring: Place the first half-ring over the next 4 stitches. Work SC through the ring and the stitch simultaneously for the 4 marked stitches.
- SC in the next 12 stitches (center gap).
- Attach Half-Ring: Place the second half-ring over the next 4 stitches. Work SC through the ring and the stitch simultaneously for the 4 marked stitches.
- SC in the final 10 stitches to the corner.
- Continue this pattern around the entire top opening, attaching the two remaining half-rings to the back panel.
- Top Edge Round 2 (Final Border):
- Ch 1. Insert hook into the single back loop of the stitch below (the one closest to the inside of the bag).
- Work Sl st in this loop for all 82 stitches around the entire perimeter. This creates a neat, braided finish.
- FO and weave the end inside the slip stitches.
🔒 Part 5: Lock Installation & Final Straps
- Install Lock Holder:
- Center the Lock Holder panel (Part 3) at the top center of the bag’s back panel.
- Attach the female/tongue portion of the lock hardware to the Lock Holder using the bolts/prongs, securing it firmly.
- Hand-sew or use the smaller hook (3.0 mm) and a separate piece of cord to sew the entire holder strip securely to the top center of the bag’s back panel.
- Install Lock Base:
- Close the bag and mark the exact center point on the front panel where the lock tongue hits.
- Tip for Thick Fabric: Since the cord is thick and the lock prongs may not pass through, use two separate strands of cord (or monofilament thread) and a large tapestry needle to sew the base of the lock securely to the front of the bag, tying and hiding the knots on the inside.
- Attach Handles: Using the long tails left on the handles (Part 3), securely sew the ends of the two structured handles to the attached half-rings.
- Attach Crossbody Strap: Clip the two 20 mm Split Rings onto the half-rings on the side gussets. Clip the leather crossbody strap to these rings.
Video Tutorial:
Your beautiful Essential Ridge Tote is now complete!


