
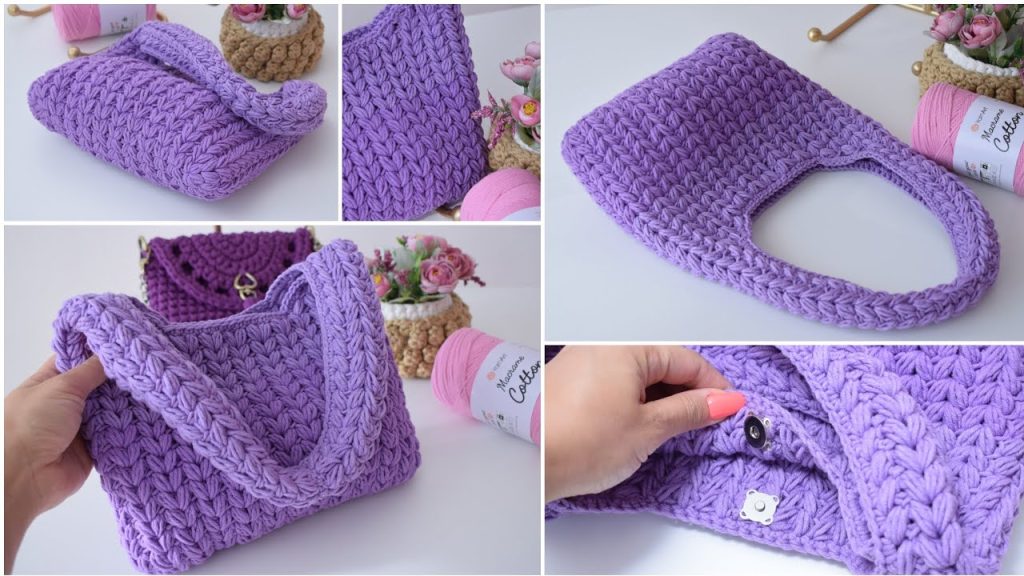
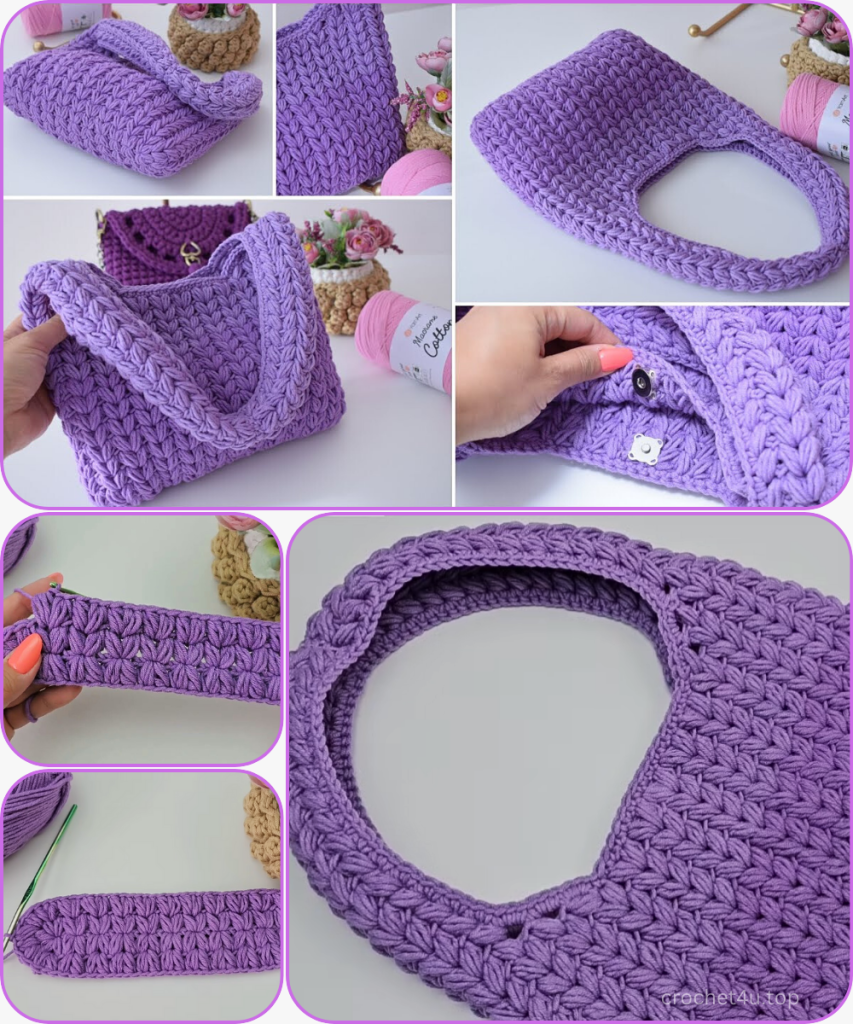
Hello, dear fiber artists! Get ready to fall in love with a project that is as soft and delightful as its name suggests: The Puffy Heart Cloud Bag. This beautiful handbag uses a repeating Puff Stitch Heart Motif to create an incredibly plump, textured fabric that is firm yet gentle to the touch. It’s perfect for adding a touch of romance and softness to any outfit.
We’re using a cotton-blend yarn to keep it light and ensure those bobbles really pop. Follow this detailed pattern to create a structured handbag complete with integrated handles.
💖 Project Overview & Sizing
This pattern creates a structured, slightly oblong handbag using continuous rounds for the body and turned rows for the integrated handles. The puff stitch fabric ensures the bag holds its shape without extra stiffening.
| Measurement | Result |
| Finished Width | Approx. 28 cm (11 inches) |
| Finished Height | Approx. 23 cm (9 inches) |
| Height with Handles | Approx. 40 cm (15.75 inches) |
| Gauge | Not strictly necessary, but 1 Heart Motif should measure approx. 3 cm wide. |
🛍️ Materials & Tools
| Icon | Item | Details |
| Yarn | Main Yarn (MC) | 2 Skeins of YarnArt Jeans Plus or similar DK/Worsted weight cotton-acrylic blend (100g/160m per skein). The blend is key for light weight and puff retention. |
| Hook | Main Hook | 4.0 mm (or size needed to achieve firm puffs). |
| Hardware | Closure | 1 Magnetic Snap (sew-on style recommended). |
| Notions | Finishing Tools | Tapestry Needle, Scissors, Monofilament (Nylon) Thread for sewing hardware, Stitch Markers (optional but helpful). |
| Prep | Tail | Leave a 50 cm tail before starting the foundation chain. This tail will be used to create the base’s unique starting stitches. |
📖 Abbreviations & Special Stitches
This pattern uses US terminology. The key to this project is mastering the Puff Stitch and its placement.
| Abbreviation | U.S. Terminology | Description |
| ch | Chain | |
| sl st | Slip Stitch | |
| PS | Puff Stitch | (Yarn over, insert hook into st, pull up a long loop) 3 times into the same stitch/space. You should have 7 loops on your hook. Yarn over and pull through all 7 loops. |
| HM | Heart Motif | [PS, ch 1, PS] worked into the same chain or stitch space. |
| st(s) | Stitch(es) | |
| rep | Repeat | |
| sk | Skip |
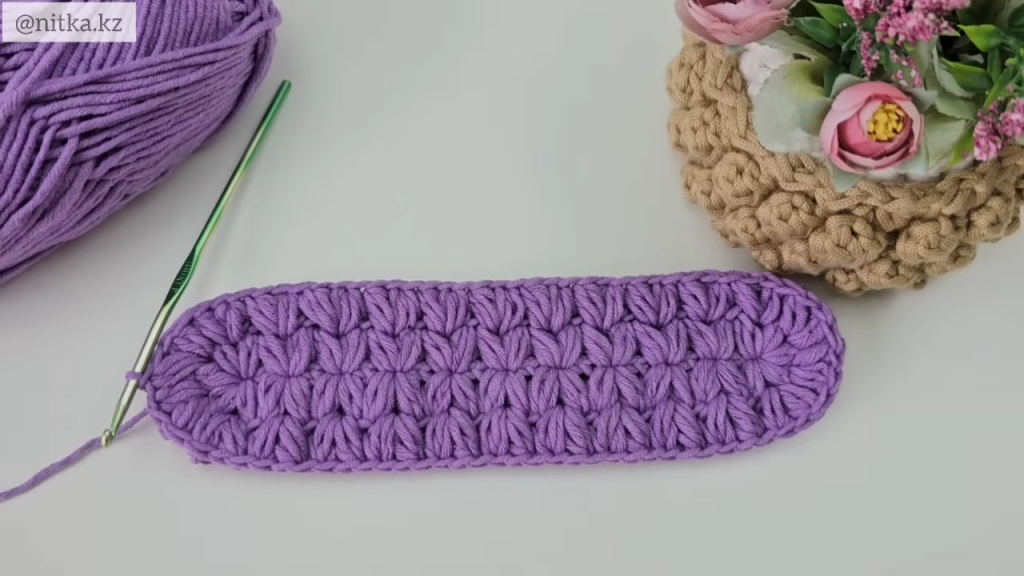
🌟 Part 1: The Foundation Chain & Base
The bag is worked in rounds starting with an oval base built around a foundation chain.

- Foundation Chain: Ch 30.
- Initial Puff Stitches (Simulating the first curve):
- Pull up a long loop. Work your first PS into the 4th ch from the hook. Ch 1. Work a second PS into the same ch.
- Work a third PS into the same ch (do not ch 1 after this final PS).
- (This cluster of 3 PS acts as the start of the first corner and sets the height for the rest of the round.)
- Side 1 (9 Heart Motifs):
- Sk 2 ch. Work HM into the next ch.
- Rep [Sk 2 ch, HM in next ch] 8 more times. (You should now have 9 HM along the side).
- End Curve (5 Puff Stitches):
- Sk 2 ch. In the last ch (the turning point), work the following: [PS, ch 1] 4 times, then PS once. (Total of 5 PS in the end stitch, separated by ch 1).
- Side 2 (9 Heart Motifs):
- Working back along the opposite side of the foundation chain, sk 2 ch. Work HM into the ch space corresponding to the one below.
- Rep [Sk 2 ch, HM in next space] 8 more times.
- Joining Curve (2 Puff Stitches):
- Sk 2 ch. In the same starting chain space where the first 3 PS were placed, work the following: [PS, ch 1] 1 time, then PS once. (This completes the 5-PS curve at the start.)
- Join: Sl st to the top of the very first PS to close the round.
Count Check: You should have a total of 26 HM motifs or motif spaces around the entire perimeter.
☁️ Part 2: Building the Body (Rounds 2-15)
All subsequent rounds are worked without increases, maintaining 26 motifs per round.
- Move to Center: Sl st into the first ch-1 space of the HM just completed.
- Round 2:
- Ch 1 (or pull up a long loop for height). Work HM into the same ch-1 space.
- Work HM into the ch-1 space of every HM motif around the entire round.
- Join: Sl st to the top of the first PS of the round to close.
- Rounds 3–15: Rep Round 2. Continue working HM into the ch-1 space of the HM directly below it.
Yarn Change Note: The video shows a yarn change around Round 10. When joining a new skein, simply knot the old and new yarns together securely (a square knot works well) and continue crocheting, ensuring the knot is hidden on the inside of the work.
- Continue until you have completed a total of 15 rounds from the base up.
- On the final motif of Round 15, FO, leaving a medium tail, and weave the tail securely into the top of the first motif of the round for a clean, invisible join.

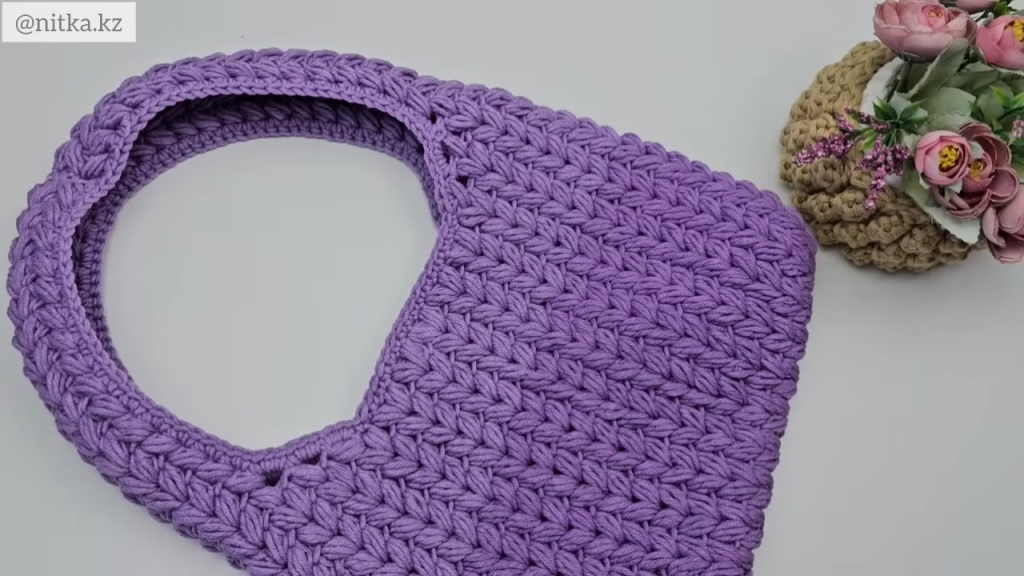
🎀 Part 3: Shaping the Handles (16 Rows High)
The handle sections are created by working back and forth in rows over a central portion of the bag opening.
- Mark Handle Section: Lay the bag flat. Mark a total of 8 motifs on the front and 8 motifs on the back for the handle opening.
- Count 4 motifs from the center edge to the left, and 4 motifs from the center edge to the right. (This leaves 5 unworked motifs in the center of the front and 5 unworked motifs in the center of the back for the arm opening).
- You will be working over the 4 motifs on the left and the 4 motifs on the right, which creates the handle shape.
- Row 1 (Handle Foundation):
- Attach yarn into the first marked ch-1 space.
- Work a Half-HM (PS only) into the first marked space.
- Work HM into the next 6 ch-1 spaces.
- Work a Half-HM (PS only) into the 8th marked space.
- Work a SC into the same 8th space to secure the edge.
- Do NOT join. Cut the yarn, pull through, and secure the end.
- Row 2 (Start Back-and-Forth):
- Reattach the yarn to the top of the last SC made in Row 1. Sl st to the top of the first PS.
- Ch 3 (counts as first leg of PS). Complete the Half-HM (working the second and third YO for the PS) into the same space.
- Work HM into the ch-1 space of the next 6 motifs.
- Work a Half-HM (PS only) into the top of the last motif.
- Work a SC into the last stitch (the securing SC from Row 1).
- Cut the yarn, pull through, and secure the end.
- Rows 3–16: Rep Row 2. You will be essentially working a 7-motif wide strip back and forth, reducing the count by working a Half-HM at the beginning and end.
- Tip: To carry the yarn neatly, simply secure the tail at the end of each row. You will cover these edges with an SC border in Part 4.
- Second Handle: Repeat Steps 1–4 exactly on the opposite side of the bag opening.
- Handle Seaming: After finishing both 16-row strips, align the corresponding front and back strips.
- Using the working yarn from the final row of the second strip, ch 1.
- SC through both the front and back pieces to seam the two handle strips together along the top edge. Work 10 SC evenly across the top seam.
- FO and weave in the end securely.
🧵 Part 4: Finishing Touches
A clean, dense SC border is vital for a polished, durable finish.
- Handle Edging:
- Attach yarn at the base of one handle (where it meets the body). Ch 1.
- Work SC evenly along the raw edge of the handle strip, working 2-3 SC per row for the length of the 16 rows.
- Continue working SC into the top seams (already worked) and the short openings.
- Sl st to the first SC to join.
- Final Edging: Sl st evenly around the entire perimeter of the SC border for a clean, tight, chain-like edge. FO and weave in the final end.
- Magnetic Snap Installation:
- Locate the exact center of the bag opening.
- Using the monofilament (nylon) thread and a sewing needle, securely stitch the first half of the magnetic snap to the top inner edge of the front panel. Ensure you sew through the thickness of the crochet fabric for security.
- Align the second half of the snap to the top inner edge of the back panel, ensuring it lines up perfectly with the first half. Stitch securely.
Video Tutorial:
Your beautiful, soft, and textured Puffy Heart Cloud Bag is now complete and ready to show off! Enjoy your new handmade accessory.


