
🌟 Introduction
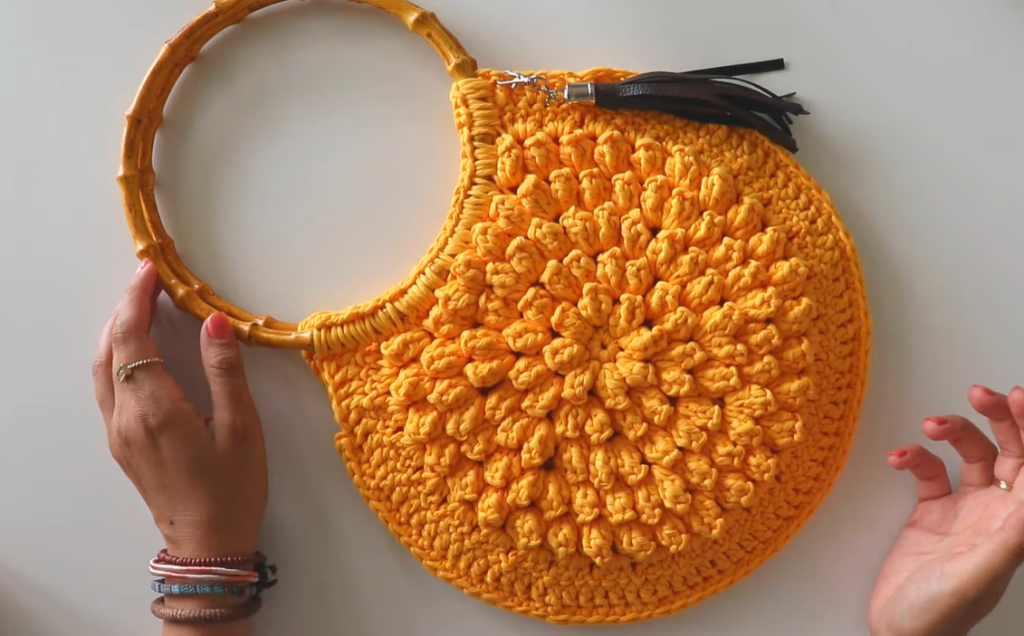
Step out in style with the Marigold Blossom Bag! This head-turning accessory features a rich, three-dimensional texture created entirely from Puff Stitches worked in increasing rounds, resulting in a beautiful sunburst or flower-like design. The flat, sturdy circle transitions perfectly to a chic bamboo handle, giving it a refined, bohemian flair. It’s the perfect summer tote or statement piece for any season.
Skill Level: Intermediate
Finished Size (approximate): 11 inches (28 cm) diameter circle.
🧵 Materials & Gauge
✨ Materials Needed
- Yarn: Approximately 250-300 yards of Worsted Weight (Aran/10-ply) cotton or a sturdy cotton blend yarn. Cotton helps the puff stitches hold their shape. (The sample image uses a vibrant, rich orange/marigold color.)
- Hook: Size H/8 (5.0 mm) crochet hook, or size needed to obtain gauge.
- Hardware:
- One Round Bamboo Handle (approx. 5-6 inches / 13-15 cm diameter).
- Optional: Small piece of leather or faux leather for the tassel and a clip for closure/tassel.
- Notions: Stitch marker, yarn needle, and scissors.
📏 Gauge (Check Your Tension!)
- Rounds 1-3 should measure approximately 2 inches (5 cm) in diameter.
- Achieving a flat gauge is critical. If your circle is bowing (cupping), the puff stitches are too tight, and you should increase your hook size or add more increase stitches.
💡 Special Stitches & Abbreviations
📝 Pattern Abbreviations (US Terms)
| Abbreviation | Meaning | | Abbreviation | Meaning | | :—: | :— | :—: | :— | | ch | chain | | st(s) | stitch(es) | | sl st | slip stitch | | rep | repeat | | sc | single crochet | | inc | increase (work 2 sts into 1 st) | | dc | double crochet | | sk | skip | | MR | Magic Ring | | PS | Puff Stitch |
⭐ Special Stitches (Written Instructions)
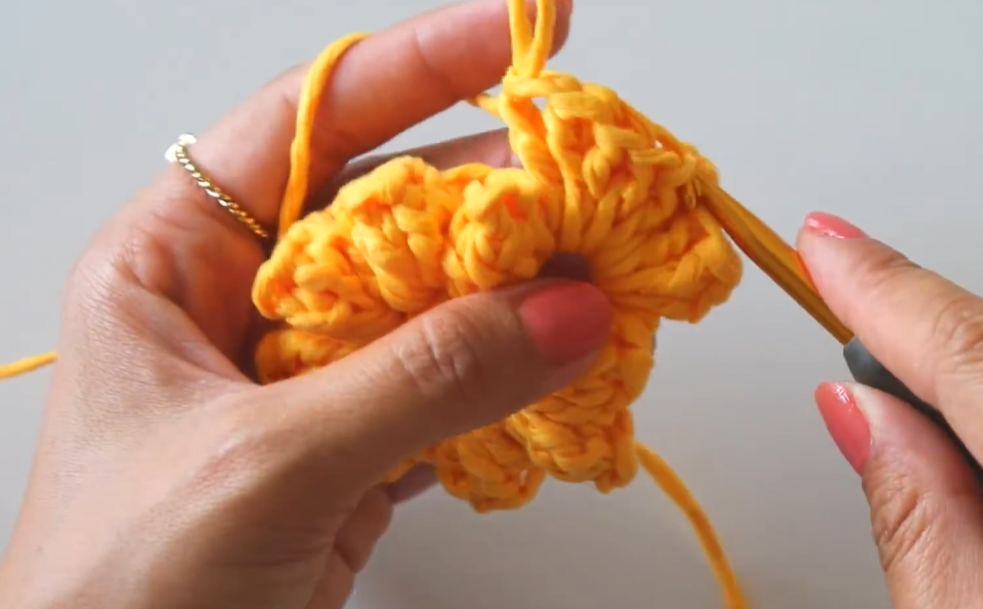
- Puff Stitch (PS): (Yo, insert hook into st, yo, pull up loop to height of dc) rep 3 times in the same st (7 loops on hook). Yo, pull through all 7 loops. Ch 1 to secure (the securing chain DOES NOT count as a stitch unless specified).
- Joining Stitch (JS): A single crochet or slip stitch placed between the puff stitches to anchor them.
👜 The Pattern: Marigold Blossom Bag Body
Note: This bag is made by creating two identical circular panels (Front and Back), which are then joined together.
Part 1: The Puff Stitch Circle (Make Two)
Foundation: Start with a Magic Ring (MR).
Round 1: Ch 1 (does not count as st), 8 sc into MR. Sl st to the first sc to join. (8 sc)
Round 2: Ch 1, PS in the first st. Ch 1, PS in the next st. Rep from * 6 more times. Ch 1, sl st to the top of the first PS to join. (8 PS, 8 ch-1 sps)
Round 3 (First Increase): Sl st into the first ch-1 sp. Ch 1, PS in the same ch-1 sp. PS in the top of the next PS, PS in the next ch-1 sp. Rep from * 7 more times. Sl st to the top of the first PS to join. (16 PS)
Round 4 (Puff Placement): Ch 1, sc in the same st. Ch 1, sk 1 PS. Sc in the next PS, ch 1, sk 1 PS. Rep from * 14 more times. Sl st to the first sc to join. (16 sc, 16 ch-1 sps)
Round 5 (Second Increase): Ch 1, PS in the first sc. PS in the next ch-1 sp. PS in the next sc. PS in the next ch-1 sp, PS in the next sc, PS in the next ch-1 sp, PS in the next sc. Rep from * around. Sl st to the top of the first PS to join. (32 PS)
Round 6 (Puff Placement): Ch 1, sc in the first PS. Ch 1, sk 1 PS, sc in the next PS. Rep from * 30 more times. Ch 1, sk 1 PS. Sl st to the first sc to join. (32 sc, 32 ch-1 sps)
Round 7 (Third Increase): Ch 1, PS in the first sc. PS in the next ch-1 sp, PS in the next sc, PS in the next ch-1 sp, PS in the next sc. Rep from * around. Sl st to the top of the first PS to join. (64 PS)

Round 8 (Puff Placement): Ch 1, sc in the first PS. Ch 1, sk 1 PS, sc in the next PS. Rep from * 62 more times. Ch 1, sk 1 PS. Sl st to the first sc to join. (64 sc, 64 ch-1 sps)
Round 9 (Fourth Increase): Ch 1, PS in the first sc. PS in the next ch-1 sp, PS in the next sc. Rep from * around. Sl st to the top of the first PS to join. (128 PS)
Round 10 (Final Sizing Row): Ch 1, sc in the first PS. Sc in the next PS. Rep from * around. Sl st to the first sc to join. (128 sc)
Fasten off the first panel. Do not fasten off the second panel; you will use this to join the pieces.
Measurement Check: At the end of Round 10, your circle should measure approximately 11 inches in diameter.
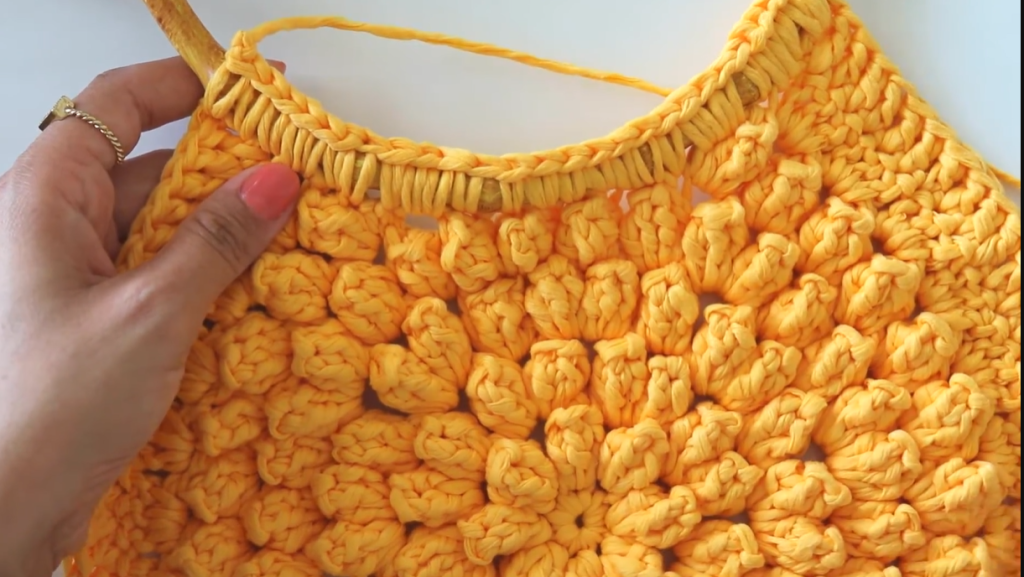
Part 2: Joining the Panels and Edge
We will join the two circles with a single crochet border, leaving an opening for the handle.
- Place the two panels together, Wrong Sides (WS) facing.
- With the working loop of the second panel, ch 1, sc through both loops of both panels simultaneously. Sc in each st around, aligning the stitches perfectly.
- Stop crocheting when you have covered approximately 2/3 of the circumference (this is about 85-90 stitches). (85-90 sc). This opening is for the handle.
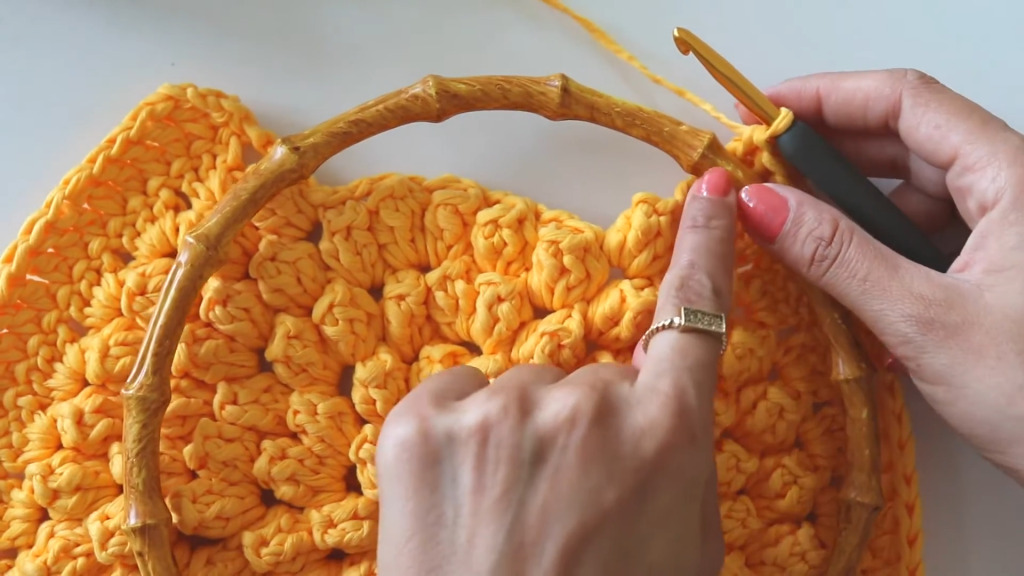
Part 3: Attaching the Bamboo Handle
- Place the handle in the opening between the two panels.
- Ch 1, turn. You will now work back and forth along the top edge of the bag, wrapping the handle.
- Handle Round 1: Insert your hook under the bamboo handle and into the first stitch of the back panel (or front panel, whichever is closer), draw up a loop, and complete an sc. Rep this process across the opening (approximately 40-43 sc, depending on your stop point), ensuring the sc stitches are wrapping tightly around the bamboo handle.
- Ch 1, turn.
- Handle Round 2 (Reinforcement): Sc in each sc across the handle section.
- Ch 1, turn.
- Handle Round 3 (Reinforcement): Sl st in each sc across the handle section.
Fasten off and weave in all remaining ends.
Video Tutorial:
✂️ Finishing & Styling
🔒 Optional Closure & Tassel
- Closure: Sew a small magnetic clasp or zipper into the top opening of the bag, inside the handle section.
- Tassel: Create a leather or yarn tassel and attach it near the corner of the handle using a swivel clasp for a decorative touch, as seen in the image.
✨ Blocking
- Wet Blocking: Although the puff stitches create texture, a light block can help flatten the final shape and define the circle. Lightly spray the completed bag with water or a fabric stiffener, and let it dry flat. Do not wet block the bamboo handle.
🧺 Care Instructions
- Spot Clean Only around the handle area.
- For the yarn body, hand wash in cold water, avoiding the bamboo handle, and lay flat to dry.
Congratulations! You now have a gorgeous Marigold Blossom Bag, perfect for turning heads wherever you go!


