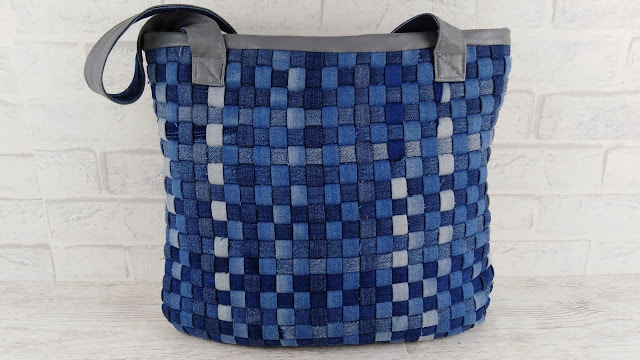
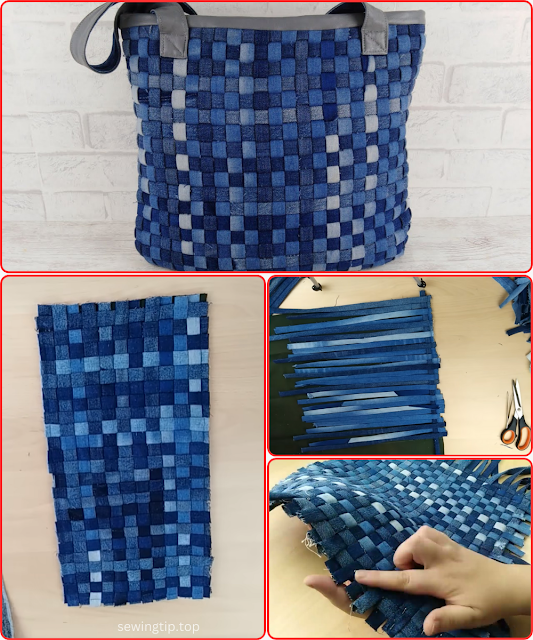
Welcome! This is an amazing project that results in a truly one-of-a-kind bag. By weaving strips of old denim, you create a unique, textured fabric that is incredibly durable and stylish. This pattern is designed for an intermediate to advanced sewer, as it requires patience and precision, but the final result is a beautiful and sustainable tote bag.
Materials
-
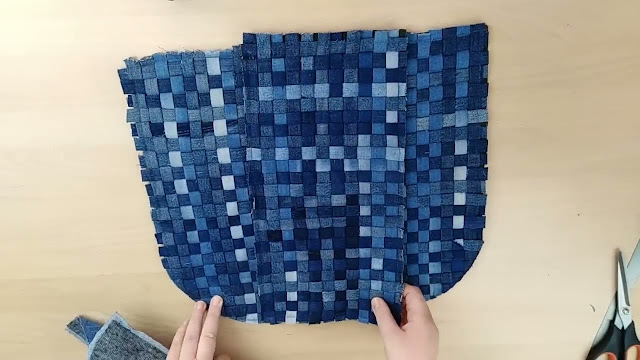
Denim Fabric: 3-4 pairs of old jeans in varying shades of blue. The variety of colors will create the checkerboard pattern seen in the image.
-
Lining Fabric: A sturdy cotton or canvas fabric (about 1 yard).
-
Top Band/Handle Fabric: A strip of faux leather, vinyl, or other durable material (about 1 yard long and 5 inches wide).
-
Thread: All-purpose thread that matches your denim and another that matches your top band fabric.
-
Basic sewing supplies: Sewing machine with a denim needle, scissors, pins or clips, a fabric pen or pencil, and a rotary cutter and mat (highly recommended for cutting even strips).
Key Concepts: Weaving and Construction
The main effort in this project goes into preparing and weaving the denim strips.
-
Strip Preparation: You need to create long, even strips of denim. Using a rotary cutter and a large cutting mat will save you a lot of time.
-
Weaving: You will create two large woven panels, one for the front and one for the back of the bag. A simple plain weave (over-under) is the easiest and most effective method.
Sewing Instructions
Note: Use a 1/2-inch seam allowance throughout the pattern unless otherwise noted.
Step 1: Prepare the Denim Strips
-
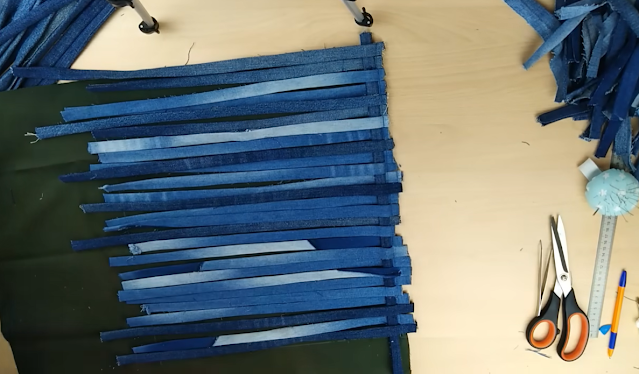
Start by deconstructing your jeans. Cut off the legs and use a seam ripper to open the inseams. Lay the fabric flat.
-
Trim off any thick seams. Using a rotary cutter and a ruler, cut the denim into long strips, each 1.5 inches wide. Cut as many as you can from each pair of jeans, separating them into piles by shade. You will need a lot of strips, so it’s better to have too many than too few.
Step 2: Weave the Fabric Panels
-
Clear a large, flat surface. Lay out a piece of old newspaper or fabric to protect your table.
-
Lay a series of denim strips vertically, side by side. For a bag that is 14 inches wide, you’ll need about 10-12 vertical strips.
-
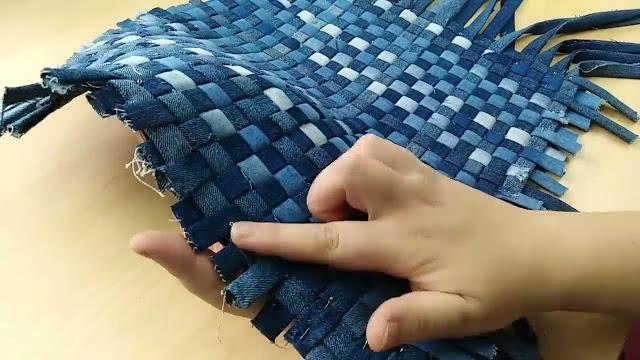
Now, begin weaving. Take a horizontal strip and weave it over and under the vertical strips. Push the strip up tightly against the one above it.
-
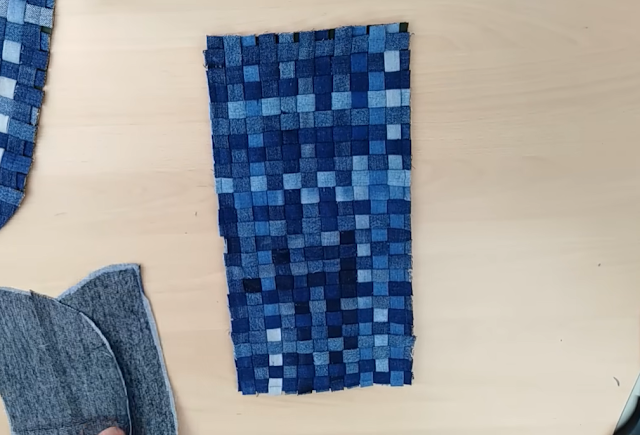
Continue this process, alternating the over/under pattern, until you have a woven panel that measures approximately 16″ wide x 16″ tall.
-
Repeat this process to create a second woven panel for the back of the bag.
Step 3: Stabilize the Woven Fabric
-
This is a crucial step to prevent the weaving from unraveling. Once your woven panel is complete, take it to your sewing machine.
-
Sew a zigzag stitch or a straight stitch around the entire perimeter of the woven panel, staying about 1/4 inch from the raw edges. This will hold all the strips in place.
-
For extra security, you can also sew a line of stitches down the center of the panel, following one of the woven strips.
Step 4: Cut the Bag Pieces
-
Place one of your stabilized woven panels on a flat surface. Using a ruler and fabric pen, mark out a rectangle that measures 14″ wide x 14″ tall. Cut out this piece. Repeat for the second panel.
-
Cut your lining fabric into two rectangles that measure 14″ wide x 14″ tall.
-
Cut your faux leather or vinyl into two long strips, each 2″ wide and 20″ long, for the handles.
-
Cut two pieces of your top band fabric, each 28″ long and 5″ tall.

Step 5: Construct the Bag
-
Take your two woven denim pieces. Place them right sides together and pin the side and bottom edges. Sew along the sides and bottom to form a bag.
-
Repeat for the lining pieces, but leave a 4-inch opening at the bottom of one of the side seams.
-
To create a flat bottom, box the corners of both the outer bag and the lining bag.
Step 6: Attach the Top Band and Handles
-
Take your two handle pieces. Place them on top of one of your top band pieces, about 5 inches in from each side. Sew them securely in place using a box-and-X pattern.
-
Pin the other top band piece on top, right sides together, and sew along the top and side seams.
-
Turn the top band right side out and press it flat.
Step 7: Final Assembly
-
Turn the main bag body right side out. Place the lining inside the main bag, with the wrong sides facing.
-
Pin the top band to the top of the bag, aligning the seams. Sew the band to the bag.
-
Reach into the opening you left in the lining, pull the bag through, and hand-sew the opening closed. Give the bag a final press with an iron.
Your woven denim tote bag is now complete!