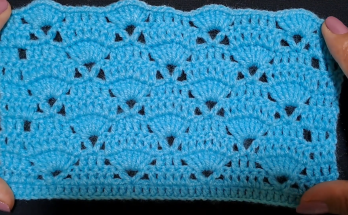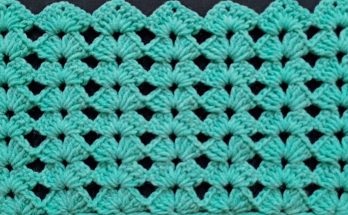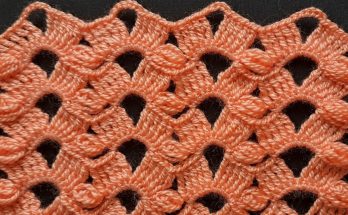
✨ Introduction: Discovering the Starfish Cluster Lace
Welcome to our detailed tutorial for the enchanting Starfish Cluster Lace pattern! This breathtaking stitch creates a beautifully textured, open fabric perfect for elegant projects like shawls, wraps, or lightweight garments. The pattern is defined by its dramatic 3-DTR clusters, which group together to form a delicate, three-petaled “starfish” or fan motif.
This post will guide you step-by-step through the pattern, ensuring your final piece is as gorgeous and detailed as the one shown in the video.

📌 Pattern Notes & Abbreviations
This pattern uses standard US crochet terminology. Due to the stitch’s height, we’ll be using Double Treble Crochet (DTR), which the video calls “puntos altos con doble lazada” (double yarn-over high stitches).
Abbreviations (US Terms)
| Abbreviation | Meaning |
| ch | Chain |
| st(s) | Stitch(es) |
| sk | Skip |
| sc | Single Crochet |
| DTR | Double Treble Crochet (Yarn over hook 3 times) |
| ch-sp | Chain Space |
| rep | Repeat |
| DTR-Cluster | Double Treble Crochet Cluster (Special Stitch) |
Special Stitches
- DTR (Double Treble Crochet): Yarn over hook 3 times, insert hook into st, yarn over and pull through st (5 loops on hook). [Yarn over, pull through 2 loops] 4 times.
- 3-DTR Cluster (Starfish Petal): [Yarn over 3 times, insert hook into designated st/sp, yarn over and pull through st, yarn over and pull through 2 loops, yarn over and pull through 2 loops] 3 times (4 loops remain on hook). Yarn over and pull through all 4 loops on the hook.
🧶 Materials & Gauge
Choosing the right materials will significantly impact the look and drape of your final fabric. The lace is best showcased with a smooth, lighter yarn.
- Yarn: Light Worsted Weight (Weight 3) or DK weight yarn is ideal. Cotton, acrylic, or a blend works well.
- Hook: A size larger than recommended on your yarn label is often best for lace. We recommend an H/8 (5.0 mm) or I/9 (5.5 mm) hook.
- Tools: Tapestry needle and scissors.
| Measurement | Details |
| Starting Chain Multiple | A multiple of $8 + 6$ (for the lace repeat) plus an additional $4 \text{ ch}$ for the starting DTR border and turning chain. |
💡 The video starts with 50 chains, plus 4 additional chains, making a total of 54 chains [01:26].
📏 Foundation & Border Set-up
This section creates the base and the initial border, providing a solid edge for the lace pattern.
Foundation Row (Chain)
- Ch 54 (or a multiple of $8 + 10 \text{ ch}$ for the border width, e.g., $50 \text{ ch}$ for the pattern $+ 4 \text{ ch}$ for the starting $ \text{DTR} + 4 \text{ ch}$ for the end $ \text{DTR}$ border).
Row 1 (First DTR Row)
- DTR in the 5th ch from the hook (the skipped $4 \text{ ch}$ count as the first DTR).
- DTR in every ch across the row.
- Ch 4 (counts as first DTR), turn.
Row 2 (Second DTR Row)
- DTR in the next st and in every st across.
- Ch 4 (counts as first DTR), turn.📝 You now have a solid, two-row border of DTR stitches.
💠 The 4-Row Starfish Cluster Lace Repeat
The lace pattern is achieved through a 4-Row Vertical Repeat. Rows 3 and 4 establish the first set of motifs, and Rows 5 and 6 shift and lock them into place.

Row 3: Creating the Starfish Motifs (Lace Row 1)
This row is worked on the right side of the fabric.
- DTR in the next $5 \text{ sts}$ (total $6 \text{ DTR}$ including the starting ch-4). (This is the first border section)
- Ch 1, sk 2 sts.
- DTR-Cluster (3-DTR Cluster, see Special Stitches) in the next st (the 3rd st after the border).
- Ch 5.
- DTR-Cluster in the same st.
- Ch 5.
- DTR-Cluster in the same st.
- Ch 1 (to close the motif).(This completes one 3-Petal Starfish Motif.)
- Sk 7 sts (count 8 sts from the motif’s base st, and insert hook in the 8th st).
- Rep the Starfish Motif in that 8th st.
- Rep the motif and skipping pattern across the row.
- End: After completing the final motif (and closing with $1 \text{ ch}$), sk 2 sts. DTR in the last $6 \text{ sts}$ (including the turning chain of the previous row).
- Ch 4, turn.
Row 4: Linking the Motifs (Lace Row 2)
This row links the top of the motifs together.

- DTR in the next $5 \text{ sts}$ (total $6 \text{ DTR}$ border).
- Ch 4.
- SC in the single ch that closed the 3-DTR Cluster on the row below.
- SC into the first $5 \text{ ch-sp}$ of the motif (work $5 \text{ sc}$ over the $5 \text{ ch}$).
- Ch 2 (this chain-space is where the next motif will be centered).
- SC into the next $5 \text{ ch-sp}$ of the motif (work $5 \text{ sc}$ over the $5 \text{ ch}$).
- Rep the [SC, $5 \text{ sc}$ in the $5 \text{ ch-sp}$, $2 \text{ ch}$, $5 \text{ sc}$ in the $5 \text{ ch-sp}$] pattern, linking each motif.
- End: After the final $5 \text{ sc}$ in the last $5 \text{ ch-sp}$, SC in the single ch that closed the final 3-DTR Cluster.
- Ch 4.
- DTR in the last $6 \text{ sts}$ (including the turning chain of the previous row).
- Ch 1, turn.
Row 5: Staggering the Motifs (Lace Row 3)
The motifs are now staggered to sit above the linking chain-space of the row below. The border temporarily changes to SC.
- SC in the next $5 \text{ sts}$ (total $6 \text{ SC}$ including the starting ch-1). (This is the new border section)
- Ch 1.
- DTR-Cluster, Ch 5, DTR-Cluster, Ch 5, DTR-Cluster, Ch 1 (the 3-Petal Starfish Motif) into the $2 \text{ ch-sp}$ from Row 4.
- Rep the Starfish Motif into the next $2 \text{ ch-sp}$ across the row.
- End: After the final motif, ch 1.
- SC in the last $6 \text{ sts}$ (including the turning chain of the previous row).
- Ch 4, turn.

Row 6: Linking the Staggered Motifs (Lace Row 4)
The border returns to DTR for this row.
- DTR in the next $5 \text{ sts}$ (total $6 \text{ DTR}$ border).
- Ch 4.
- SC into the single ch that closed the 3-DTR Cluster on the row below.
- SC into the first $5 \text{ ch-sp}$ of the motif (work $5 \text{ sc}$ over the $5 \text{ ch}$).
- Ch 2 (ready for the next staggered motif).
- SC into the next $5 \text{ ch-sp}$ of the motif (work $5 \text{ sc}$ over the $5 \text{ ch}$).
- Rep the linking pattern across the row.
- End: After the final $5 \text{ sc}$ in the last $5 \text{ ch-sp}$, SC in the single ch that closed the final 3-DTR Cluster.
- Ch 4.
- DTR in the last $6 \text{ sts}$ (including the turning chain of the previous row).
- Ch 1, turn.

🔄 Continuing the Pattern
To continue your fabric:
- Repeat Rows 3-6 until your project reaches the desired length.
- Notice the pattern shifts: Rows 3 and 4 establish the motif placement, and Rows 5 and 6 shift the motif to the center of the previous one. This creates the interlocking diamond effect.
✂️ Finishing Your Project
Once you have completed your final row:
- Fasten Off (FO): Cut the yarn, leaving a tail of at least 6 inches. Pull the tail through the loop on your hook to secure the last stitch.
- Weave in Ends: Use your tapestry needle to securely weave the starting and ending tails into the dense DTR border sections on the wrong side of your work.
- Blocking (Highly Recommended): This is essential for lace patterns. Gently wash or steam your finished piece and pin it out firmly to open up the delicate cluster and chain spaces. Allow it to dry completely. Blocking transforms the drape and truly showcases the beauty of the Starfish Cluster Lace!
I hope you enjoy crocheting with this intricate and stunning stitch!


