
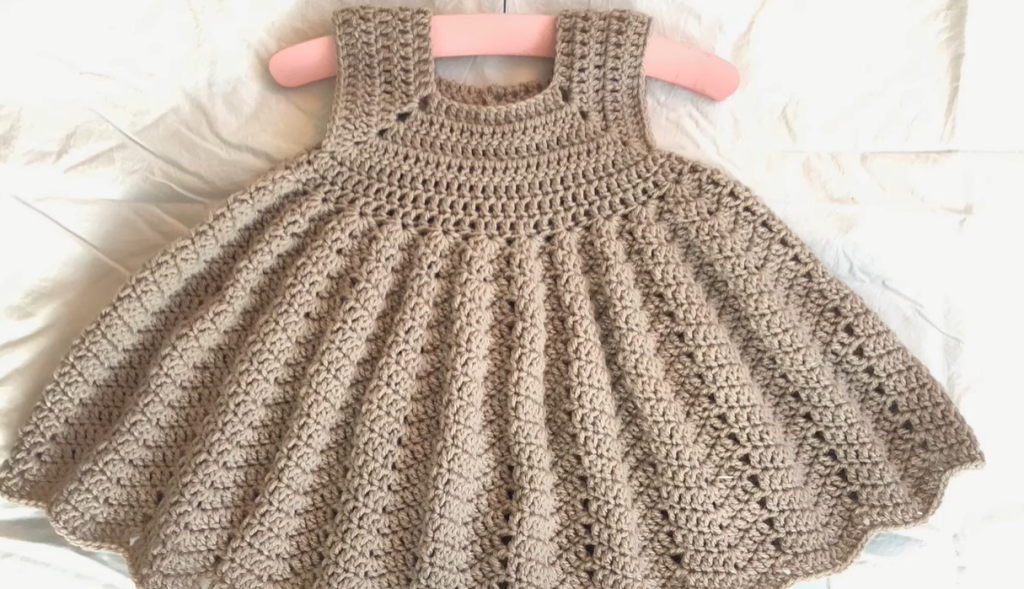
There’s beauty in simplicity, and this crochet baby dress proves it. Featuring a sleek, seamless yoke, wide comfortable straps, and a widely flared skirt, this dress relies on impeccable shape and subtle texture for its charm. The solid color and clean lines make it a versatile piece that can be dressed up or down.
This pattern is designed to be worked top-down, mostly in the round, resulting in minimal seaming. We’ll use a combination of solid double crochet and textured eyelet rounds to create the flowy, pleated effect you see in the skirt.
Materials Needed
- Yarn: Approximately 350-400 yards of DK Weight (Light Worsted / #3) or Worsted Weight (#4) yarn, depending on how substantial you want the fabric to be. We recommend a soft cotton blend or acrylic. The color used is a versatile Heathered Taupe (Main Color – MC).
- Crochet Hook: 4.0 mm (US G-6), or size needed to obtain gauge.
- Button: One small (1/2 inch) button for the back neck slit.
- Tapestry Needle: For weaving in ends and sewing the button.
- Stitch Markers: 4 markers for the raglan corners.
Size & Gauge
- Size: 6-12 Months (Finished Chest Circumference: approx. 20 inches / 51 cm)
- Gauge: In DC (Yoke section) using a 4.0 mm hook: 14 DC stitches and 8 rows = 4 inches (10 cm) square.
Skill Level & Notes
- Skill Level: Intermediate. You must be comfortable with working top-down raglan shaping in the round and consistent stitch counting.
- Construction: The dress is worked seamlessly from the top down. A small slit is left at the back neckline for easy dressing.
- Chains: The starting chain (ch 3) at the beginning of DC rounds always counts as the first DC unless noted otherwise.
Abbreviations
| Abbreviation | Description |
| ch | chain |
| sl st | slip stitch |
| sc | single crochet |
| dc | double crochet |
| st(s) | stitch(es) |
| rep | repeat |
| PM | Place Marker |
| ch-sp | chain space |
Export to Sheets
Part 1: The Yoke (Top-Down Raglan)
We begin working flat for the first few rows to create the back neck slit, then join to work in the round.

Setup Row (Back Slit): Ch 45. Sl st to the first ch, being careful not to twist the chain. Ch 3 (counts as dc). Dc in the next 35 ch. Leave the remaining 9 ch unworked. (36 dc)
Row 1 (Working Flat): Ch 3 (counts as dc), turn. Dc in the next 4 sts. [Dc, ch 2, dc] in the next st (PM in ch-2 sp). Dc in the next 6 sts (Shoulder). [Dc, ch 2, dc] in the next st (PM). Dc in the next 10 sts (Front). [Dc, ch 2, dc] in the next st (PM). Dc in the next 6 sts (Shoulder). [Dc, ch 2, dc] in the next st (PM). Dc in the last 5 sts. (46 dc, 4 ch-2 sps)
Row 2 (Increase Row): Ch 3, turn. Dc in each st until the first ch-2 sp. [Dc, ch 2, dc] in the ch-2 sp. Rep [Dc in each st to next ch-2 sp, (dc, ch 2, dc) in ch-2 sp] 3 times. Dc in each remaining st. (62 dc, 4 ch-2 sps)
Rounds 3-6 (Joining): Repeat Row 2. After the last stitch of Row 6, sl st to the top of the beg ch-3 to join and begin working in the round. The back slit remains open for now.
- End of Round 6 Stitch Count: 126 dc, 4 ch-2 sps.
Round 7 (Separating for Armholes): Ch 3, dc in each st until the first ch-2 sp. Dc in the ch-2 sp. Ch 4 (skips the sleeve stitches). Dc in the second ch-2 sp. Dc in each st until the third ch-2 sp. Dc in the ch-2 sp. Ch 4 (skips the second sleeve stitches). Dc in the fourth ch-2 sp. Dc in each remaining st. Sl st to the top of the beg ch-3 to join. (70 dc, 8 ch = 78 sts)
Part 2: The Skirt (Working in the Round)
The skirt is formed by alternating solid double crochet rounds with eyelet rounds, creating the ribbed, flared texture.
Round 8 (Skirt Setup): Ch 3. Work 4 dc into each ch-4 sp. Dc in each dc around. Sl st to join. (86 dc)
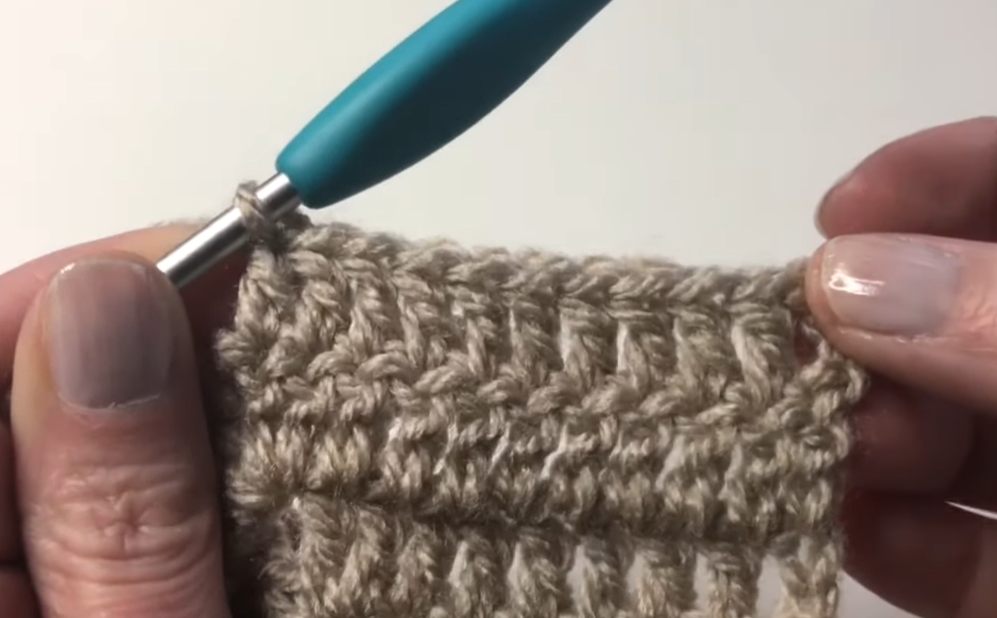
Round 9 (Solid DC): Ch 3. Dc in each st around. Sl st to join. (86 dc)
Round 10 (Eyelet Texture Round): Ch 3. [Ch 1, sk 1 st, dc in the next st] rep around. The last dc should fall before the sl st join. Sl st to the top of the beg ch-3 to join. (43 dc, 43 ch-1 sps)
Round 11 (Increase DC): Ch 3. Dc in the ch-1 sp, 2 dc in the next dc. [Dc in the next ch-1 sp, 2 dc in the next dc] rep around. Sl st to join. (129 dc)
Round 12 (Solid DC): Ch 3. Dc in each st around. Sl st to join. (129 dc)
Round 13 (Eyelet Texture Round): Ch 3. [Ch 1, sk 1 st, dc in the next st] rep around. Sl st to join. (65 dc, 64 ch-1 sps)
Round 14 (Increase DC): Ch 3. Dc in the ch-1 sp, 2 dc in the next dc. [Dc in the next ch-1 sp, 2 dc in the next dc] rep around. You will increase by approximately 64 stitches this round. Sl st to join. (193 dc)
Round 15 (Solid DC): Ch 3. Dc in each st around. Sl st to join. (193 dc)
Round 16 (Eyelet Texture Round): Ch 3. [Ch 1, sk 1 st, dc in the next st] rep around. Sl st to join.
Round 17 (Solid DC): Ch 3. Dc in each st around. Sl st to join.
Round 18 (Increase DC): Ch 3. Dc in the next 18 sts, 2 dc in the next st. [Dc in the next 19 sts, 2 dc in the next st] rep around, distributing approximately 10 increases evenly. Sl st to join. (Approx. 203 dc)
Rounds 19-25: Repeat Rounds 16 and 17 (alternating Eyelet and Solid DC rounds).
Round 26 (Final Hem): Ch 3. Dc in each st around. Sl st to join.
Fasten off.

Part 3: Edging and Finishing
A. Neckline and Armhole Edging
- Armholes (Make 2): Attach yarn at the underarm. Work 1 round of sc evenly around the armhole opening. Sl st to join and fasten off.
- Neckline: Attach yarn at the bottom of the back neck slit. Work 1 round of sc evenly around the entire neckline opening and up one side of the back slit. Do not fasten off.
B. Back Slit Closure
- Button Loop: From the end of the neckline sc round, ch 3 (creates loop). Sl st back into the same stitch. Fasten off.
- Button Side: Re-attach yarn at the bottom of the unworked side of the back slit. Work a row of sc up the side. Fasten off.
- Sew the small button onto the neck opening, directly opposite the button loop you created.
Video Tutorial:
The Essential Step: Blocking
This step is non-negotiable for creating the full, beautifully flared skirt.
- Dampen: Gently soak the dress in water, squeeze out the excess (do not wring), and roll it in a clean towel.
- Pin: Lay the damp dress flat on a blocking mat or foam board. Pin the skirt edge out wide, stretching it to define the full circle of the flare. Pin the armholes and neckline to neaten the edges.
- Dry: Allow the dress to dry completely before unpinning.
Your beautiful, seamless Modern Minimalist Baby Dress is now ready! This pattern is so versatile—try making it in different colors for every season!


