
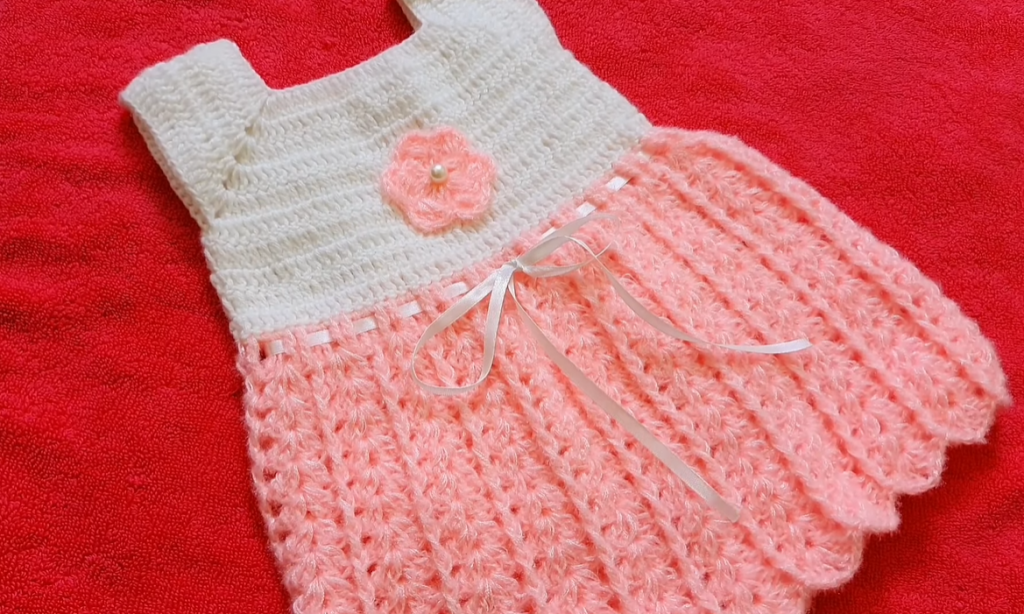
There is nothing quite as timeless as a beautifully simple crocheted baby dress, and this design, with its soft color palette and lovely textured skirt, is an absolute classic. Featuring a clean white yoke, a delicate pink skirt worked in a repeating shell-like texture, and a sweet ribbon detail at the waist, this project is perfect for gifting or keeping.
This long, detailed pattern will guide you step-by-step through the top-down raglan construction and the beautiful stitch work to create a treasured piece for your little sweetheart.
Materials Needed
- Yarn: Approximately 350-400 yards of DK Weight (Light Worsted / #3) yarn. A soft acrylic or cotton blend is ideal for comfort and washability.
- Main Color (MC): Approx. 120 yards (Cream/White for the Yoke)
- Contrast Color (CC): Approx. 250-300 yards (Soft Pink/Peach for the Skirt)
- Crochet Hook: 3.5 mm (US E-4), or the size needed to obtain gauge.
- Ribbon: Approx. 1.5 yards of thin (1/4 inch wide) satin ribbon (White/Cream).
- Button: One small (1/2 inch) button for the back neck closure.
- Embellishments: One small pearl or bead for the flower center.
- Tapestry Needle: For weaving ends, sewing the flower, and threading the ribbon.
- Stitch Markers: 4 markers for the raglan corners.
Size & Gauge
- Size: 3-6 Months (Finished Chest Circumference: approx. 17 inches / 43 cm)
- Gauge: In DC (Yoke section) using a 3.5 mm hook: 16 DC stitches and 8 rows = 4 inches (10 cm) square.
Skill Level & Notes
- Skill Level: Intermediate. Requires knowledge of garment construction, raglan shaping, and working simple textured stitches.
- Construction: The dress is worked top-down, beginning at the neckline. The yoke is worked flat in rows with a back opening, and the skirt is then joined to work in the round.
- Chain Counts: The starting chain (e.g., ch 3) at the beginning of DC rows always counts as the first DC unless noted otherwise.
Abbreviations
| Abbreviation | Description |
| ch | chain |
| sl st | slip stitch |
| sc | single crochet |
| dc | double crochet |
| st(s) | stitch(es) |
| rep | repeat |
| PM | Place Marker |
| ch-sp | chain space |
Export to Sheets
Special Skirt Stitch
V-Stitch Shell (VSS)
This stitch is used to create the textured, ribbed look of the skirt.
- VSS: (2 dc, ch 1, 2 dc) all worked into the same stitch or space.
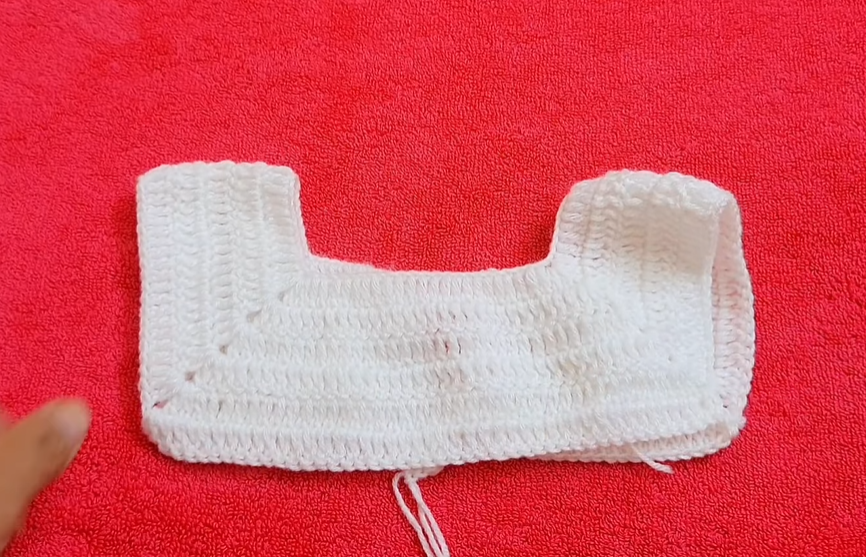
Part 1: The Yoke (MC – Cream/White)
The yoke is worked flat in rows with a back opening for the neck.
Row 1 (Foundation): Ch 54. Dc in the 4th ch from hook (counts as 2 dc). Dc in the next 3 ch (5 dc for Right Back). [Dc, ch 2, dc] in the next ch (PM in ch-2 sp). Dc in the next 8 ch (Shoulder). [Dc, ch 2, dc] in the next ch (PM). Dc in the next 16 ch (Front). [Dc, ch 2, dc] in the next ch (PM). Dc in the next 8 ch (Shoulder). [Dc, ch 2, dc] in the next ch (PM). Dc in the last 6 ch (Left Back). (50 dc, 4 ch-2 sps)
Row 2 (Increase Row): Ch 3 (counts as dc), turn. Dc in each st until the first ch-2 sp. [Dc, ch 2, dc] in the ch-2 sp. Rep [Dc in each st to next ch-2 sp, (dc, ch 2, dc) in ch-2 sp] 3 times. Dc in each remaining st. (66 dc, 4 ch-2 sps)
Rows 3-6: Repeat Row 2. Continue increasing by 4 dc each row (one at each raglan corner).
- End of Row 6 Stitch Count: 130 dc, 4 ch-2 sps.
Row 7 (Armhole Joining Row): Ch 3, turn. Dc in each st until the first ch-2 sp. Dc in the ch-2 sp. Ch 2 (skips the first sleeve/shoulder section). Dc in the second ch-2 sp. Dc in each st until the third ch-2 sp. Dc in the ch-2 sp. Ch 2 (skips the second sleeve/shoulder section). Dc in the fourth ch-2 sp. Dc in each remaining st. Do not join. (70 dc, 4 ch)
Part 2: The Skirt (CC – Soft Pink)
We now join for working in the round.
Round 1 (Ribbon Channel): Ch 1, turn. Sc in the first dc. [Ch 1, sk 1 st, sc in the next st] rep until the last st of the Left Back panel. Ch 1. Sl st to the beg sc to join, closing the back opening. (37 sc, 37 ch-1 sps)
Round 2 (Skirt Setup): Ch 3 (counts as dc). Dc in each sc and each ch-1 sp around. Sl st to the top of the beg ch-3 to join. (74 dc)
Round 3 (Start VSS): Ch 3 (counts as dc). Dc in the same st. [Sk 3 sts, VSS (2 dc, ch 1, 2 dc) in the next st] 18 times. Sk 3 sts. Sl st to the top of the beg ch-3 to join. (19 VSS shells total)
Round 4: Ch 3, dc in the same st. [VSS in the ch-1 sp of the next shell] 18 times. Sl st to the top of the beg ch-3 to join.
Rounds 5-15: Repeat Round 4. Continue working VSS into the ch-1 space of the previous round’s VSS shell.
- Note: For a longer dress, simply add more rounds here.
Round 16 (Scalloped Hem): Ch 1. Sc in the first dc. [Work 7 dc in the ch-1 sp of the next shell (large scallop), sc in the middle of the next V-Stitch (between the 2-dc groups)] rep around. Finish with a sl st to the beg sc. Fasten off CC. Weave in ends.
Part 3: Finishing and Edging (MC – Cream/White)
A. Neckline and Armhole Edging
- Neckline: Attach MC at the bottom right corner of the back placket. Work a round of sc evenly around the entire neckline. Sl st to join. Fasten off.
- Armholes: Attach MC at the underarm. Work a round of sc evenly around the armhole opening. Sl st to join and fasten off. Repeat for the second armhole.
B. Back Button Placket
- Button Loop Side (Left Back): Attach MC to the bottom of the left back opening. Work a row of sc evenly up the entire edge. Ch 1, turn. Sc in the first few sts. Ch 2, sk 1 st (creates button loop). Sc in the remaining sts. Fasten off.
- Button Placement Side (Right Back): Attach MC to the bottom of the right back opening. Work a row of sc evenly up the entire edge. Fasten off.
- Sew the button onto the Right Back panel, aligning it with the button loop you just created.
Part 4: The Flower Appliqué
(Use CC – Soft Pink)
Round 1 (Center): Make a magic ring. Ch 2 (does not count as st). 6 hdc into the ring. Sl st to join. (6 hdc)
Round 2 (Petals): Ch 1. [Sl st into the first hdc, ch 2, dc, ch 2, sl st] all into the same hdc. [Sl st into the next hdc, ch 2, dc, ch 2, sl st] all into the next hdc. Rep 4 more times to create 6 petals. Sl st to the beg sl st. Fasten off, leaving a long tail for sewing.
Video Tutorial:
Assembly and Final Touches
- Sew on Flower: Place the flower on the bodice, slightly off-center (as pictured), and use the long tail to sew it securely onto the white yoke.
- Add Pearl: Use fine needle and thread to attach the small pearl or bead to the very center of the flower.
- Thread Ribbon: Using the tapestry needle, thread the white satin ribbon in and out through the ch-1 spaces of the Ribbon Channel round. Tie a neat bow at the center front.
The Essential Step: Blocking
Blocking is vital for this dress to make the skirt drape beautifully and ensure the lace is crisp.
- Dampen: Gently wet the dress, focusing on the skirt and yoke. Squeeze out excess water.
- Pin: Pin the dress to a blocking mat or towel. Pin the hem points to define the scalloped edge. Ensure the skirt is fully stretched to show off the VSS texture.
- Dry: Allow the dress to dry completely before unpinning.
Your beautiful Little Sweetheart Sundress is complete! This classic piece is sure to be a cherished item for years to come.


