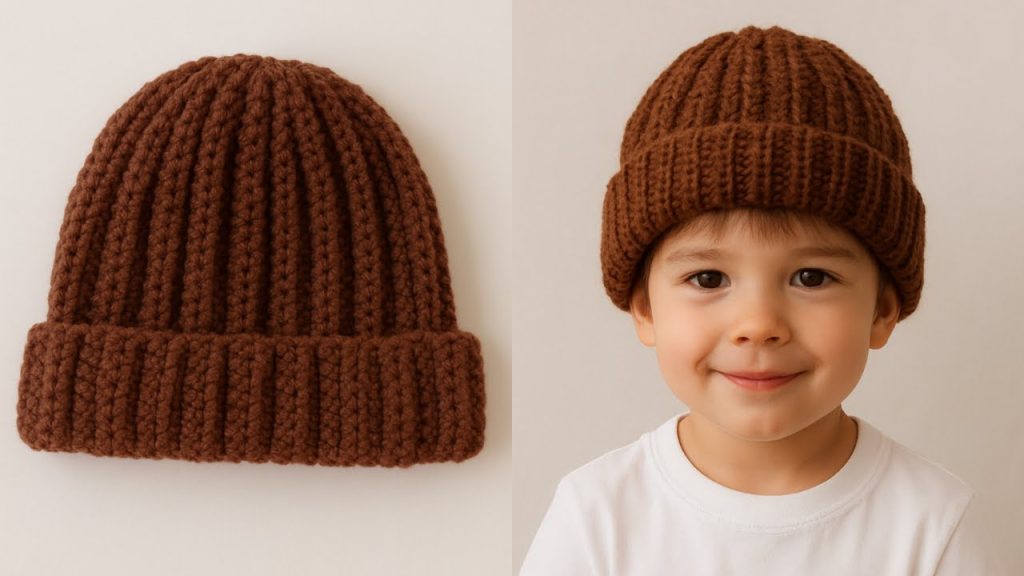
Meet the Classic Ribbed Cuff Beanie, the perfect timeless accessory for anyone in the family! This design uses the simple but incredibly effective Half Double Crochet in the Back Loop Only (HDC-BLO) stitch to create deep, stretchy, vertical ribbing that mimics a knit fabric. The resulting texture is squishy, warm, and provides a beautiful roll-up cuff for maximum coziness.
This detailed pattern is written for a Toddler size (2-4 Years, Head Circumference: 18–20 inches) and is suitable for the Easy-Intermediate crocheter.
Materials Needed 🧶
- Yarn: Approximately 200-250 yards of Worsted Weight (Aran / #4) yarn. A wool or acrylic blend is recommended for excellent stitch definition and stretch.
- Main Color (MC): Rich Chocolate Brown (Solid)
- Crochet Hook: 5.5 mm (US I-9), or the size needed to obtain gauge.
- Tapestry Needle: For seaming and weaving in ends.
- Scissors.
Skill Level & Notes 💡
- Skill Level: Easy/Intermediate. Requires mastery of the HDC stitch and working in the back loop only. The main technique is creating a flat rectangle that is seamed and cinched.
- Construction: The hat is worked flat in rows. The starting chain determines the height of the hat (Crown to Brim), and the rows determine the circumference (stretch).
- Ribbing: All stitches are worked in the Back Loop Only (BLO) from Row 2 onward to create the knit-like ribbing.
- Sizing: To make the hat taller or shorter, adjust the number of stitches in the starting chain. To adjust the circumference, adjust the number of rows worked.
Gauge 📏
In Half Double Crochet in the Back Loop Only (HDC-BLO) using a 5.5 mm hook: 11 HDC-BLO rows (measured horizontally) and 10 HDC sts (measured vertically) = 3 inches (7.5 cm) square.
- The finished rectangle should measure approximately 18 inches long by 10 inches high before seaming.
Abbreviations 📚
| Abbreviation | Description |
| ch | chain |
| sl st | slip stitch |
| sc | single crochet |
| hdc | half double crochet |
| st(s) | stitch(es) |
| rep | repeat |
| BLO | Back Loop Only |
Export to Sheets
Special Stitch ✨
HDC-BLO (Ribbing)
This forms the vertical ribs of the beanie:
- HDC-BLO: Half Double Crochet worked into the Back Loop Only of the stitch from the previous row. You will always work into the back loop except for the initial foundation chain.
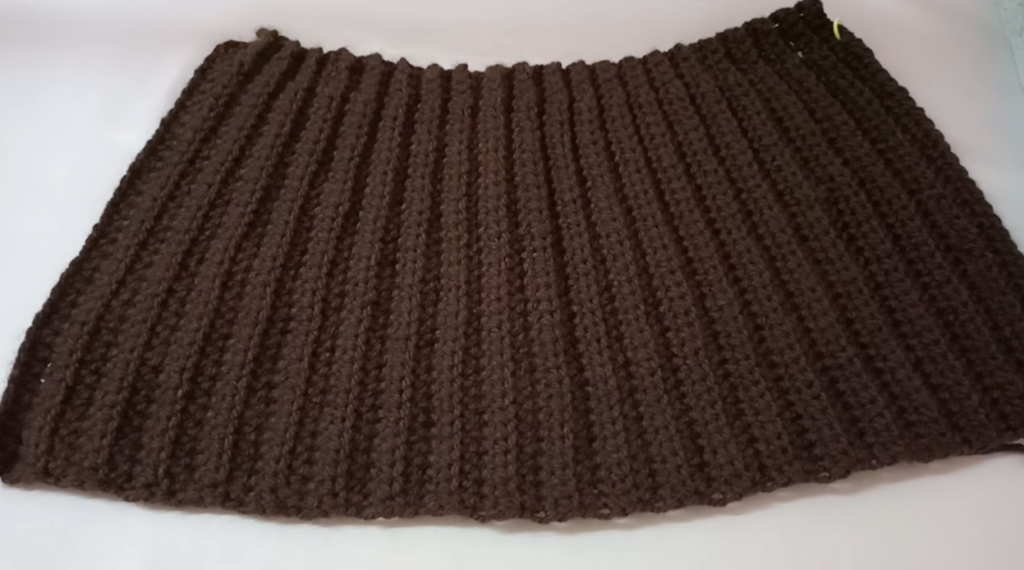
Part 1: The Hat Body (HDC-BLO) ◼️
The final piece is a rectangle designed for vertical ribbing. The starting chain creates the height (Crown to Brim).
Row 1 (Foundation/Height): Ch 37. Hdc in the 2nd ch from hook and in each ch across. (36 hdc)
Row 2 (Ribbing): Ch 1, turn. Hdc in the BLO of each st across. (36 hdc)
Rows 3-60: Repeat Row 2 until the piece measures approximately 18 inches long, slightly stretched. This length should allow for a snug fit on a head circumference of 18–20 inches. Do not fasten off after the last row.
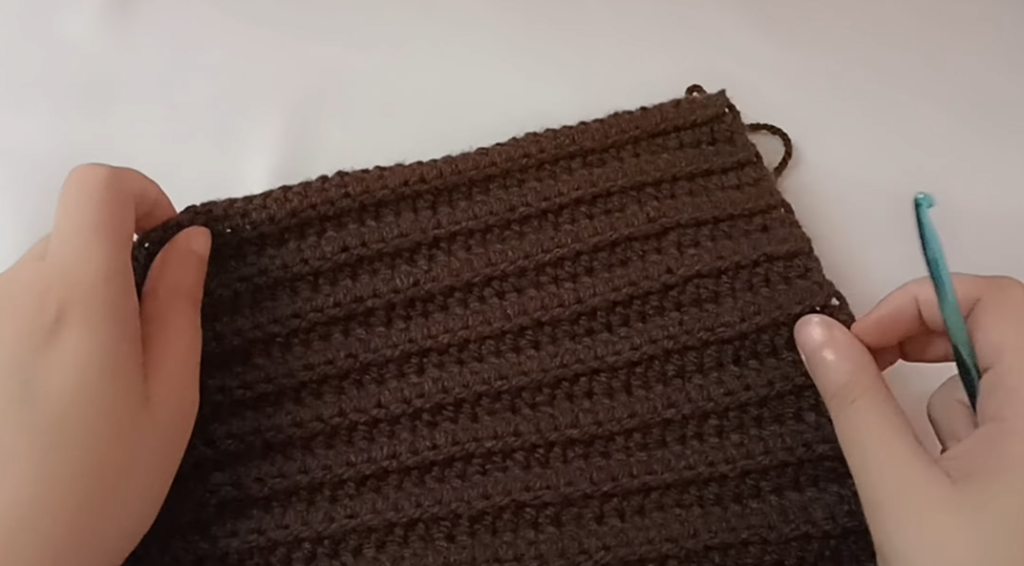
Part 2: Assembly & Shaping 👑
We now join the two short ends of the rectangle to form a tube, and then cinch the top edge to form the crown.
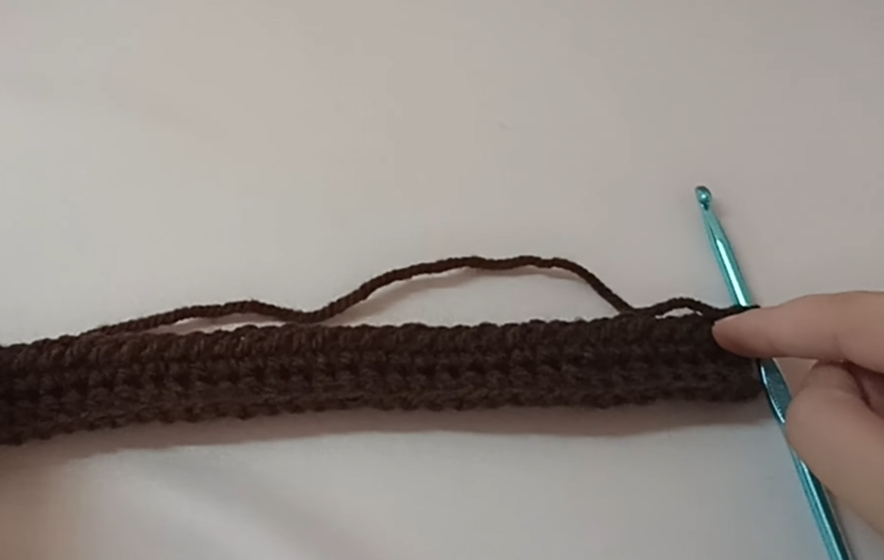
- Seam the Side: Ch 1. Fold the rectangle in half so that Row 1 edge meets Row 60 edge. Work a slip stitch seam by inserting the hook through the BLO of the working row (Row 60) and the starting chain loop of the foundation row (Row 1). Sl st all the way up the side to close the hat.
- Cinch the Crown (Top): Leave a very long tail (approx. 24 inches) and fasten off. Thread this long tail onto your tapestry needle. Weave the needle in and out through the top loop of every row end all the way around the top open edge of the hat tube.
- Secure the Crown: Pull the yarn tail tightly to gather the top edge and cinch the hole closed. Sew across the cinched hole several times in a star pattern to ensure it is completely secured and flat. Knot and weave the excess tail into the inside of the hat.
Part 3: The Cuff/Brim 👒
The cuff is formed by the starting chain edge of the finished rectangle. No extra ribbing is needed, as the entire hat uses the HDC-BLO ribbing.
- Bottom Edge Finish (Optional): Attach yarn to the bottom edge seam. Work 1 round of sl st or sc evenly around the brim edge. Sl st to join. This gives a neat, firm finish to the edge that will be folded up. Fasten off and weave in the end.
- Cuff Formation: The hat is designed to have a 3-inch cuff. Simply fold the bottom edge of the hat up to the desired height (approx. 7–8 HDC rows worth of ribbing).
Video Tutorial:
Finishing and Final Touches 🫧
- Weave in all remaining ends securely on the inside of the hat.
- Blocking (Recommended): Gently wet block or steam block the beanie. Place it over a round object (like a bowl or balloon) to help set the shape of the crown and ensure the ribbing is uniform and stretchy. Allow to dry completely.
Your classic Ribbed Cuff Beanie is now ready for cozy adventures!