
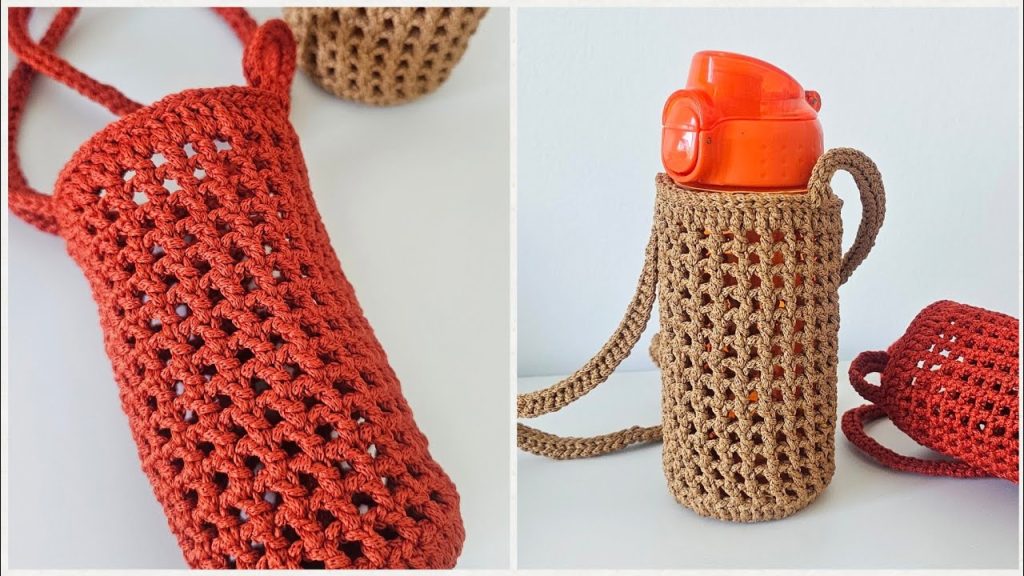
Ready to stay hydrated in style? Carrying a water bottle is essential, but fumbling with it can be annoying. This Crocheted Mesh Water Bottle Holder (or case/bag) is the perfect solution! It’s lightweight, customizable for any bottle size, and the open-mesh design works up quickly and provides a chic, breathable cradle for your drink.
This pattern is a fantastic introduction to working in the round and creating an easy eyelet mesh. Grab some sturdy yarn, and let’s craft a practical accessory you’ll take everywhere!
🧶 Materials You’ll Need
Gather these items before you begin your hydrating hook-up:
- Yarn:Cotton, Macrame Cord, or T-Shirt Yarn (Light Worsted/DK to Aran/Worsted Weight). Choose a fiber that is sturdy, durable, and washable. The example image appears to use a strong cotton or macrame cord.
- Quantity: Approximately 100-150 yards (Varies based on bottle size and yarn weight).
- Crochet Hook: 4.0 mm to 5.0 mm (G-6 to H-8). Match the hook size to your yarn to achieve a firm, non-stretchy fabric for the base and a nice open mesh for the body.
- Stitch Marker: Essential for tracking the rounds.
- Scissors
- Yarn Needle (Tapestry Needle): For weaving in ends.
- Your Water Bottle: Keep your bottle handy to check the fit as you crochet!
📏 Sizing & Gauge
This pattern is easily adjustable for any bottle size!
- Gauge is less critical than fit. The goal is for the base to match the diameter of your bottle’s bottom, and for the mesh to hug the bottle without being too tight or too loose.
- Base Diameter: The finished base should be the same diameter as the bottom of your water bottle.
📝 Abbreviations (US Terms)
Keep this reference handy:
- ch: chain
- sl st: slip stitch
- sc: single crochet
- dc: double crochet
- st(s): stitch(es)
- inc: increase (2 sc or 2 dc in the same stitch)
- BLO: back loop only
- MR: Magic Ring
💡 Important Notes Before You Start
A few quick tips to ensure your bottle holder is perfect:
- Working in the Round: The base and body are worked in joined rounds. You will sl st to the first stitch of the round and ch 3 (counts as dc) to start the next round, or ch 1 (does not count as st) for single crochet rounds.
- Adjusting the Base: The base pattern is a basic circle. You might need to add or subtract increase rounds to perfectly match the size of your bottle.
- Mesh Stitch: The mesh is created by alternating double crochet (dc) and chain stitches (ch). It is crucial that your total stitch count for the base is an even number before starting the mesh.
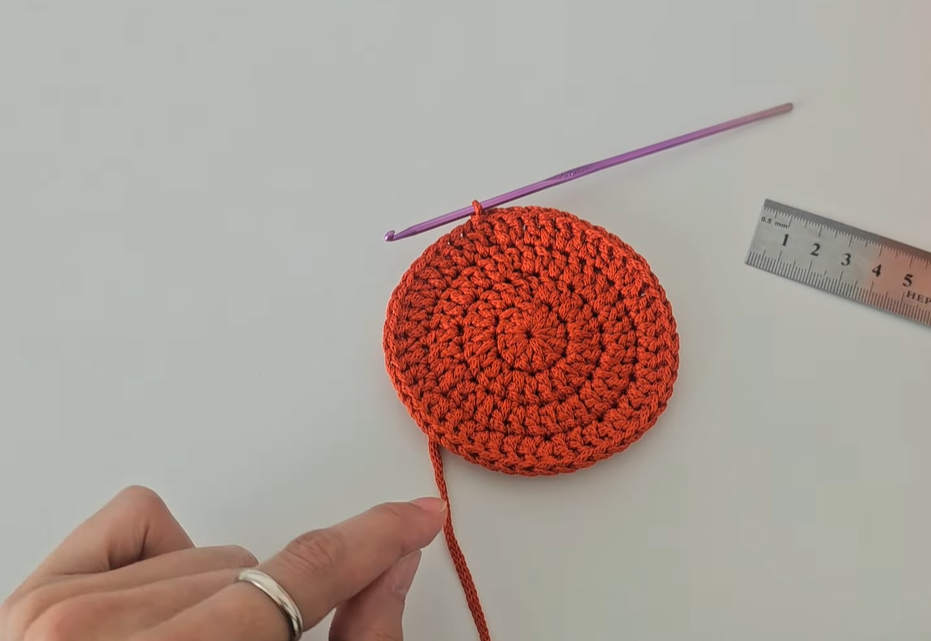
🟢 Part 1: The Base (Fit to Your Bottle)
We’ll start with a classic flat circle, using single crochet for a dense, sturdy bottom.
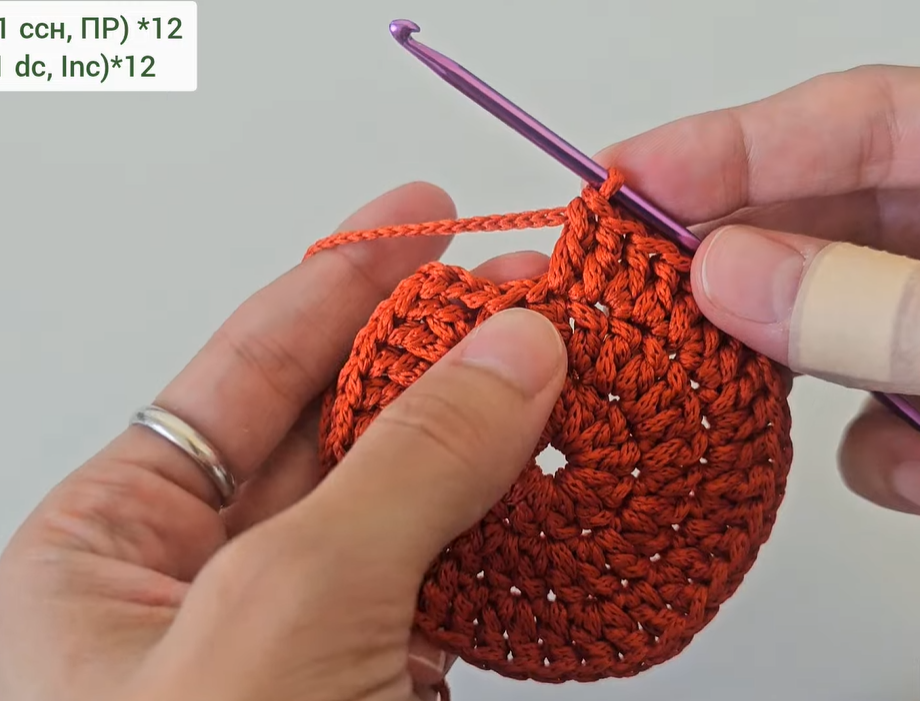
- Round 1: Start with a MR. Ch 1 (does not count as st). Work 6 sc into the ring. Pull tail tight to close. Sl st to the first sc to join. (6 sts)
- Round 2: Ch 1. Sc inc in each st around. Sl st to join. (12 sts)
- Round 3: Ch 1. [1 sc in next st, sc inc in next st] repeat around. Sl st to join. (18 sts)
- Round 4: Ch 1. [1 sc in next 2 sts, sc inc in next st] repeat around. Sl st to join. (24 sts)
- Round 5: Ch 1. [1 sc in next 3 sts, sc inc in next st] repeat around. Sl st to join. (30 sts)
Continue increasing in this pattern (adding one more sc between increases each round) until the base is the exact diameter of the bottom of your water bottle. Be sure to finish with a stitch count that is an EVEN NUMBER (e.g., 36, 42, 48, etc.).

⬆️ Part 2: Transition to Sides and Establishing the Mesh
Once the base is the right size, we’ll turn the corner and introduce the mesh pattern.
- Transition Round (Shaping): Ch 1. Work 1 sc in the BLO (back loop only) of each st around. Sl st to join. (Stitch count remains the same).
- This BLO round creates a definite ridge, forcing the work to turn upward and form the side wall.
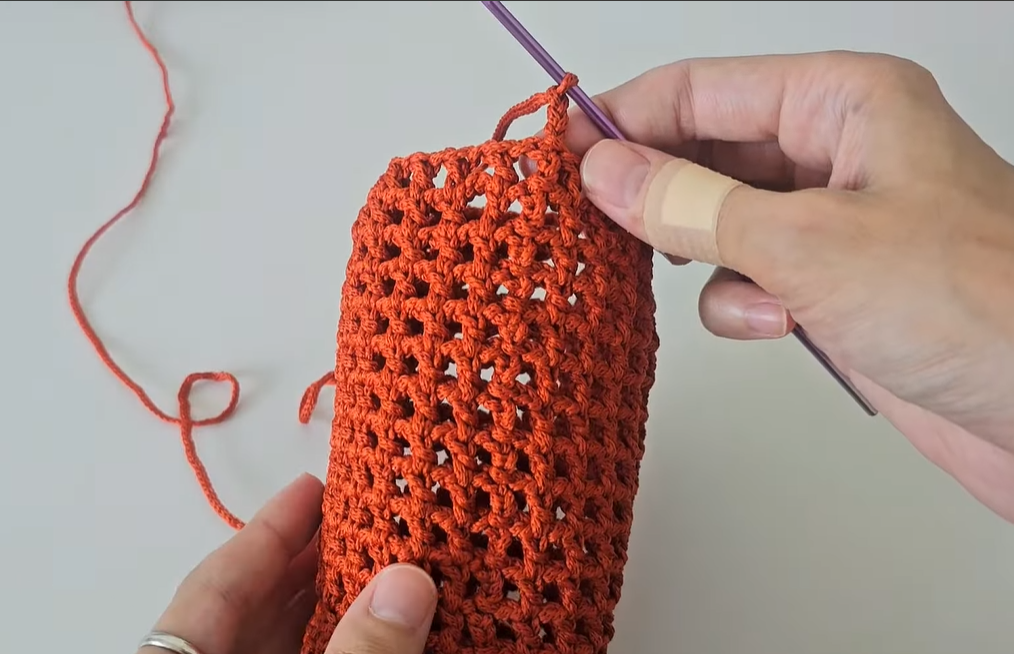
- Foundation Mesh Round (Row 1 of Mesh):
- Ch 3 (counts as first dc). Ch 1 (part of the mesh). Skip the next st.
- [1 dc in the next st, ch 1, skip next st] repeat around.
- Sl st to the 2nd ch of the starting chain-3 to join.
- You should have an equal number of dc stitches and ch-1 spaces.
- Mesh Round 2:
- Ch 3 (counts as first dc). Ch 1.
- Work 1 dc into the next dc from the previous round.
- [Ch 1, 1 dc in the next dc] repeat around.
- Ch 1, sl st to the 2nd ch of the starting chain-3 to join.
- The mesh pattern is simply a DC worked into a DC, and a CH 1 worked over a CH 1 space. It’s very easy to maintain!
➿ Part 3: Building the Body
Now you’ll repeat the mesh pattern until the holder reaches the desired height.
- Mesh Body: Repeat Mesh Round 2 continuously until the mesh reaches the shoulder (the point where the bottle’s curve transitions to the neck).
- Keep checking the fit against your bottle. It should hug the sides nicely.
- Tapering/Top Sc Border: Once you reach the shoulder, switch to single crochet for 1-2 rounds to provide a clean, tight, non-stretchy edge that grips the bottle’s neck.
- Border Round 1: Ch 1 (does not count as st). Work 1 sc into the top of the first dc, and 1 sc into the next ch-1 space. [1 sc in next dc, 1 sc in next ch-1 space] repeat around. Sl st to join. (Total stitch count is the same as the base).
- Border Round 2 (Optional): Ch 1. Work 1 sc in each st around. Sl st to join.
👜 Part 4: The Handle and Strap
The water bottle holder in the image has a short handle and a long shoulder strap. We’ll create both.
Short Handle (Optional):
- Placement: Identify 4 stitches on the side of the holder where you want the handle to sit. Join yarn with a sl st.
- Row 1: Ch 1. Sc in the same st and next 3 sts. Ch 1, turn. (4 sts)
- Rows 2-8 (or until desired length): Sc in each st across. Ch 1, turn. (4 sts)
- Joining: Fold the handle over. Sl st the final row to the 4 corresponding stitches on the opposite side of the handle opening. Fasten off.
Long Shoulder Strap:
- Placement: Attach yarn to the holder directly opposite the handle (or in the middle of the handle if you only made one attachment point).
- Chain: Ch 1. Sc in the same st. Now, Ch 120-150 (or whatever length you need for a comfortable cross-body strap).
- Return: Turn the chain over. Work sc into the 2nd ch from the hook and in every chain stitch back down to the body of the holder.
- Anchor: Sc into the body of the holder in the next stitch over. Sl st to the first sc of the round.
- Final Pass (Optional for a thick strap): Ch 1. Working around the sc stitches you just made, work a sl st into the side of every sc stitch on the strap and join back to the body. This provides a very dense, sturdy, rope-like finish similar to the image.
- Fasten Off: Cut the yarn and weave in the ends securely.
Video Tutorial:
✨ Finishing Touches
- Weave in Ends: Use your tapestry needle to hide all remaining tails on the inside of the case. Be thorough, especially where the strap attaches, as this point will see the most stress.
- Load Up: Insert your water bottle!
Congratulations! You’ve crocheted a custom-fit, stylish water bottle carrier that’s perfect for hiking, festivals, or just a walk in the park. Which color bottle will you use it with first?


