
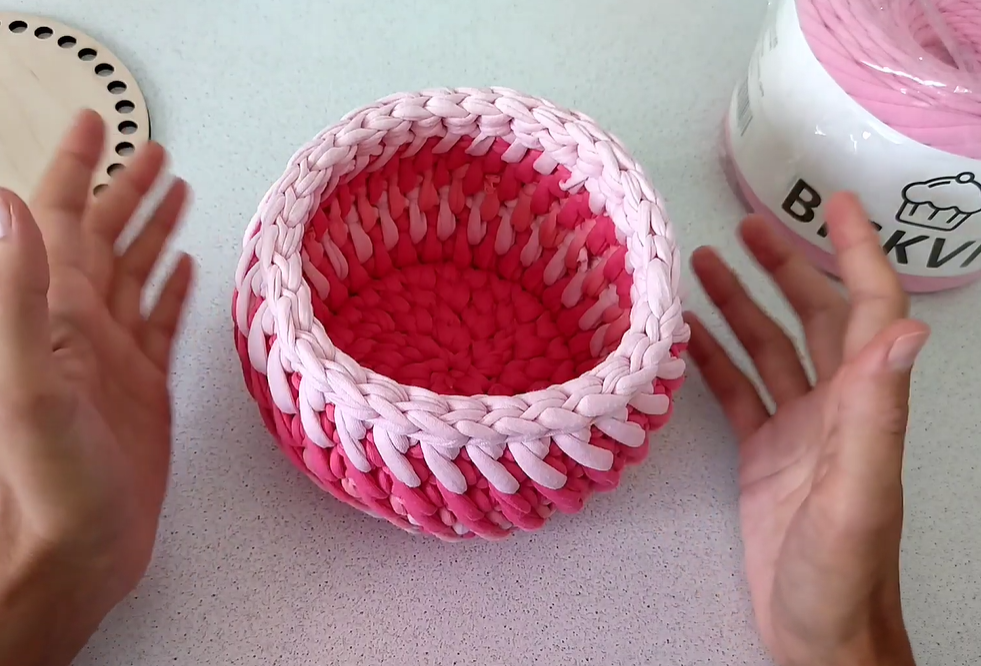
Hello, fellow crafters! Are you looking for a quick, rewarding project that results in a gorgeous, structural home decor piece? Today, we’re diving into the world of T-Shirt yarn (Zpagetti/Fettuccini) and the magic of a pre-punched wooden base. This combination creates a basket that is sturdy enough to hold its shape perfectly, and the Spike Stitch (or Elongated Single Crochet) gives it that stunning, modern two-tone vertical texture you see in the image!
This “Pink Pop” Basket works up quickly, even for beginners, and makes an incredible gift, planter cover, or stylish storage solution. Let’s get hooking!
🧶 Materials You’ll Need
Gathering the right supplies is essential for working with a wooden base and chunky yarn.
- T-Shirt Yarn (Super Bulky Weight 6):
- Color A (Basket Body): Bright Pink (Approx. 120 – 150 yards)
- Color B (Spike Stitch/Rim): Light Pink/Cream (Approx. 80 – 100 yards)
- Note: T-Shirt yarn thickness varies widely. Adjust hook size as needed.
- Wooden Base: One circular wooden base (MDF or plywood) with pre-punched holes.
- Recommended Diameter: 6 – 8 inches (15-20 cm).
- Hole Count: Ensure the hole count is an even number for colorwork symmetry (e.g., 30, 36, or 40 holes).
- Crochet Hook:
- 4.0 mm (G/6): Used only for attaching yarn to the wooden base (it needs to fit through the holes).
- 8.0 mm (L/11) to 10.0 mm (N/P): Used for the basket body. Choose a size that gives you a firm, tight fabric with your chosen T-shirt yarn.
- Stitch Marker: Essential for working in continuous rounds.
- Scissors
- Yarn Needle (Tapestry Needle): For weaving in ends.
📏 Finished Size (Approximate)
- Diameter: Matches the size of your wooden base (e.g., 7 inches / 18 cm).
- Height: 4 – 5 inches (10-13 cm).
📝 Abbreviations (US Terms)
- ch: chain
- sl st: slip stitch
- sc: single crochet
- st(s): stitch(es)
- dec: decrease (sc2tog)
- SpSt: Spike Stitch (detailed instructions below)
- BLsc: Back Loop Single Crochet
- BLO: Back Loop Only
💡 Important Notes Before You Start
- Stiffness: The Tapestry Crochet technique (carrying unused yarn) and the sc into both loops create a very stiff, structured fabric perfect for baskets.
- Color Changes: We will be using the Tapestry Crochet method for the spike stitch section (Part 3), carrying the unused color tightly as we work.
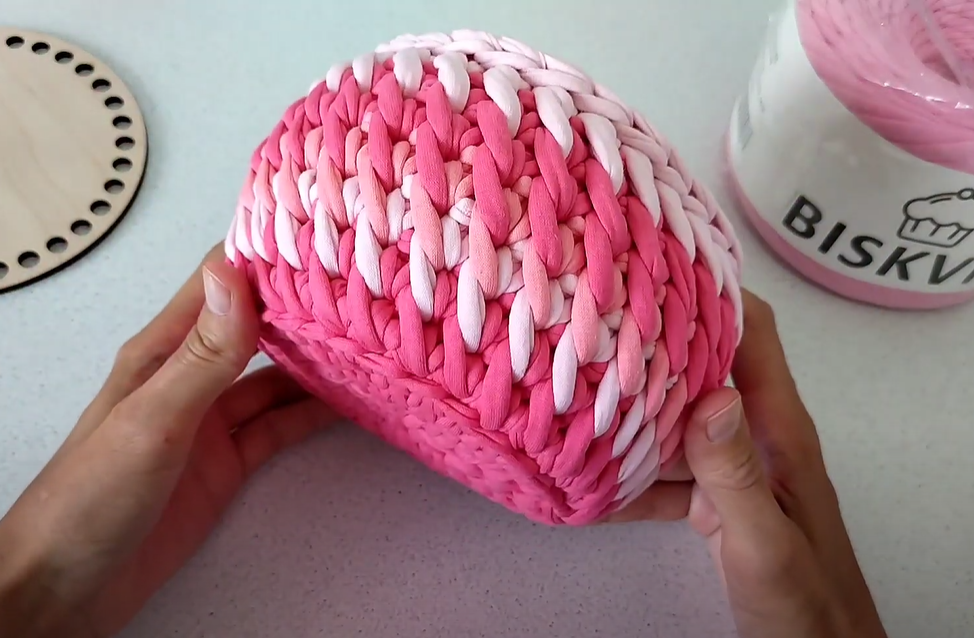
- Spike Stitch (SpSt): This is the key to the vertical lines. To work a SpSt, insert your hook into the stitch one or two rows below the stitch you would normally work into. This elongates the single crochet.
- Tension: Keep your tension tight throughout the entire project to ensure the sides stand up straight.
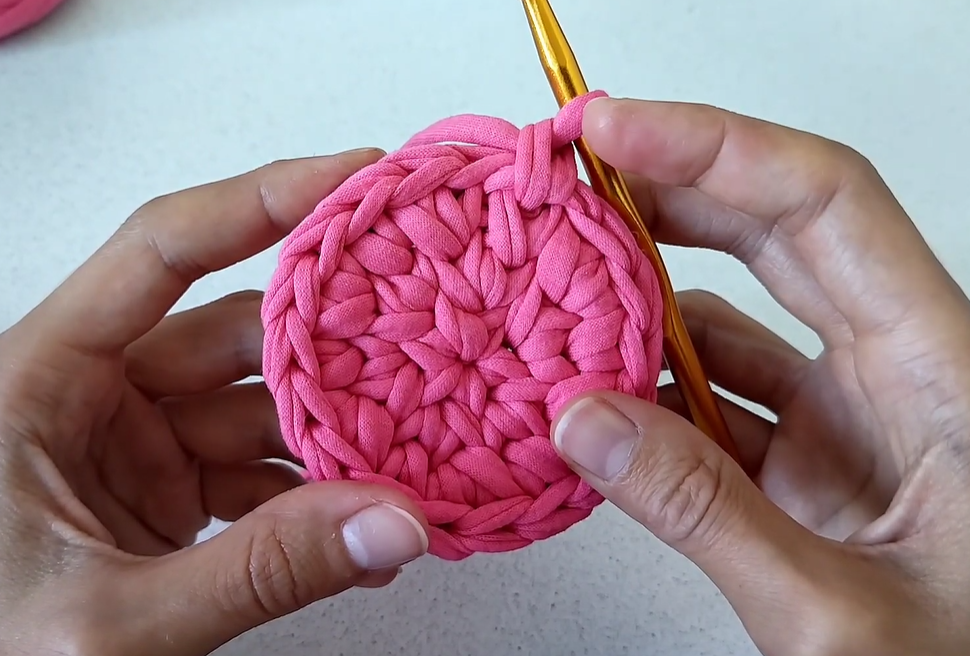
🪵 Part 1: Preparing the Base (Color A – Bright Pink)
We start by crocheting around the wooden base holes. Use your smaller hook (4.0 mm) here!
- Base Round 1: Using Color A (Bright Pink) and your 4.0 mm hook, attach the yarn to any hole with a sl st. Ch 1 (does not count as st). Work 2 sc into every hole around the base.
- Tip: This ensures the crochet work lays flat and prepares you for the next round.
- Stitch Count: (Hole count x 2). If you have 30 holes, you should have 60 sc.
- Sl st to the first sc to join.
- Base Round 2 (Transition): Change to your larger hook (e.g., 9.0 mm). Ch 1 (does not count as st). Work 1 sc in the BLO (back loop only) of each st around. Sl st to join.
- This BLO row creates the clean corner that helps the basket sides turn upward and stand tall.
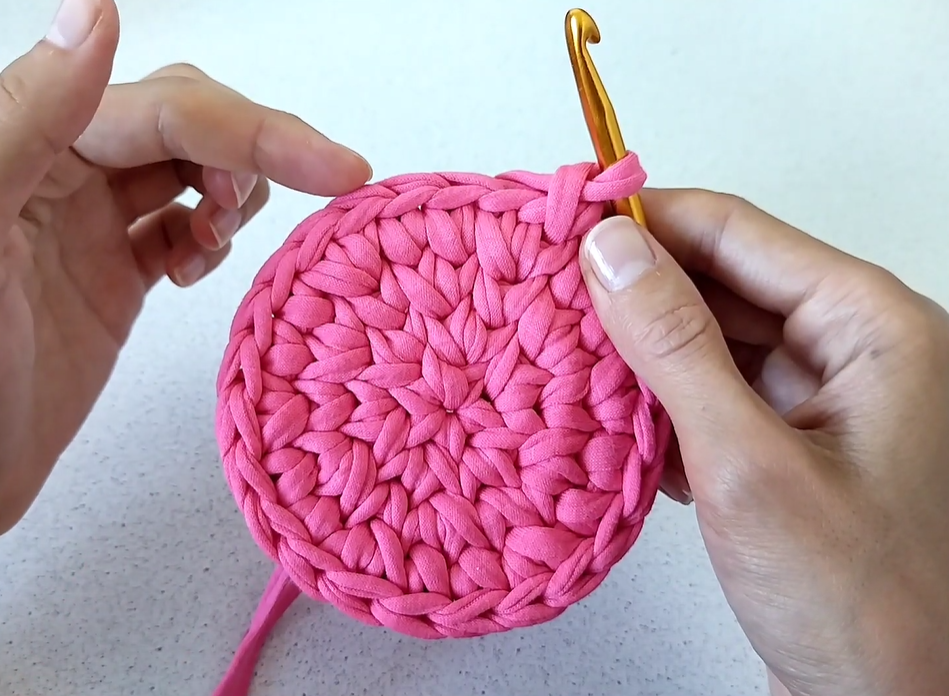
🧱 Part 2: Building the Solid Walls (Color A – Bright Pink)
We will now build the solid body of the basket using simple single crochet, working into both loops for maximum stiffness.
- Body Rounds 3 – 6 (or until 1/3 height): Ch 1 (does not count as st). Work 1 sc into both loops of each st around. Sl st to join at the end of each round.
- Work 4-5 rounds here, or until the solid pink section reaches about one-third of your desired final height.
- Stitch Count: Remains the same as Base Round 2 (e.g., 60 sts).
- Preparation Round (Last Round of Color A): Before joining the last stitch of your final Color A round, drop Color A and pick up Color B (Light Pink). Join with Color B. Do not cut Color A; we will carry it.
💈 Part 3: The Spike Stitch Colorwork (Color B & A)
This is where the magic happens! We will alternate colors and use the spike stitch technique.
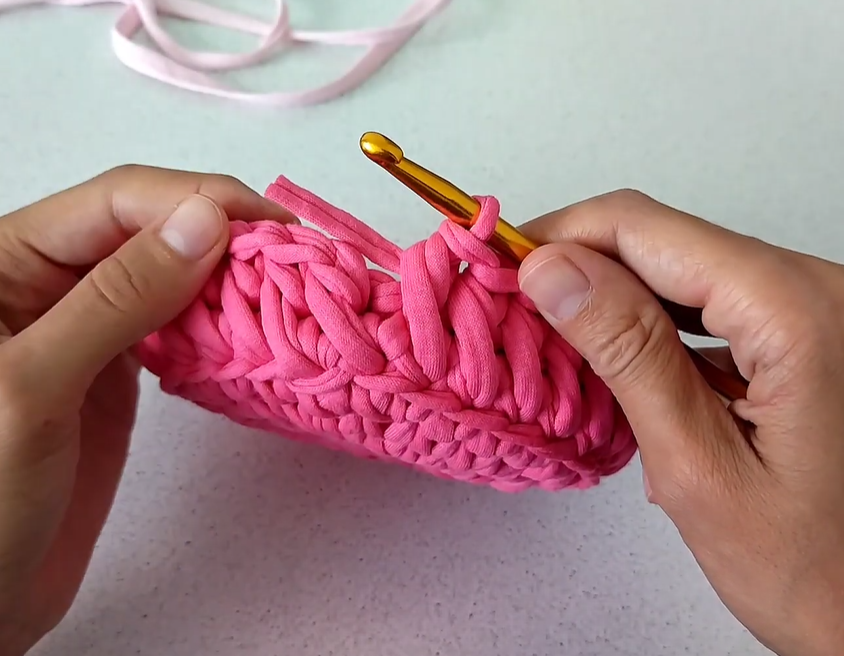
- Tapestry Technique: You must carry Color A behind your work and work your stitches over the unused Color A strand. This hides the yarn and adds bulk/stiffness.
- Spike Round 1 (Color B): Ch 1 (does not count as st).
- Work 1 sc into both loops of the first st with Color B.
- Now, change to Color A (carried yarn) on the last yarn over of the stitch.
- Spike Stitch Sequence:
- With Color A, work a SpSt into the corresponding stitch 2 rounds below (into the solid Color A section).
- Change to Color B on the last yarn over of the SpSt.
- With Color B, work 1 sc into both loops of the next st.
- Repeat the sequence [SpSt in Color A, sc in Color B] around the basket.
- Sl st to the first sc (Color B) to join. (Stitch Count remains the same)
- Note: Ensure your SpSt (Color A) is pulled tight but not so tight that it warps the work. The regular sc (Color B) keeps the structure.
- Spike Round 2 (Color B): Ch 1 (does not count as st).
- Work 1 sc into both loops of the first st with Color B.
- Change to Color A.
- Spike Stitch Sequence:
- With Color A, work a SpSt into the top of the previous SpSt from Round 1.
- Change to Color B.
- With Color B, work 1 sc into the top of the previous sc from Round 1.
- Repeat the sequence [SpSt in Color A, sc in Color B] around the basket.
- Sl st to the first sc (Color B) to join.
- Repeat Spike Round 2: Repeat this round continuously until the colored section reaches your desired height (e.g., another 4-5 rounds). The image shows about 5-6 rows of the two-tone effect.
🔝 Part 4: The Final Rim
The top of the basket in the image has a neat, smooth, and slightly rolled finish. We will achieve this using slip stitches.
- Last Spike Round: Complete your final Spike Round 2. Sl st to the first sc to join. Cut Color A and weave the tail securely into the inside of the basket. You will no longer be carrying yarn.
- Rim Round (Color B): Ch 1 (does not count as st). Work 1 sc in both loops of each st around. Sl st to join.
- Slip Stitch Border: Ch 1 (does not count as st). Work 1 sl st into the front loop of each st around.
- Working sl st into the front loop only creates a subtle roll that keeps the rim from sagging and gives it a nice finish.
- Sl st to the first sl st to join.
- Fasten Off: Cut the yarn, leaving a long tail (about 6 inches). Use your yarn needle to weave the tail through the last few stitches and securely hide it inside the basket.
Video Tutorial:
✨ Finishing Touches
- Weave in Ends: Use your yarn needle to securely weave in all remaining tails on the inside of the basket. Ensure the knots where you started the tapestry work are secure.
- Shape: Because of the tight T-shirt yarn and the sc stitches, your basket should stand perfectly on its own! Give it a gentle press and shape with your hands.
Congratulations! Your gorgeous, sturdy Pink Pop Spike Stitch Basket is ready to fill with yarn, keys, or beautiful blooms!


