
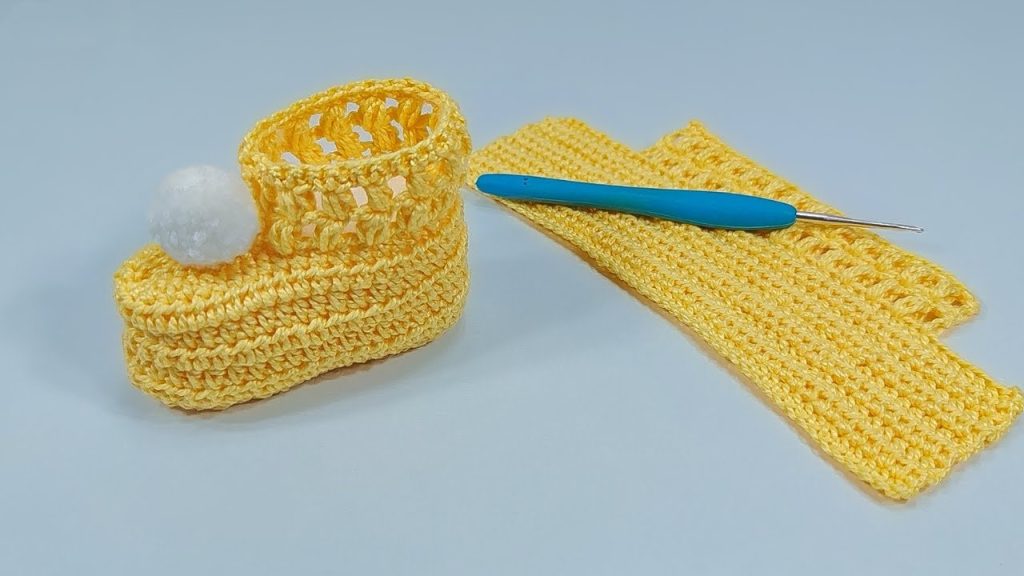
Welcome, crocheters! These adorable Sunny Pop Baby Booties are the perfect project for a new arrival. This design is built on a sturdy, warm base using Half Double Crochet in the Back Loop Only (HDC BLO) to create lovely horizontal ribbing, then finished with a beautiful openwork cuff for a light, summery feel. The pom-pom adds the final touch of fun!
This pattern is written for Newborn (0–3 months) and worked in two simple pieces: the main body (worked flat) and the cuff (worked in the round).
📐 Sizing and Fit Guide
This pattern is sized for newborns. To ensure the best fit, please check the finished dimensions.
| Size | Age (Approx.) | Finished Sole Length |
| Newborn | 0 – 3 Months | 3.5 inches (9 cm) |
Export to Sheets
🛠️ Materials Needed
- Yarn: Approximately 60 – 80 yards (55 – 75 meters) of a soft DK weight (light worsted/8-ply) yarn in your main color (Sunny Yellow).
- Hook:US size E/4 (3.5 mm) crochet hook.
- Use this size for the dense base and the cuff.
- Notions:
- Tapestry Needle for seaming and weaving in ends.
- Sharp Scissors.
- 2 Small White Pom-poms (or buttons) for the toe detail.
📏 Gauge (Essential for Baby Sizing)
- Gauge: 18 HDC stitches and 14 rows equals 4 inches (10 cm) in HDC BLO.
- Why Gauge is Critical: Baby sizing is very precise. A slight difference in tension can drastically change the fit. Your base strip should measure approximately 3.5 inches wide for the final sole.
ℹ️ Key Techniques & Abbreviations
The pattern relies on the HDC BLO for the ribbing and a simple Shell stitch for the cuff’s openwork.
- ch = Chain
- st(s) = Stitch(es)
- sl st = Slip Stitch
- sc = Single Crochet
- hdc = Half Double Crochet
- hdc2tog = Half Double Crochet two stitches together (a decrease).
- BLO = Back Loop Only (insert hook only into the loop furthest from you).
- Shell (Sh): (2 dc, ch 1, 2 dc) in the same space or stitch.
- FO = Fasten Off
☀️ The Pattern: Sunny Pop Baby Booties
1️⃣ The Body Strip (Sole and Instep)
This piece is worked flat and creates the shoe’s entire body. The chain length is the height/depth of the bootie.
| Row | Instructions | Stitch Count |
| Foundation | Ch 18. | 18 chs |
| Row 1 (RS) | Hdc in 2nd ch from hook and in each ch across. Ch 1, turn. | 17 sts |
| Row 2 (WS) | Hdc in the BLO of each st across. Ch 1, turn. | 17 sts |
| Rows 3–32 | Repeat Row 2 (working in BLO) for a total of 32 rows, or until the piece measures approximately 7 inches (18 cm) long. This length wraps around the sole, heel, and toe. | 17 sts |

Export to Sheets
- Prepare for Seaming: Do not chain 1. FO the yarn, leaving a very long tail (20 inches / 50 cm) for seaming.
2️⃣ Shaping and Seaming
The single strip is folded and seamed to create the bootie shape.
| Step | Instructions | Result |
| Fold and Align | Fold the long crocheted strip in half, aligning the rows. | |
| Seam the Toe | Thread the long tail onto your tapestry needle. Starting at the folded end (which will be the toe), use your needle to weave the yarn through the loops of the first 5 rows on both sides. Pull the yarn tightly to cinch the toe closed. Secure firmly. | Closed Toe |
| Seam the Sole | Using the same yarn, continue seaming along the bottom edge (the sole) until you have sewn up to Row 25 (leaving 7 rows open for the heel and ankle opening). Use a whipstitch or mattress stitch. | Shoe Base Formed |
| Seam the Heel | Seam the remaining 7 rows on the opposite side (the short end) to form the back heel seam. | Fully Seamed Body |
| Secure Ends | Secure the thread firmly and weave in all remaining yarn tails on the inside. | Clean Finish |
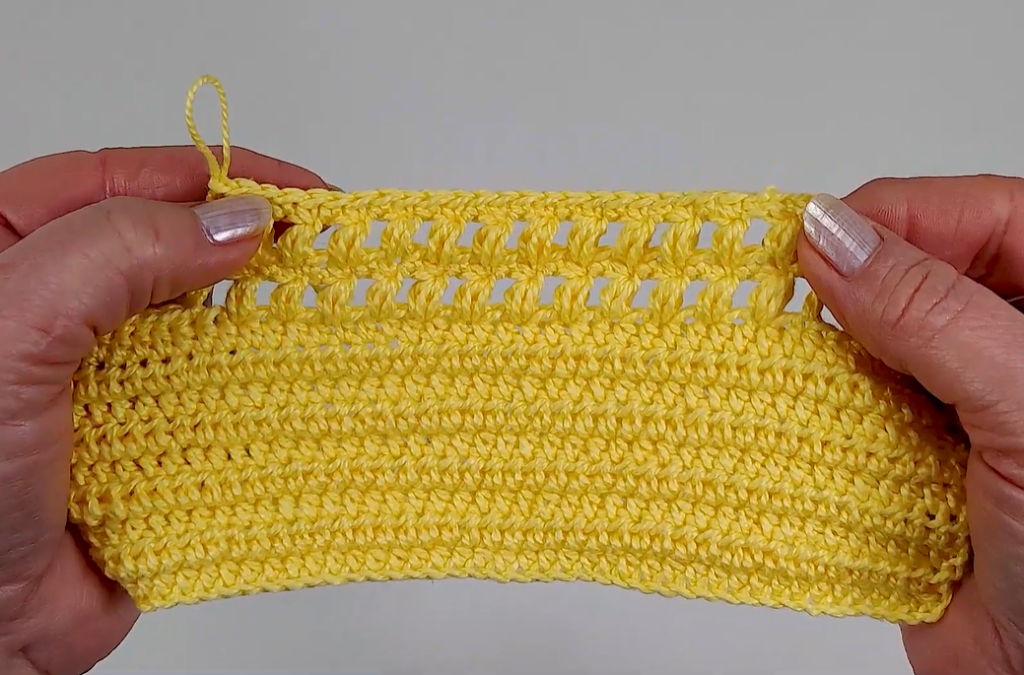
3️⃣ The Openwork Cuff (Worked in the Round)
We now add the decorative cuff by joining yarn to the ankle opening.
| Rnd | Instructions | Stitch Count |
| Rnd 1 (Setup) | Join yarn to the back heel seam. Ch 3 (counts as dc). Work 32 dc evenly around the ankle opening (2 dc per row-end). Join with sl st to top of Ch 3. | 32 dc |
| Rnd 2 (Shell) | Ch 1, sc in same st. Skip 1 st. Shell in next st. Skip 3 sts. Repeat [Shell in next st, skip 3 sts] around. End with Shell in last st. Join with sl st to first sc. | 8 Shells |
| Rnd 3 | Sl st into the ch-1 space of the first Shell. Ch 3 (counts as dc). Work Shell in each ch-1 space around. Join with sl st to top of Ch 3. | 8 Shells |
| Rnd 4 | Repeat Rnd 3. | 8 Shells |
| Last Rnd | Ch 1, sc in first ch-1 space. Sc in each st and ch-1 space around. Join with sl st to first sc. FO. | 32 sc |
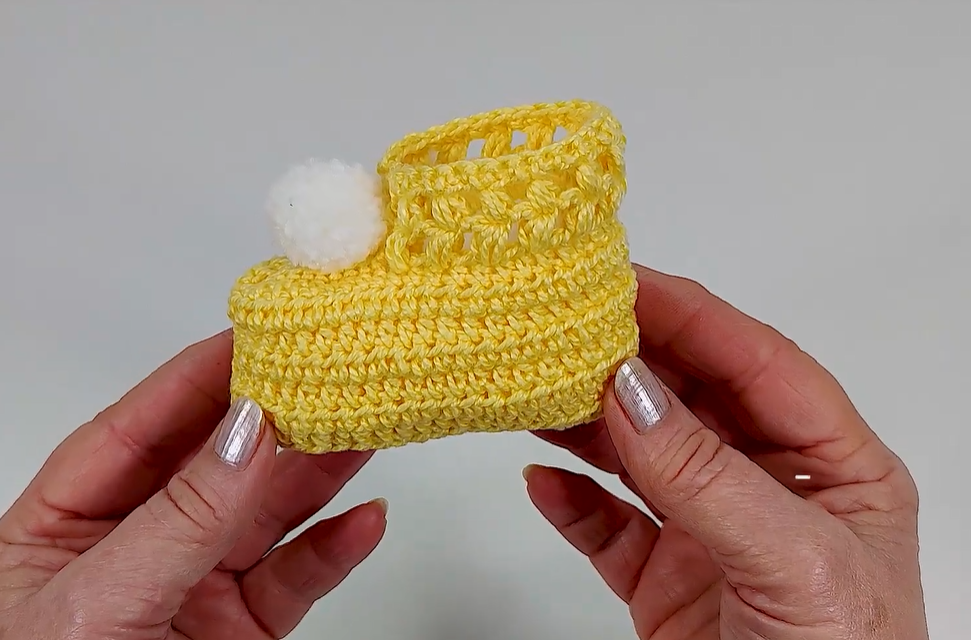
4️⃣ Final Embellishment
- Pom-Pom Attachment: Using a tapestry needle and matching yarn, securely stitch the white pom-pom to the front center of the toe, right where the toe was cinched closed.
- The Second Bootie: Repeat the entire pattern for a perfect pair!
Video Tutorial:
✨ Pro-Tips and Sizing Adjustments
Adjusting to 3–6 Months Size
To make the bootie larger, you primarily need to increase the length of the base strip.
- Initial Chain: Start with a foundation chain of 20 stitches instead of 18 (for more height/depth).
- Body Length: Work the ribbed body for approximately 38–40 rows (about 8.5 inches / 21.5 cm) before seaming.
- Cuff Adjustment: The cuff size will automatically increase with the longer base. Ensure you work the correct number of stitches in Rnd 1 (approx. 36-40 dc) to maintain an even stitch count for the Shell stitch repeats.
Keeping the Bootie On
- Drawstring Cuff: Before starting Rnd 4 of the cuff, thread a piece of elastic cord or thin ribbon through the stitches of Rnd 3. Tie a small bow to keep the cuff snug around the baby’s ankle.
- Yarn: Use a yarn with good elasticity (like a wool or wool blend) which helps the bootie retain its shape better.


