
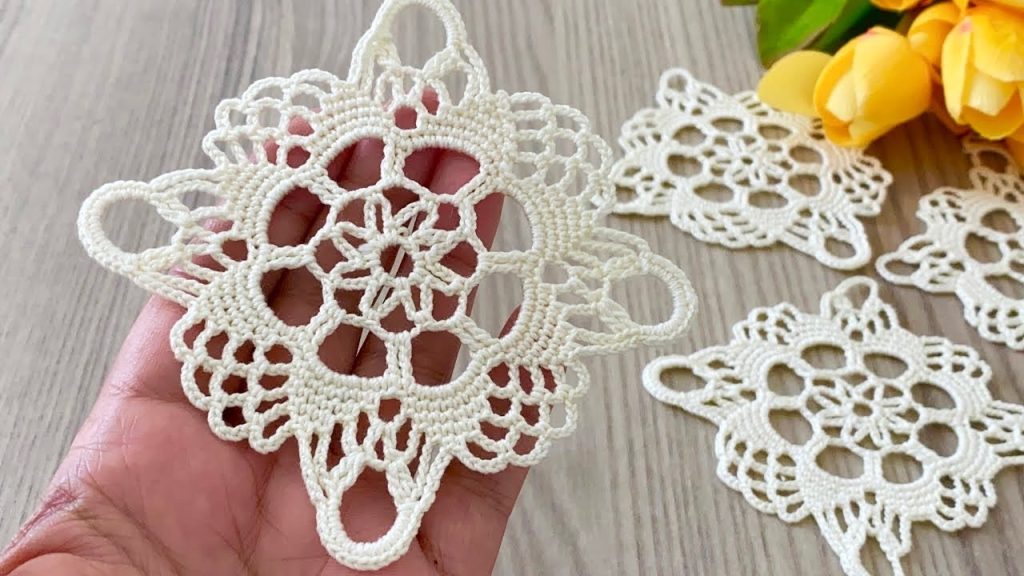
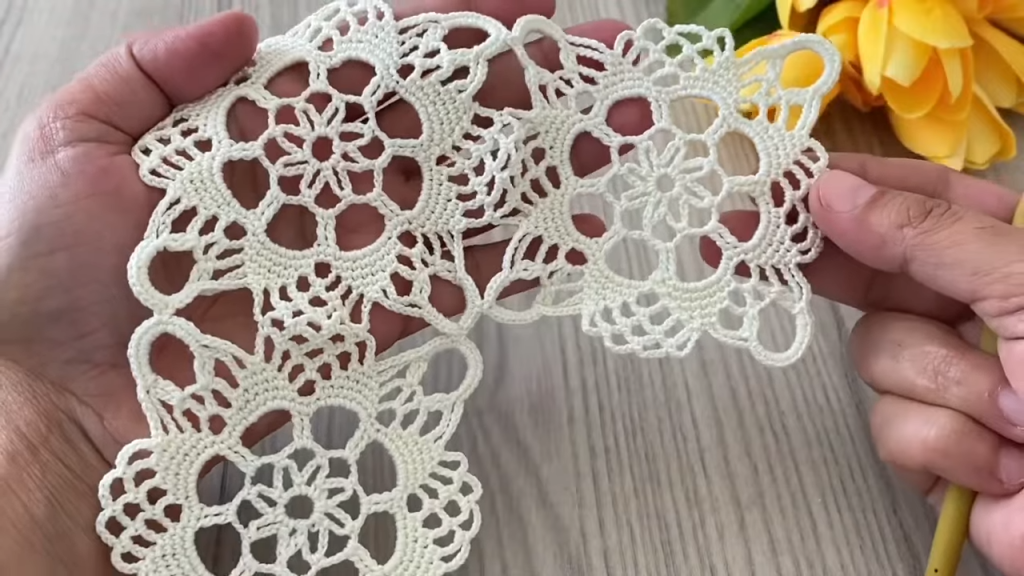
Welcome to the blog! Today, we’re diving into a project that perfectly blends intricate lace with simple stitches to create a stunning, star-shaped motif. This finished piece is versatile—it makes a gorgeous coaster, a beautiful doily accent, or even a lovely appliqué for larger projects.
The motif in the image features a solid central circle, surrounded by a lattice of openwork, and finished with a unique, four-pointed border composed of loops and delicate picots. Don’t let the detail scare you! With a good understanding of the basic crochet stitches and a little patience, you’ll be able to create these beautiful pieces. We’ll be using US crochet terms throughout this pattern.
Skill Level: Intermediate
Requires knowledge of basic stitches, working in the round, and forming shells and picots.
🧶 Materials: Gather Your Supplies
To achieve the delicate look of the motif in the photo, your choice of yarn and hook is crucial.
- Yarn: Lightweight cotton thread (Size 10 or 20) or a fine Fingering/Sock Weight yarn (Weight 1) is ideal. The example looks like it was made with an off-white or cream cotton thread.
- Hook: A steel crochet hook appropriate for your thread. For Size 10 thread, a 1.5mm to 1.75mm hook (US 7 or 8 steel) will work well to keep the tension tight and the stitches defined. If you use a fingering weight yarn, try a 2.25mm (US B/1) or 2.75mm (US C/2) hook.
- Tapestry Needle: For weaving in ends.
- Scissors
- Blocking Supplies: Pins and a blocking mat are highly recommended to open up the lace and define the points!
📝 Abbreviations (US Terms)
- ch: chain
- sl st: slip stitch
- sc: single crochet
- dc: double crochet
- tr: treble crochet (or triple crochet)
- sk: skip
- sp: space
- ch-sp: chain space
- Picot: ch 3, sl st into the first ch
- V-Stitch (V-St): dc, ch 1, dc in the same stitch or space
- Shell: 5 dc in the same stitch or space
- ( ): Instructions in parentheses are worked into the same stitch or space.
- **: Instructions between asterisks are repeated.
- [ ]: Total number of stitches/spaces at the end of the round.
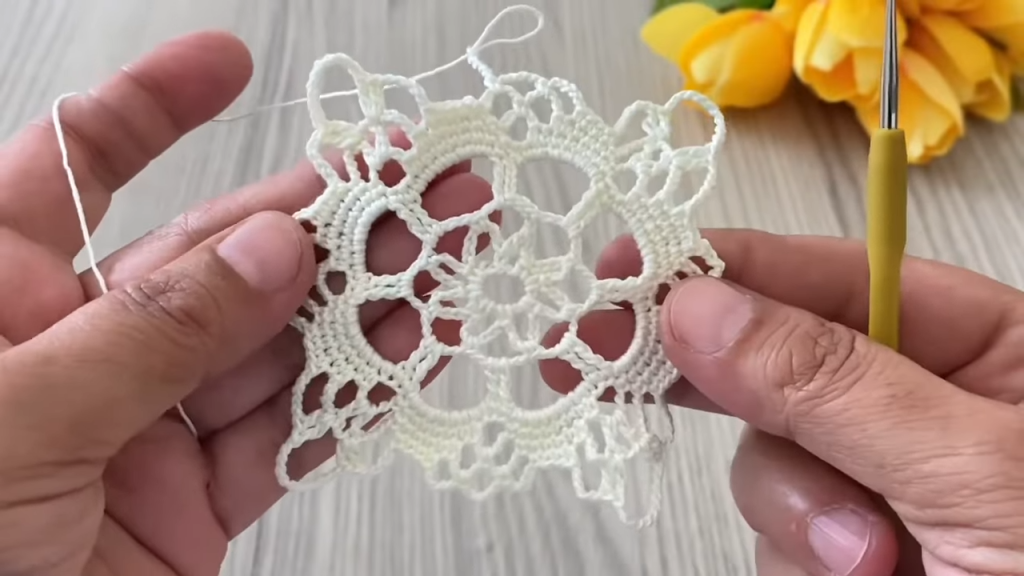
🧵 Pattern Instructions: Starburst Motif
This pattern is worked in the round, starting from the center.
Round 1: The Foundation Ring
- Ch 4, sl st into the first ch to form a ring. Or, use a magic ring for a tighter center.
- Ch 3 (counts as first dc), work 11 dc into the ring.
- Sl st to the top of the beginning ch 3 to join. [12 dc]

Round 2: Building the Center
- Ch 1 (does not count as a stitch), sc in the same stitch.
- Ch 3, sc in the next dc.
- Repeat *ch 3, sc in the next dc* around.
- Sl st to the beginning sc to join. [12 sc, 12 ch-3 sps]
Round 3: Star Center Spokes
- Sl st into the first ch-3 sp.
- Ch 5 (counts as 1 dc, ch 2).
- (dc, ch 2) in the next 11 ch-3 sps.
- Sl st to the 3rd ch of the beginning ch 5 to join. [12 dc, 12 ch-2 sps]
Round 4: Creating the Lattice
- Ch 1 (does not count as a stitch), sc in the same stitch (which is the join of the previous round).
- Ch 5 (this forms the first large loop).
- *Sc in the next dc (the top of the next spoke), ch 5*.
- Repeat from * to * around.
- Sl st to the beginning sc to join. [12 sc, 12 ch-5 sps]
🌸 Developing the Points
Round 5: Defining the Quadrants
This round begins to establish the four main points of the motif.

- Sl st into the first ch-5 sp.
- Ch 3 (counts as 1 dc), 2 dc in the same ch-5 sp.
- *V-St (dc, ch 1, dc) in the next ch-5 sp.
- 3 dc in the next ch-5 sp.
- Tr (treble crochet) in the next ch-5 sp (this forms a corner/point).
- 3 dc in the next ch-5 sp.
- V-St in the next ch-5 sp.*
- Repeat from * to * one more time. You should have reached the start of the round after two full repeats.
- Sl st to the top of the beginning ch 3 to join. [8 tr, 16 V-St, 32 dc] Wait, let’s simplify this count and focus on the groups for clarity. [4 Tr corners, 8 V-St, 8 groups of 3 dc]
Round 6: Lace Edging
This round works across the stitches and into the spaces to create the scalloped edge.
- Ch 1 (does not count as a stitch), sc in the same stitch.
- Sc in the next 2 dc.
- Shell (5 dc) in the ch-1 sp of the next V-St.
- Sc in the next 3 dc.
- Sc in the tr corner stitch.
- Ch 3, sc in the same tr stitch (this forms a small corner loop).
- Sc in the next 3 dc.
- Shell (5 dc) in the ch-1 sp of the next V-St.
- Sc in the next 3 dc.
- *Skip the next two V-St stitches and the 3 dc group*. Tr into the next Tr corner. Ch 5, tr back into the same Tr corner (this forms a large loop for the next round’s corner).
- Sc in the next 3 dc.
- Shell (5 dc) in the ch-1 sp of the next V-St.
- Sc in the next 3 dc.
- Sc in the tr corner stitch.
- Ch 3, sc in the same tr stitch (small corner loop).
- Sc in the next 3 dc.
- Shell (5 dc) in the ch-1 sp of the next V-St.
- Sc in the next 3 dc.
- Sl st to the beginning sc to join.
Note: Round 6 is complex! The repeat is across a quarter of the motif. If you find the count uneven, ensure you have four large Tr-Ch 5-Tr loops and four small Sc-Ch 3-Sc loops.
🎯 Final Round: The Signature Border
This round creates the distinctive, pointed outer border using picots and long loops, mimicking the look of the motif in the image.
- Sl st into the center dc of the next shell (the 3rd dc of the 5-dc group).
- Ch 1 (does not count), sc in the same stitch.
- Ch 5, skip to the ch-3 corner loop. Sc into the ch-3 sp.
- Ch 3, Picot, ch 3, Picot, ch 3, sc into the same ch-3 sp (this creates the pointed tip).
- Ch 5, skip to the center dc of the next shell. Sc in the center dc.
- Ch 10 (This creates the large, distinctive corner loop). Sl st back into the same sc.
- Sc in the center dc of the next shell.
- Ch 5, skip to the ch-3 corner loop. Sc into the ch-3 sp.
- Ch 3, Picot, ch 3, Picot, ch 3, sc into the same ch-3 sp.
- Ch 5, skip to the center dc of the next shell. Sc in the center dc.
- Ch 10, sl st back into the same sc.
Continue this sequence of (Picot Point, Center Loop) around the entire motif.
- Sl st to the beginning sc to join.
✂️ Finishing and Blocking
Weaving in Ends
Cut your yarn, leaving a generous tail. Use your tapestry needle to carefully weave the tail into the back of your work. Be sure to weave it in securely to prevent unraveling, passing it through several stitches in different directions.
Blocking: The Secret to Perfection
Blocking is essential for this project! It opens up the lace, straightens the edges, and truly defines the star points and loops, making your motif look professional and crisp, just like the one in the photo.
- Wet or Steam: Submerge the motif in cool water until fully saturated (wet blocking) or use a steamer/iron over the motif without touching it (steam blocking).
- Pin it Out: Place the wet/damp motif onto a blocking mat or towel. Gently stretch and shape the motif, carefully pinning out all four corner loops and the four main picot points to the exact shape you want.
- Dry: Allow the motif to dry completely before unpinning. This sets the shape of the lace.
Video Tutorial:
💡 Troubleshooting & Tips
- Counting is Key: With lace patterns, it is absolutely vital to count your stitches and chains at the end of each round. If your piece starts to ripple or curl, you’ve likely missed a stitch or chain somewhere.
- Picot Perfection: The Picots in the final round are what give the four points their distinct sharpness. Make sure your tension is even for these tiny loops.
- Adjusting Size: To make a larger or smaller motif, use a heavier or lighter yarn/thread and the corresponding hook size. The pattern structure remains the same!
Happy Crocheting! We’d love to see your finished Starburst Lace Motif! Drop a comment below if you have any questions.


