
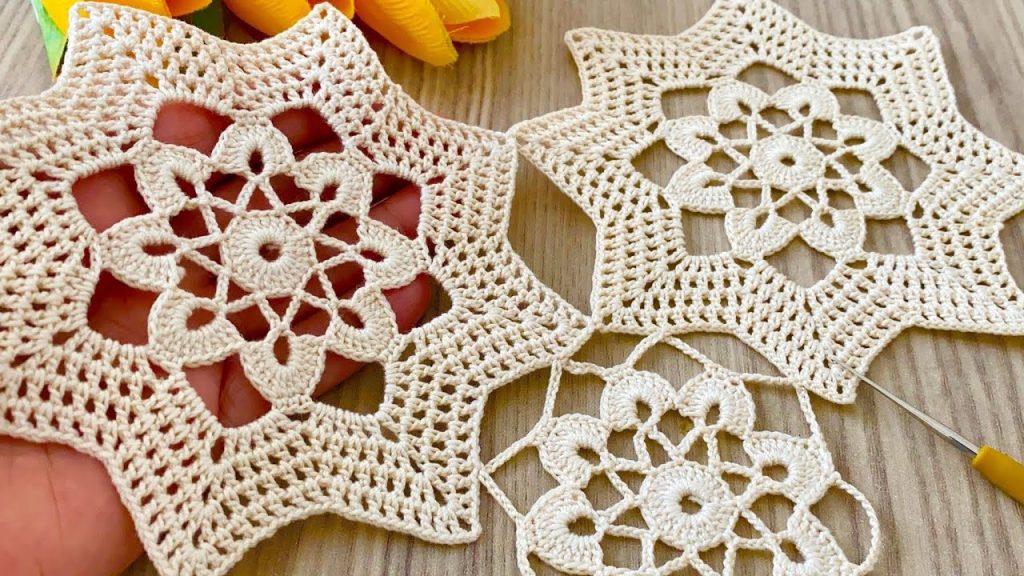
This exquisite pattern creates a radiant, star-shaped motif featuring a delicate floral center framed by pointed outer edges and open netting. These motifs are perfect for creating unique doilies, table runners, or even a stunning shawl when joined together. The structure is deceptively simple, relying on precise counting and consistent tension to achieve the crisp, clean lines seen here.
⭐️ Project Overview and Technique Check
| Feature | Detail |
| Skill Level | Intermediate. Requires careful stitch counting, working in the round, and creating clusters. |
| Stitches Used | Chain (ch), Slip Stitch (sl st), Single Crochet (sc), Double Crochet (dc), Treble Crochet (tr), dc Cluster. |
| Construction | Worked continuously in the round, from the center outwards. |
| Yarn Type | Fine cotton thread is recommended for optimal lace detail. |
| Final Product | An 8-pointed star motif ready for joining. |
Export to Sheets
🧵 Materials & Gauge
Yarn
- Weight: Crochet Thread Size 10 or a Lace/Fingering Weight (Category 0 or 1) yarn. Using a fine thread is essential to replicate the elegant, delicate look of the sample.
- Fiber: 100% Mercerized Cotton thread is highly recommended, as it holds its shape and blocks beautifully.
- Color: The sample uses a classic, neutral ecru or cream color.
- Yardage: Approximately 30−40 yards per motif.
Hook
- Size: 1.5 mm to 1.75 mm (Steel Hook US 8 or 7), or the size that matches your chosen thread. The key is to use a hook that results in tight, firm stitches for defined points.
Notions
- Tapestry Needle for weaving in ends.
- Scissors.
- T-pins and blocking board (essential for achieving the star’s points).
Gauge (Approximate)
Due to the geometric nature, the motif size is the gauge. The finished star should measure approximately 5.5 inches from point to point before blocking.
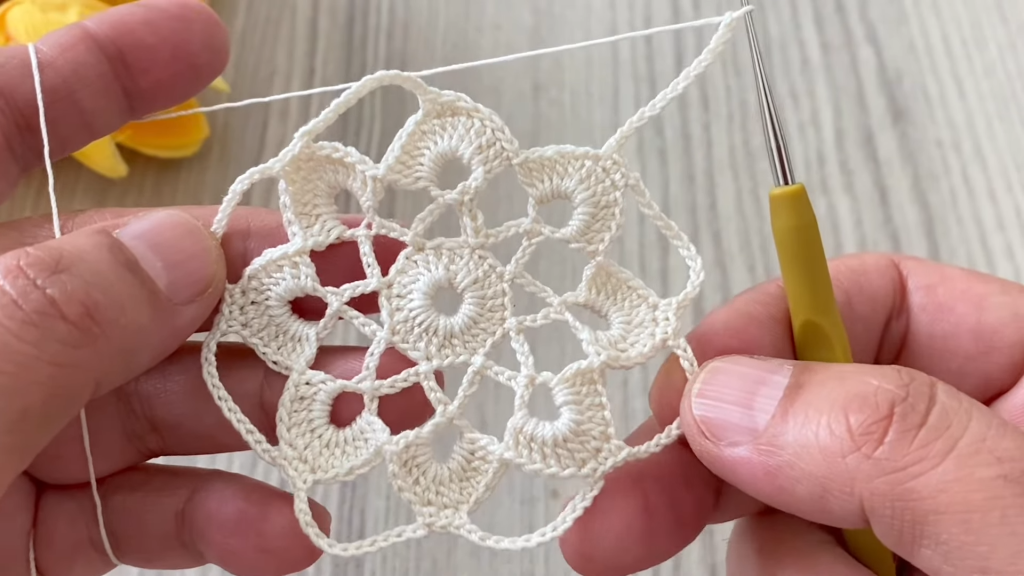
🌻 Pattern Instructions: The Floral Center
The motif begins with a solid, compact floral center worked in the round.
Round 1 (Center Ring): ch 6, sl st to the first ch to form a ring. ch 3 (counts as dc), 15 dc into the ring. sl st to the top of the starting ch 3 to join. (16 dc)
Round 2 (Inner Petal Loops): ch 1 (sc in the first stitch). ch 3, sc in the 2nd dc from the hook. Repeat the sequence (ch 3,sc in 2nd dc) 7 times more. You should have 8 ch 3 loops. sl st to the first sc to join. (8 loops)
Round 3 (Cluster Petals): sl st into the first ch 3 loop. ch 3 (counts as dc). Work 3 dc in the same loop. This forms the first 4 dc cluster. ch 2, 4 dc into the next ch 3 loop. Repeat the sequence \mathbf{\text{ch 2}, 4 \text{ dc}} 6 times more. ch 2, sl st to the top of the starting ch 3 to join. (8 clusters)
Round 4 (Large Petal Loops): sl st over the next 2 dc to reach the center of the first cluster. ch 1 (sc in that space). ch 5. sc in the ch 2 space between clusters. ch 5. sc in the 3rd dc of the next cluster. Repeat the sequence ch 5,sc in ch 2 space, ch 5,sc in 3rd dc 3 times more. You should have 16 ch 5 loops. sl st to the first sc to join.

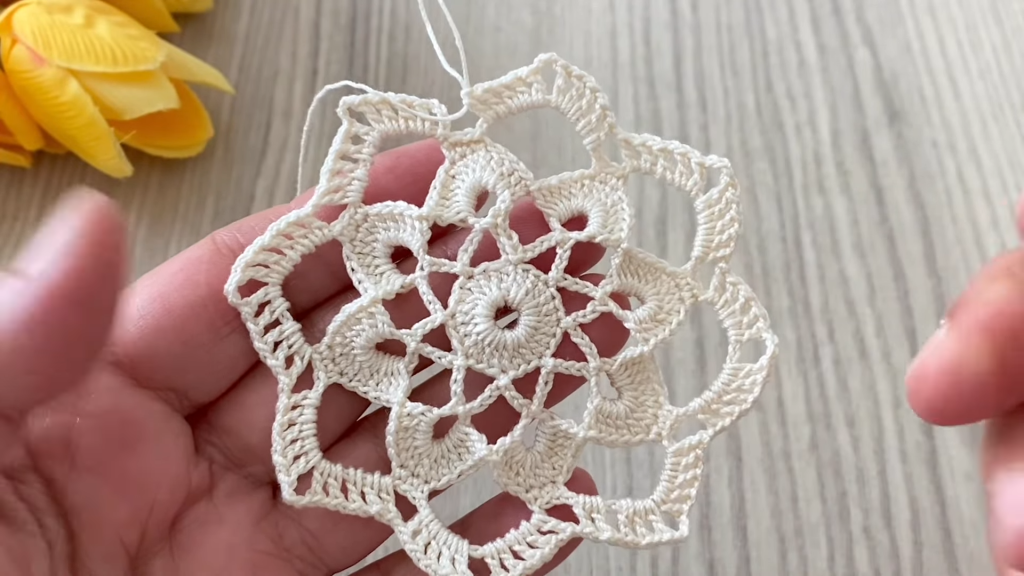
🌟 Pattern Instructions: Star Points and Outer Netting
This section defines the 8 points of the star using tr stitches and opens up the motif with large netting.
Round 5 (Defining Points): sl st into the first 3 ch of the ch 5 loop. ch 5 (counts as tr,ch 1). tr in the same space. ch 2. In the next ch 5 loop, work: tr,ch 1,tr. ch 2. Repeat the sequence tr,ch 1,tr in ch 5 loop, ch 2 14 times more. sl st to the 4th ch of the starting ch 5 to join. (16 tr-v-stitches)
Round 6 (Deep Netting): sl st into the ch 1 space. ch 6 (counts as dc,ch 3). dc in the same ch 1 space. ch 5. In the next ch 1 space, work: dc,ch 3,dc. ch 5. Repeat this sequence 14 times more. sl st to the 3rd ch of the starting ch 6 to join. (16 dc-v-stitches)
Round 7 (Final Edge – Increasing Points): sl st into the ch 3 space. ch 1 (sc in the ch 3 space). sc in the same space. ch 3. sc into the center of the next ch 5 loop. ch 3. sc into the ch 3 space of the next V-stitch. ch 3. sc into the center of the next ch 5 loop. Repeat this sequence 7 times more. sl st to the first sc to join.
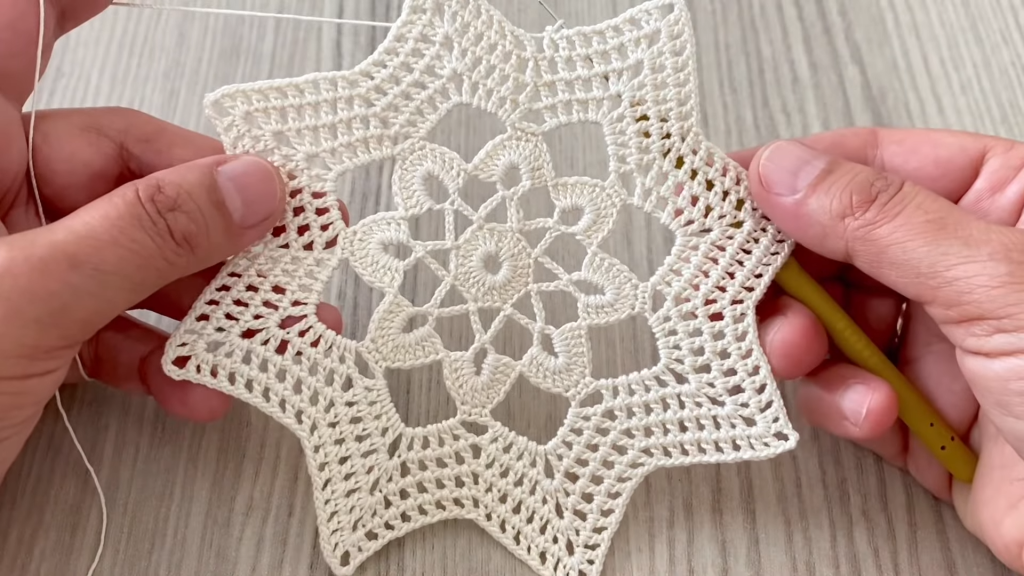
📐 Final Section: The Star Points
This round creates the defined 8 sharp points of the star.
Round 8 (Star Points): sl st into the ch 3 space. ch 1 (sc in the ch 3 space). 3 dc in the same space. 3 tr in the next ch 3 space. ch3 (forms the point), sl st to the base of the ch 3. 3 tr in the same space. 3 dc in the next ch 3 space. sc in the next ch 3 space. 3 dc in the next ch 3 space. 3 tr in the next ch 3 space. ch 3 (point), sl st to the base of the ch 3. 3 tr in the same space. Repeat this sequence \mathbf{3 \text{ times more}}. 3 dc in the final ch 3 space. sl st to the first sc to join.
Fasten off, leaving a short tail for weaving.
Video Tutorial:
🔗 Finishing and Blocking
Blocking is essential to open up the lace and define the eight star points beautifully.
- Weave: Carefully weave in all starting and ending yarn tails on the back of the motif.
- Soak: Submerge the motif in cool water for 15−20 minutes. Gently squeeze out the excess water—do NOT wring or twist the delicate lace.
- Pin: Lay the wet motif onto a foam blocking mat. Using rust-proof T-pins, carefully pin out the motif, ensuring all eight points are pulled taut and symmetrical. Pin out the edges of the inner floral sections as well for definition.
- Dry: Allow the piece to dry completely flat. This will take 12−24 hours.
- Joining (Optional): If you are joining multiple motifs (as shown in the image), the best time to join is using the Join-As-You-Go method during Round 8 of the second motif, connecting the points with ch 3 or sl st joins, or stitching them together after blocking.
Your Celestial Starburst Motif is now complete! Will you be creating a series of these to make a larger textile?


