
💎 Introduction: The Beauty of Modular Crochet
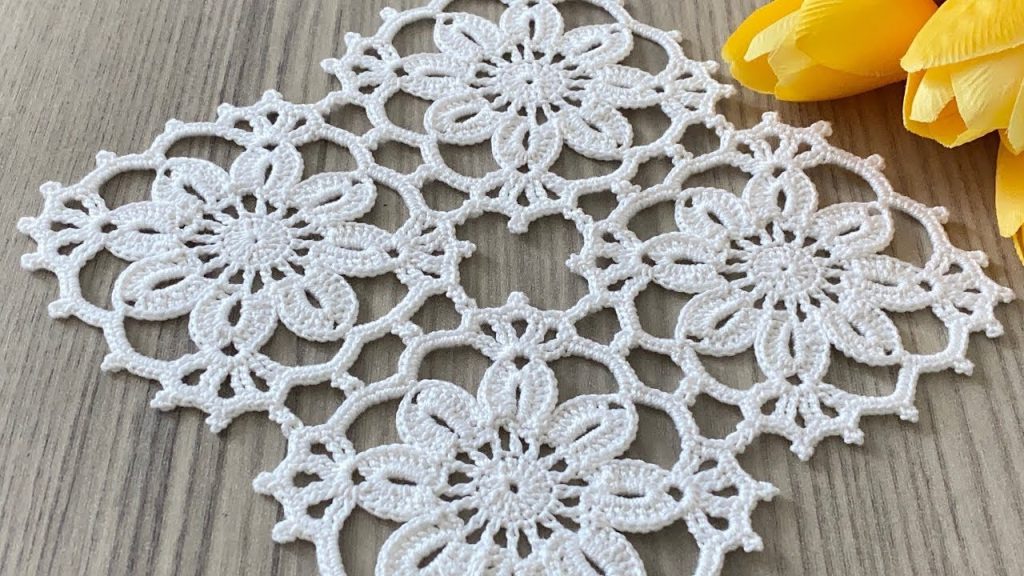
Welcome, fellow fiber artists! Today, we are embarking on a project that combines four delicate floral lace motifs into one breathtaking square centerpiece. This technique, known as modular crochet, allows you to create large, intricate pieces by focusing on smaller, manageable units. The image shows four beautifully designed floral medallions joined by a lacy lattice, resulting in a show-stopping doily.
We will first detail the pattern for the Floral Medallion Motif and then provide instructions for the Joining Round and the final Edging. This project is deeply rewarding and perfect for showcasing the elegance of fine crochet thread. We’ll be using standard US crochet terms.
Skill Level: Intermediate to Advanced
Requires familiarity with working in the round, shells, picots, and joining motifs.
🛍️ Materials: What You Will Need
To capture the fine, crisp detail shown in the image, your material choice is crucial.
- Yarn: Lace Weight or Thread Weight Cotton (Size 10 is standard for doilies, but Size 20 or 30 will yield a finer result). The sample is a pristine white.
- Hook: A steel crochet hook sized appropriately for your thread. For Size 10 thread, a 1.5mm to 1.75mm hook (US 7 or 8 steel) is recommended.
- Tapestry Needle: For weaving in ends.
- Scissors
- Blocking Supplies: Pins and a blocking mat are essential to define the shape and open up the lace details.
📋 Abbreviations (US Terms)
- ch: chain
- sl st: slip stitch
- sc: single crochet
- dc: double crochet
- tr: treble crochet (or triple crochet)
- sk: skip
- sp: space
- ch-sp: chain space
- Picot: ch 3, sl st into the first ch
- Shell: 5 dc in the same stitch or space
- ( ): Instructions in parentheses are worked into the same stitch or space.
- **: Instructions between asterisks are repeated.
- [ ]: Total number of stitches/spaces at the end of the round.
- JOIN: See specific instructions in the joining section.
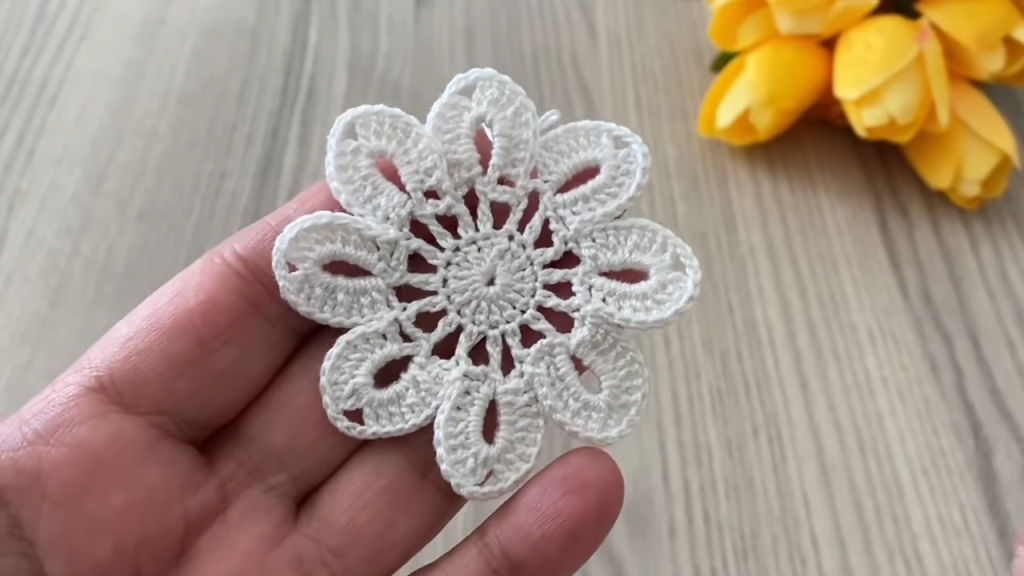
🌹 Part 1: The Floral Medallion Motif (Make 4)
We’ll start with the central flower that forms the heart of each quadrant.

Round 1: Center
- Ch 4, sl st into the first ch to form a ring. (Or use a Magic Ring).
- Ch 3 (counts as first dc), work 15 dc into the ring.
- Sl st to the top of the beginning ch 3 to join. [16 dc]
Round 2: Base of Petals
- Ch 1 (does not count as a stitch), sc in the same stitch.
- *Ch 3, sk 1 dc, sc in the next dc.*
- Repeat from * to * around. You will have 8 ch-3 loops.
- Sl st to the beginning sc to join. [8 sc, 8 ch-3 sps]
Round 3: Forming the Petals
- Sl st into the first ch-3 sp.
- Ch 3 (counts as 1 dc), work (4 dc, ch 1, 5 dc) into the same ch-3 sp. This is your first large Shell-Petal.
- *Sk 1 sc. Shell-Petal (5 dc, ch 1, 5 dc) in the next ch-3 sp.*
- Repeat from * to * around.
- Sl st to the top of the beginning ch 3 to join. [8 Petals]
Round 4: Lacy Overlay
- Ch 1 (does not count as a stitch), sc in the top of the first dc of the round.
- *Ch 5. Sc into the ch-1 sp at the peak of the petal.
- Ch 5. Sc into the first dc of the next petal.*
- Repeat from * to * around.
- Sl st to the beginning sc to join. [16 sc, 16 ch-5 sps]
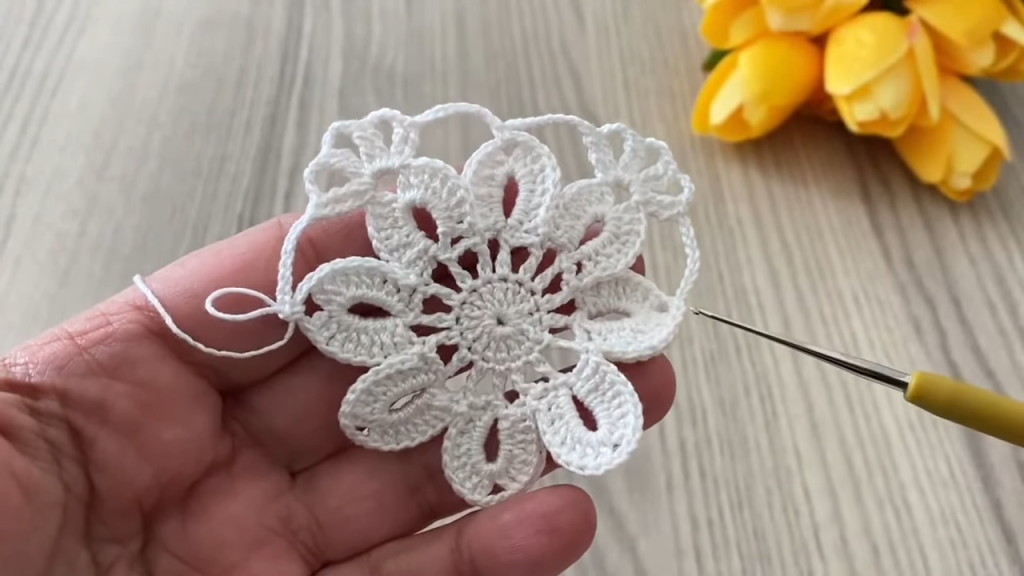
Round 5: Final Motif Edging
This round adds the final scalloped edge and prepares the motif for joining.
- Sl st into the first ch-5 sp.
- Ch 3 (counts as 1 dc), work (2 dc, Picot, 3 dc) into the same ch-5 sp.
- *3 dc, Picot, 3 dc in the next ch-5 sp.*
- Repeat from * to * around. [16 scalloped points]
- Sl st to the top of the beginning ch 3 to join.
Fasten off and weave in ends for the first three motifs. DO NOT fasten off the fourth motif, as it will be used for joining.
⛓️ Part 2: The Joining Round
The joining happens on the final round of the fourth motif and is done simultaneously with the edging. You will join it to the existing three motifs in a line (two joins) or as the fourth piece to make the square (three joins).
For joining, we will use a Chain Join technique in place of the center picot.
Chain Join (CJ):
- Ch 1, sl st into the corresponding picot of the adjacent motif, ch 1 (completes the ch 3). Then, sl st into the first ch to form the picot.
Joining Instructions for the 4th Motif:
- Start the final round (Round 5) as written until you reach the second scalloped point that will touch an existing motif.
Step 1: Join to Motif 1 (First Contact Point)
- In the ch-5 sp: 3 dc.
- CJ (join to a corner Picot on Motif 1).
- 3 dc in the same ch-5 sp.
Step 2: Join at the Center (Where 3 Motifs Meet)
- Work the next scallop (3 dc, Picot, 3 dc) as written.
- Work the next scallop (3 dc, Picot, 3 dc) as written.
- In the next ch-5 sp (this will be the corner where 3 motifs meet): 3 dc.
- CJ (join to the nearest free picot on Motif 1).
- Ch 2, sl st into the center hole where the three motifs meet.
- Ch 2.
- CJ (join to a corner Picot on Motif 2).
- 3 dc in the same ch-5 sp.
Step 3: Join to Motif 2 (Second Contact Point)
- Work the next scallop (3 dc, Picot, 3 dc) as written.
- In the next ch-5 sp: 3 dc.
- CJ (join to a corner Picot on Motif 2).
- 3 dc in the same ch-5 sp.
Step 4: Complete the Round
- Continue completing the final round (3 dc, Picot, 3 dc) for the remainder of the round, making sure the free edges of the fourth motif have the full picots.
- Sl st to join. Fasten off.
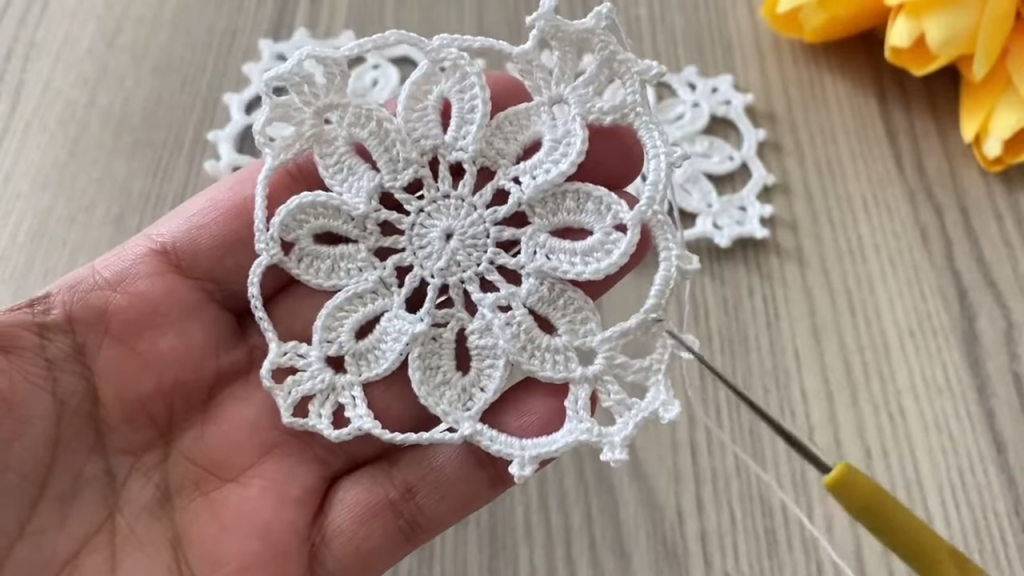
💫 Part 3: Finishing Lattice Edging
The image shows a thin, lacy round connecting the motifs and squaring off the entire piece. This is the final step before blocking.
- Attach thread with a sl st to any picot at the edge of the newly formed square.
Round 6: The Connector
- Ch 1 (does not count), sc in the picot where you joined.
- *Ch 5. Sc in the next picot.*
- Repeat * to * across one side of the motif until you reach the point between motifs.
- [Between Motifs]: Ch 3, tr into the small center gap where the four motifs join. Ch 3, sc into the first picot of the next motif.
- Continue (ch 5, sc) across the next motif side.
- [Corner]: When you reach the outer corner (the picot at the furthest point of a single motif), work (ch 5, Picot, ch 5, sc) into that picot.
- Repeat this sequence around the entire perimeter: (Ch 5, sc) across the sides, (Ch 5, Picot, Ch 5, sc) at the corners, and the Ch 3, Tr, Ch 3 connector in the center of the sides.
- Sl st to the beginning sc to join.
Video Tutorial:
📏 Finishing and Blocking: Your Doily’s Transformation
Blocking is not optional for a piece like this—it’s the key to making it look exactly like the professional, crisp piece in the photo!
- Preparation: Wet or steam your entire piece thoroughly.
- Pinning: Place the damp doily onto your blocking mat. Gently pull out the work, focusing on making the entire piece perfectly square. Pin out every corner and every point along the edge.
- Center: Pay special attention to the center join. Use pins to stretch the connector lattice so it is open and even.
- Drying: Allow the piece to dry completely and stiffen (this may take 24-48 hours depending on your climate and thread).
Unpin and admire your beautiful, intricate Floral Lace Centerpiece! Enjoy your stunning new decor piece!


