
💡 Introduction: Mastering Continuous Lace
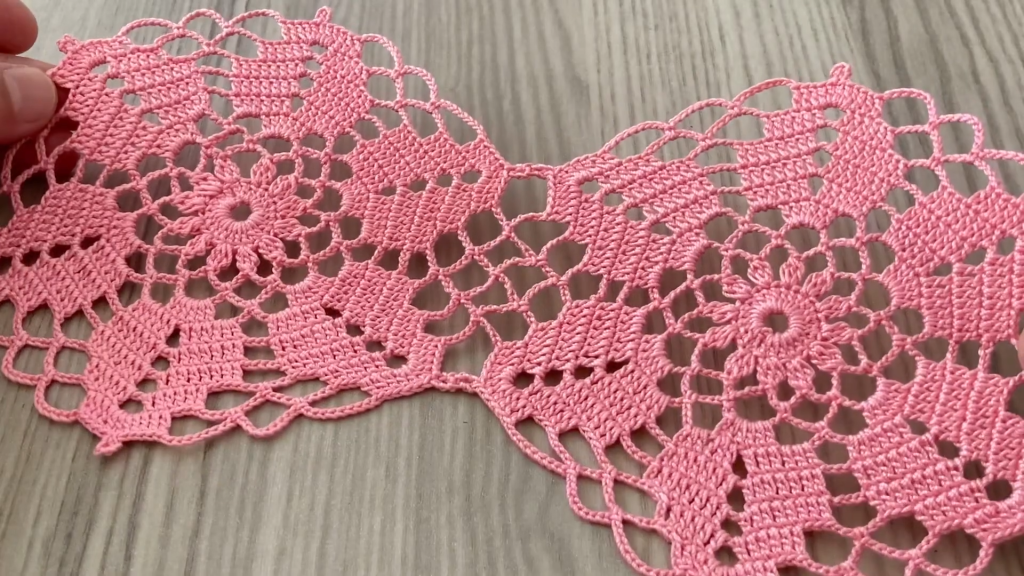
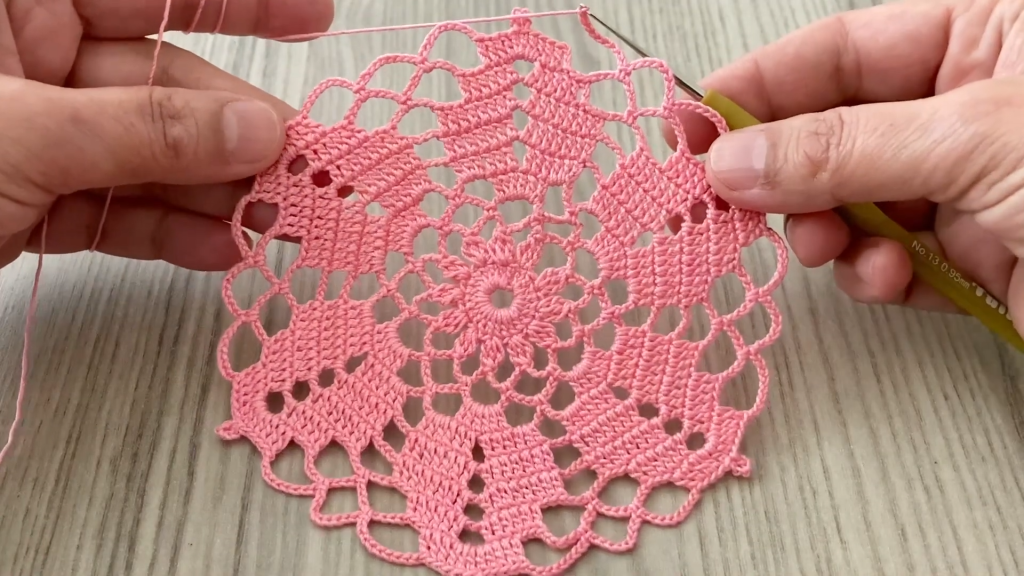
Welcome to a truly beautiful project! The image shows a stunning piece of modular lace that works perfectly as a trim for towels, linens, clothing, or even as a delicate bookmark. The key to this pattern is mastering the Petal Medallion Motif and then joining them seamlessly to form a continuous strip. The finished piece features a robust, almost solid center and a light, airy outer edge.
We’ll start by creating the main circular motif, then learn the specific technique for joining the second motif to the first as you crochet. We’ll be using standard US crochet terms.
Skill Level: Intermediate
Requires knowledge of basic stitches, working in the round, shells, and joining motifs simultaneously.
🧵 Materials: Your Toolkit
To achieve the precise, lacy look of the sample, your choice of materials is important. The coral/pink color is beautiful, but this pattern works wonderfully in white, cream, or any pastel.
- Yarn: Lace Weight or Thread Weight Cotton (Size 10 is standard for sturdy lace, but Size 20 or 30 will give a more delicate drape). The color used in the sample is a medium pink.
- Hook: A steel crochet hook appropriate for your thread. For Size 10 thread, a 1.5mm to 1.75mm hook (US 7 or 8 steel) is recommended.
- Tapestry Needle: For weaving in ends.
- Scissors
- Blocking Supplies: Highly recommended to define the curves and scallops.
📋 Abbreviations (US Terms)
- ch: chain
- sl st: slip stitch
- sc: single crochet
- dc: double crochet
- tr: treble crochet (or triple crochet)
- sk: skip
- sp: space
- ch-sp: chain space
- Picot: ch 3, sl st into the first ch
- Shell: 5 dc in the same stitch or space
- ( ): Instructions in parentheses are worked into the same stitch or space.
- **: Instructions between asterisks are repeated.
- [ ]: Total number of stitches/spaces at the end of the round.
- JOIN: Join with a sl st to the corresponding stitch or space on the previous motif.
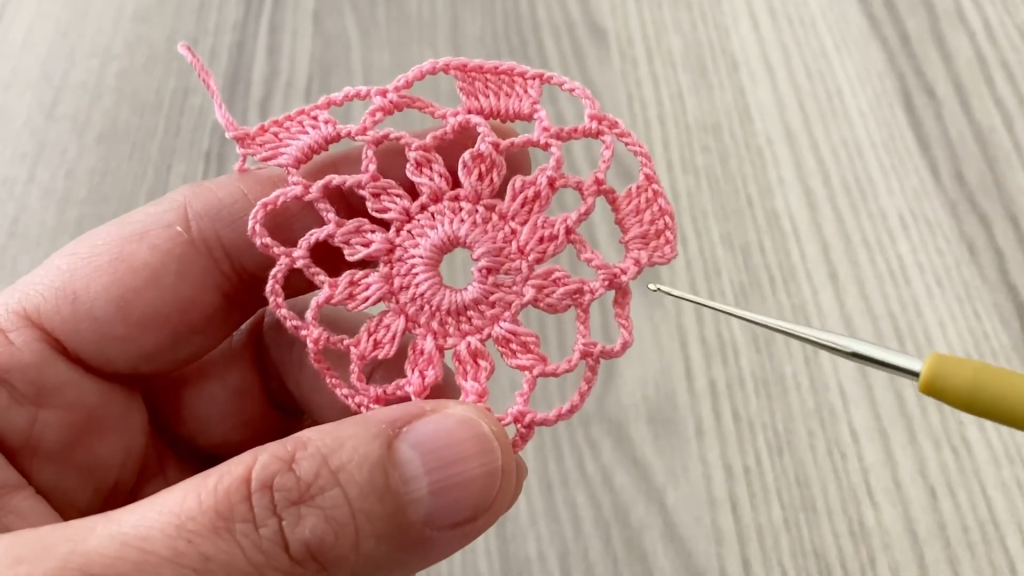
🌹 Part 1: The Petal Medallion Motif (First Motif)
This motif has a swirling, slightly spiraled center, typical of many vintage lace designs.
Round 1: Center Swirl
- Ch 4, sl st into the first ch to form a ring. (Or use a Magic Ring).
- Ch 3 (counts as first dc), work 15 dc into the ring.
- Sl st to the top of the beginning ch 3 to join. [16 dc]
Round 2: Solid Foundation
- Ch 3 (counts as 1 dc), dc in the same stitch.
- *2 dc in the next dc.*
- Repeat from * to * around.
- Sl st to the top of the beginning ch 3 to join. [32 dc]
Round 3: Starting the Petals
- Ch 1 (does not count as a stitch), sc in the same stitch.
- *Ch 3, sk 3 dc, sc in the next dc.*
- Repeat from * to * around. You will have 8 ch-3 loops.
- Sl st to the beginning sc to join. [8 sc, 8 ch-3 sps]
Round 4: Defining the Petals
- Sl st into the first ch-3 sp.
- Ch 3 (counts as 1 dc), work 4 dc into the same ch-3 sp.
- *Ch 2, 5 dc in the next ch-3 sp.*
- Repeat from * to * around.
- Ch 2, sl st to the top of the beginning ch 3 to join. [8 Petals of 5 dc, 8 ch-2 sps]
🔗 Part 2: The Lattice and Joining Edge
This round creates the open lattice and the scalloped edge. For the first motif, you will complete the full round. For all subsequent motifs, you will join as you go.
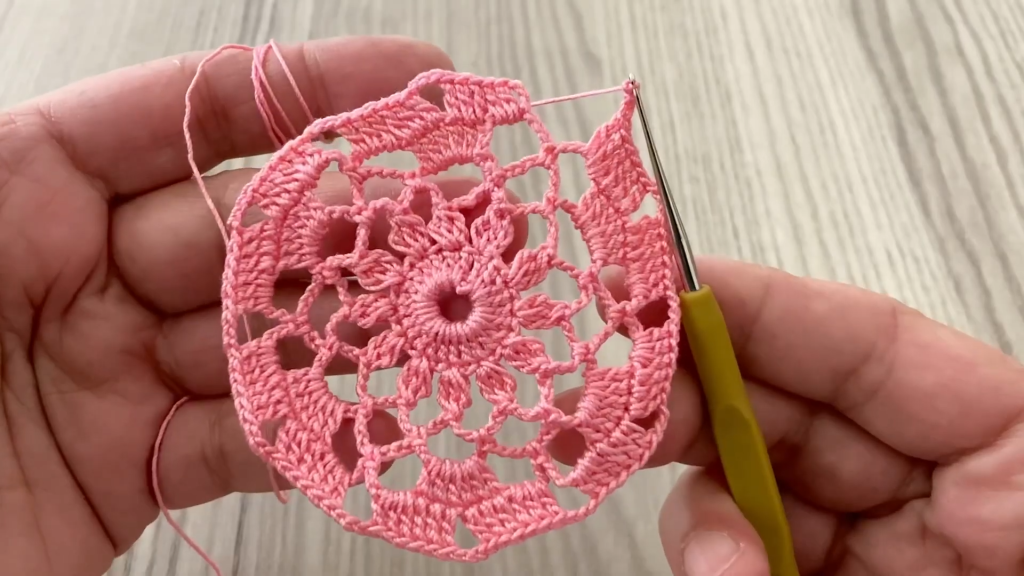
Round 5: Lattice Edge (First Motif ONLY)
- Ch 5 (counts as 1 dc, ch 2). Dc in the first dc of the round (same stitch). This creates the first V-Stitch foundation.
- *Ch 3, sc in the next ch-2 sp.
- Ch 3, V-St (dc, ch 2, dc) in the 3rd dc of the next 5-dc petal.*
- Repeat from * to * around (8 V-Stitches, 16 ch-3 sps).
- Sl st to the 3rd ch of the beginning ch 5 to join. Fasten off and weave in ends for the first motif.
Round 5: Lattice Edge and Joining (Second & Subsequent Motifs)
When working the second motif, you will need to replace the ch-2 in the V-Stitch and some ch-3 spaces with a sl st join to the corresponding stitches/spaces of the previous motif.
- Start: Ch 5 (counts as 1 dc, ch 2). Dc in the first dc of the round (same stitch). (This V-St is on the free side).
- Ch 3, sc in the next ch-2 sp.
- Ch 3, V-St (dc, ch 2, dc) in the 3rd dc of the next 5-dc petal. Work the next section straight across the medallion, as this is the top/bottom edge.
- Ch 3, sc in the next ch-2 sp.
- Ch 3, V-St (dc, ch 2, dc) in the 3rd dc of the next 5-dc petal.
- Ch 3, sc in the next ch-2 sp.
The Joining Section (Work ONLY for Motifs 2, 3, 4, etc.)
This section spans four repeats (from one petal’s center to the next four petals’ centers) where the two medallions touch.
- First Join Point (Ch-3 Sp): Ch 1, JOIN (sl st into the 1st corresponding ch-3 sp on Motif 1), ch 1, sc in the next ch-2 sp.
- Second Join Point (V-St): Ch 1, V-St (dc, JOIN (sl st into the ch-2 sp of the corresponding V-St on Motif 1), dc) in the 3rd dc of the next 5-dc petal.
- Third Join Point (Center Lattice): Ch 1, JOIN (sl st into the center ch-3 sp on Motif 1), ch 1, sc in the next ch-2 sp.
- Fourth Join Point (V-St): Ch 1, V-St (dc, JOIN (sl st into the ch-2 sp of the corresponding V-St on Motif 1), dc) in the 3rd dc of the next 5-dc petal.
- Fifth Join Point (Ch-3 Sp): Ch 1, JOIN (sl st into the last corresponding ch-3 sp on Motif 1), ch 1, sc in the next ch-2 sp.
Continue working the round as the First Motif instructions (Steps 3-6) until you reach the start of the round. Sl st to the 3rd ch of the beginning ch 5 to join. Do not fasten off.
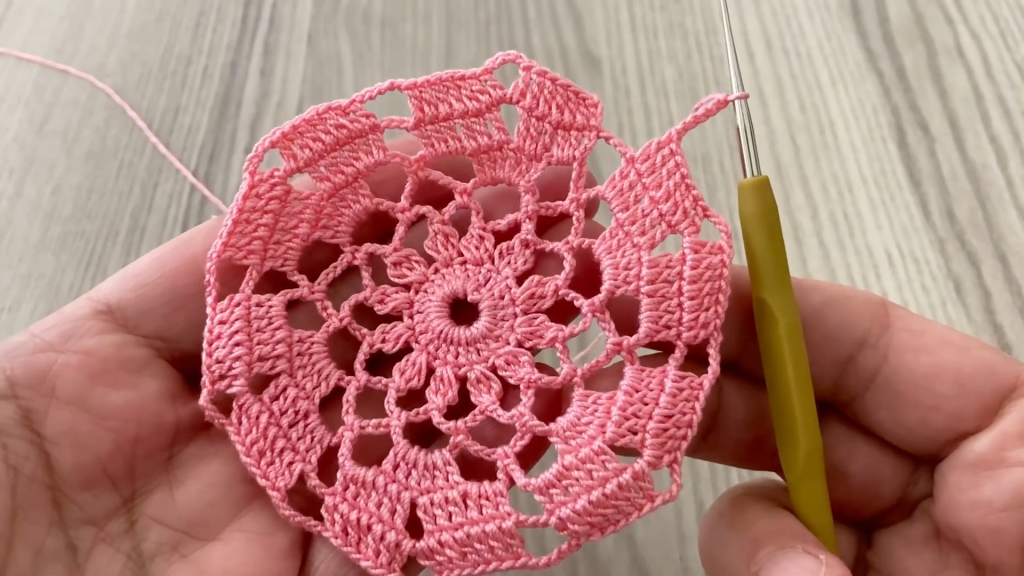
🌊 Part 3: The Continuous Scalloped Border
This round is worked continuously along the long edges of the entire strip, creating the final scalloped detail.
Round 6: Continuous Edging
- Ch 1 (does not count as stitch), sc in the ch-2 sp of the V-Stitch you just joined into.
- *Shell (5 dc) in the next ch-3 sp.
- Sc in the next ch-3 sp.
- Shell (5 dc) in the ch-2 sp of the next V-St.*
- Repeat from * to * until you reach the center join point between two medallions.
Connecting the Motifs (The Center Dip)
- When you reach the dip between the motifs (where you joined two sc stitches with a ch-3 sp between them):
- Dc in the last ch-3 sp on the first motif.
- Tr into the joining sl st between the two motifs.
- Dc in the first ch-3 sp on the second motif.
- Sc in the next ch-3 sp (to resume the border pattern).
- Continue the edging pattern (Shell, Sc, Shell, Sc) along the rest of the strip.
- When you reach the end of the strip, fasten off. (If you’re making a loop, continue until the start and sl st to join.)
Video Tutorial:
✨ Finishing: Shaping Your Lace
Blocking
Blocking is absolutely crucial for this style of lace, as it sets the intricate stitches and fully opens up the lattice work, making the piece lay flat and defining the beautiful scallops.
- Dampen: Wet the entire strip thoroughly using a cool water bath or steam.
- Pin: Gently stretch the strip to its full length and width on a blocking mat or towel. Use pins to anchor every single shell and scallop point along the top and bottom edges. Pin out the center dip where the motifs meet to define the diamond shape.
- Dry: Allow the lace to dry completely before unpinning.
Now you have a stunning, professional-looking piece of continuous crochet lace! What beautiful linens will you decide to trim with your new edging?


