
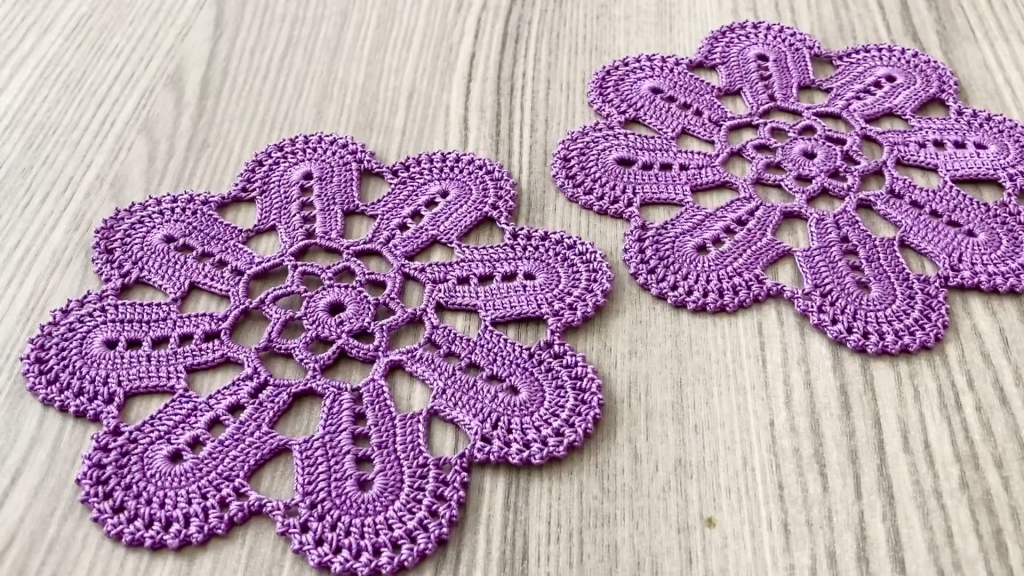
🌟 Introduction: Creating Dimensional Crochet
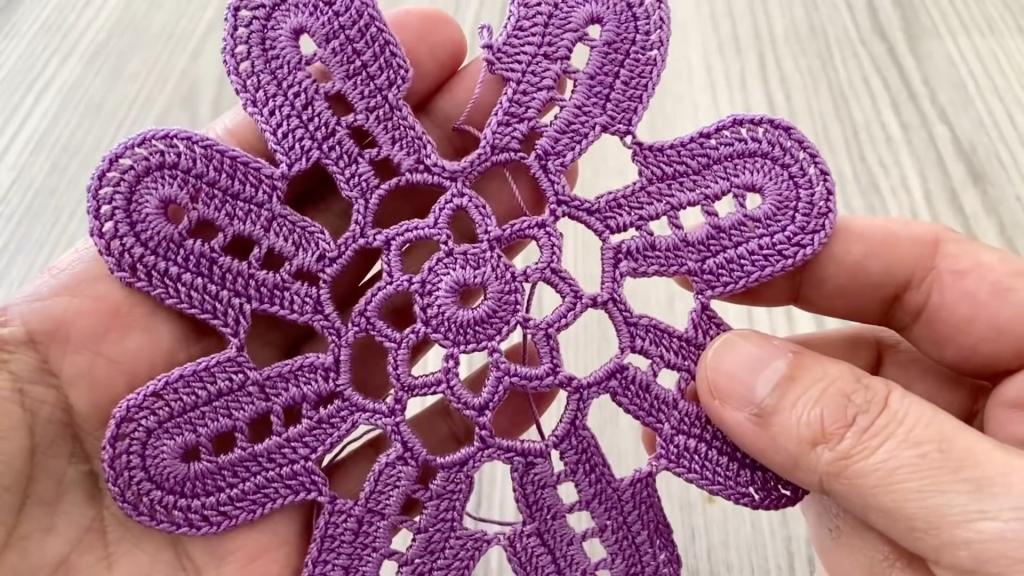
Welcome to the blog! Today’s project focuses on crafting a stunning 8-petaled floral motif that’s perfect for a coaster or small doily. The design is built around a tight center, radiating outward to form unique, tear-drop shaped petals with textured surfaces and a final scalloped edge. This pattern requires careful counting and layering stitches to achieve the dimensional look seen in the photo.
We’ll be using standard US crochet terms throughout this detailed pattern. The texture within the petals is achieved by working a combination of double crochet (dc) stitches with strategically placed chain spaces to shape the curved edges.
Skill Level: Intermediate
Requires comfort with working in the round, shells, and precise stitch placement.
🛍️ Materials: Gather Your Supplies
To achieve the crisp definition of the petals and the deep color saturation, a mercerized cotton is highly recommended.
- Yarn: Lightweight Cotton Thread (Size 10 or 20) or a fine Fingering/Sock Weight yarn (Weight 1) is ideal. The example uses a vibrant purple/violet shade.
- Hook: A steel crochet hook appropriate for your thread. For Size 10 thread, a 1.5mm to 1.75mm hook (US 7 or 8 steel) will create a firm coaster. If using thicker yarn, size up your hook accordingly.
- Tapestry Needle: For weaving in ends.
- Scissors
- Blocking Supplies: Recommended to open up the center lace and define the scallop of the final round.
📋 Abbreviations (US Terms)
- ch: chain
- sl st: slip stitch
- sc: single crochet
- dc: double crochet
- tr: treble crochet (or triple crochet)
- sk: skip
- sp: space
- ch-sp: chain space
- Picot: ch 3, sl st into the first ch
- Shell: 5 dc in the same stitch or space
- ( ): Instructions in parentheses are worked into the same stitch or space.
- **: Instructions between asterisks are repeated.
- [ ]: Total number of stitches/spaces at the end of the round.
🌸 Pattern Instructions: The Royal Bloom Motif
This pattern is worked in the round, starting from the center and creating the petals outward.
Round 1: The Center
- Ch 4, sl st into the first ch to form a ring. (Or use a Magic Ring).
- Ch 3 (counts as first dc), work 15 dc into the ring.
- Sl st to the top of the beginning ch 3 to join. [16 dc]
Round 2: Foundation for Petals
- Ch 1 (does not count as a stitch), sc in the same stitch.
- *Ch 3, sk 1 dc, sc in the next dc.*
- Repeat from * to * around. You will have 8 ch-3 loops.
- Sl st to the beginning sc to join. [8 sc, 8 ch-3 sps]
Round 3: Opening the Center Lace
- Sl st into the first ch-3 sp.
- Ch 5 (counts as 1 dc, ch 2). Dc in the same ch-3 sp. This is your first V-Stitch (V-St).
- *V-St (dc, ch 2, dc) in the next ch-3 sp.*
- Repeat from * to * around.
- Sl st to the 3rd ch of the beginning ch 5 to join. [8 V-St]
Round 4: Petal Base
- Sl st into the ch-2 sp of the V-St.
- Ch 3 (counts as 1 dc), work 2 dc in the same ch-2 sp.
- Ch 2.
- *3 dc in the ch-2 sp of the next V-St. Ch 2.*
- Repeat from * to * around.
- Sl st to the top of the beginning ch 3 to join. [8 groups of 3 dc, 8 ch-2 sps]
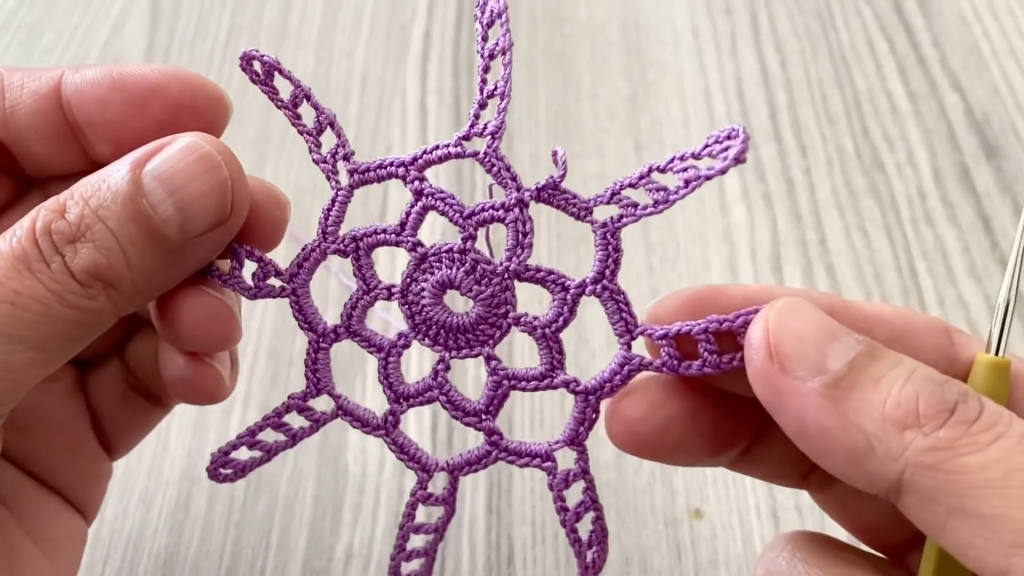
🌷 Shaping the Elongated Petals
Round 5: Defining the Petals
- Ch 3 (counts as 1 dc), dc in the next 2 dc. Ch 2.
- Tr (treble crochet) in the ch-2 sp of the previous round. Ch 2.
- *Dc in the next 3 dc. Ch 2.
- Tr in the next ch-2 sp of the previous round. Ch 2.*
- Repeat from * to * around.
- Sl st to the top of the beginning ch 3 to join. [8 tr, 24 dc, 16 ch-2 sps]
Round 6: Building the Shells
This round begins to create the solid, rounded petal shape.
- Ch 3 (counts as 1 dc), dc in the next 2 dc.
- Shell (5 dc) in the next ch-2 sp.
- Dc in the tr stitch.
- Shell (5 dc) in the next ch-2 sp.
- *Dc in the next 3 dc.
- Shell (5 dc) in the next ch-2 sp.
- Dc in the tr stitch.
- Shell (5 dc) in the next ch-2 sp.*
- Repeat from * to * around.
- Sl st to the top of the beginning ch 3 to join.
At the end of this round, you should have 8 distinct, solid sections of stitches separated by the dc stitches that were worked into the previous 3-dc groups.
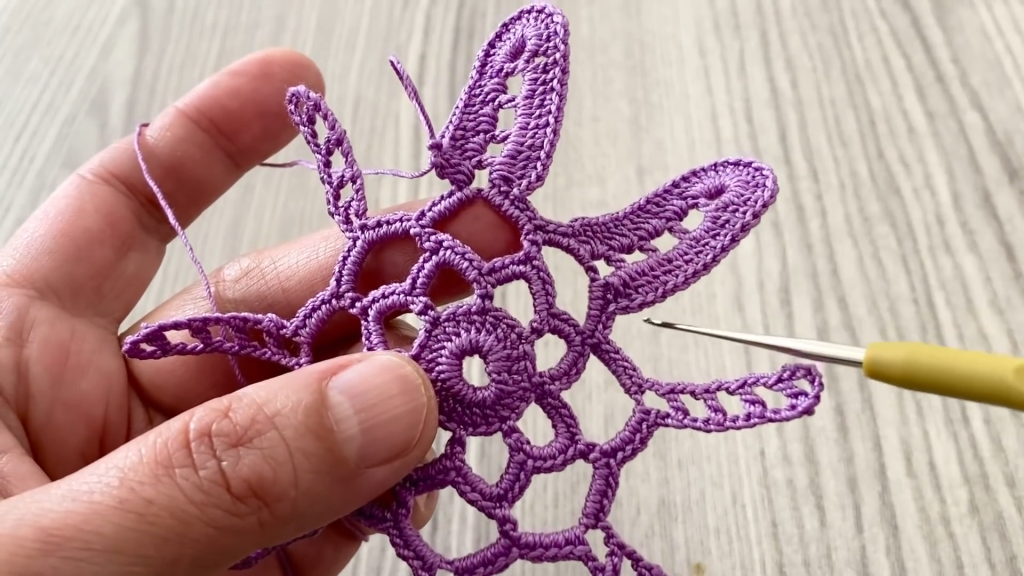
Round 7: Completing the Tear-Drop Shape
This is a shaping round worked across the entire solid section of the petals.
- Ch 1 (does not count as stitch), sc in the same stitch.
- Sc in the next 2 dc.
- Hdc (half double crochet) in the next 2 dc.
- Dc in the next 7 stitches (this spans the center of the shell and the dc over the tr).
- Hdc in the next 2 dc.
- Sc in the next 3 dc (this brings you to the valley between petals).
- *Sc in the next 3 dc (starting the next petal).
- Hdc in the next 2 dc.
- Dc in the next 7 stitches.
- Hdc in the next 2 dc.
- Sc in the next 3 dc.*
- Repeat from * to * around.
- Sl st to the beginning sc to join. [8 Petals shaped]
🌊 Final Round: The Scalloped Edge
This round adds the final, clean, and decorative scalloped border seen in the image.
- Ch 1 (does not count as stitch), sc in the same stitch.
- *Ch 5 (forms the small valley arch). Skip 4 stitches. Sc in the 5th stitch.
- Shell (5 dc) in the next stitch (this should be the center of the petal’s curve, the 9th stitch of the petal).
- Sc in the 5th stitch after the shell.
- Ch 5 (forms the next valley arch). Skip 4 stitches. Sc in the 5th stitch.*
- Repeat from * to * around.
- Sl st to the beginning sc to join. Fasten off.
Video Tutorial:
📐 Finishing and Blocking: Perfecting the Shape
Blocking is essential to turn your textured piece of crochet into the smooth, defined coaster shown in the image.
- Dampen: Wet the motif thoroughly with cool water or use a steamer.
- Pin: Place the damp piece on a blocking mat or towel. Gently pull out the central hole and the outer points. Pin out all 8 points where the shells are located, and pin out the center of the Ch 5 arches in the valleys to define the scallops.
- Dry: Allow the motif to dry completely before unpinning. The tension will be set, and the piece will maintain its beautiful shape.
Enjoy your finished Royal Bloom Coaster!


