
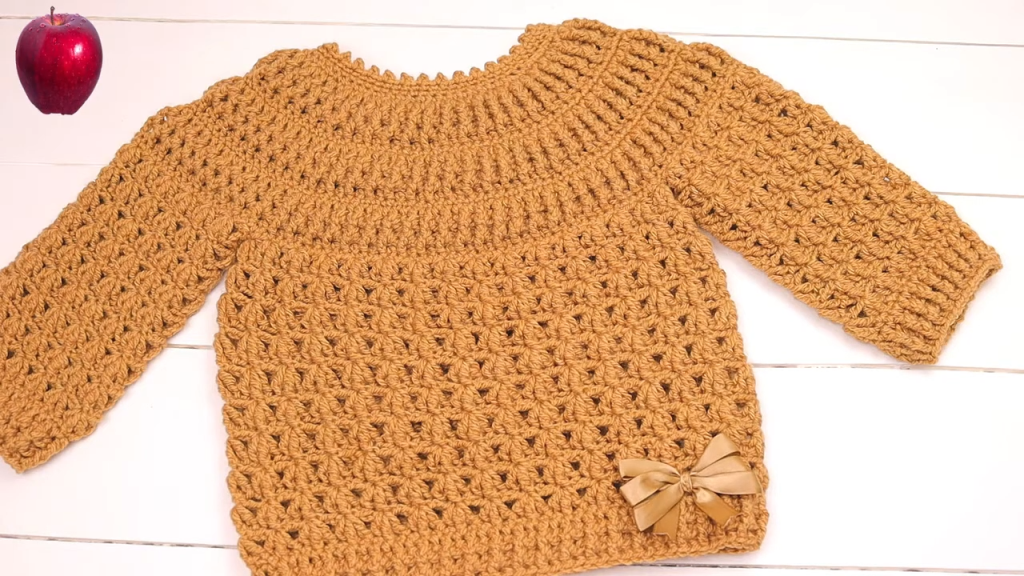
Hello, cozy crafters! Get your favorite warm yarn ready, because today we’re making the Cinnamon Starfall Sweater. This piece is a true delight, featuring an all-over Star Stitch (or a close variation), which creates a beautiful, dense fabric that looks like tiny clusters of stars. The simple round yoke construction and ribbed finishes on the sleeves and neck make this a classic, pull-over sweater for any little one.
This pattern is designed for an Intermediate skill level, as the Star Stitch requires careful stitch placement. However, once you get the hang of the two-row repeat, it’s very quick and meditative!
🛍️ Section 1: Materials & Gauge
🧶 Supplies You’ll Need
- Yarn: Approximately 400 – 500 yards of DK weight (Category 3) yarn. The sample uses a rich, solid cinnamon or caramel color. A soft, washable acrylic or wool blend is recommended.
- Hook:
- 4.0 mm (G/6) crochet hook for the main body and sleeves.
- 3.5 mm (E/4) crochet hook for the ribbing (neckline and cuffs).
- Tools: Stitch markers (for the raglan corners), a tapestry needle, and scissors.
📏 Gauge Check
Work in Double Crochet (DC): 16 DC and 8 rows = 4 inches (10 cm).
- Star Stitch Gauge: 4 Star Stitch clusters and 4 rows (2 pattern repeats) should measure 4 inches (10 cm) wide and 3 inches (7.5 cm) tall.
📝 Key Abbreviations
| Abbreviation | Meaning | Abbreviation | Meaning | |
| Ch | Chain | Dc | Double Crochet | |
| Sl St | Slip Stitch | Fpdc | Front Post Double Crochet | |
| Sc | Single Crochet | Bpdc | Back Post Double Crochet | |
| Hdc | Half Double Crochet | Star St | Star Stitch (See Special Stitches) | |
| Sk | Skip | Sp | Space |
Export to Sheets
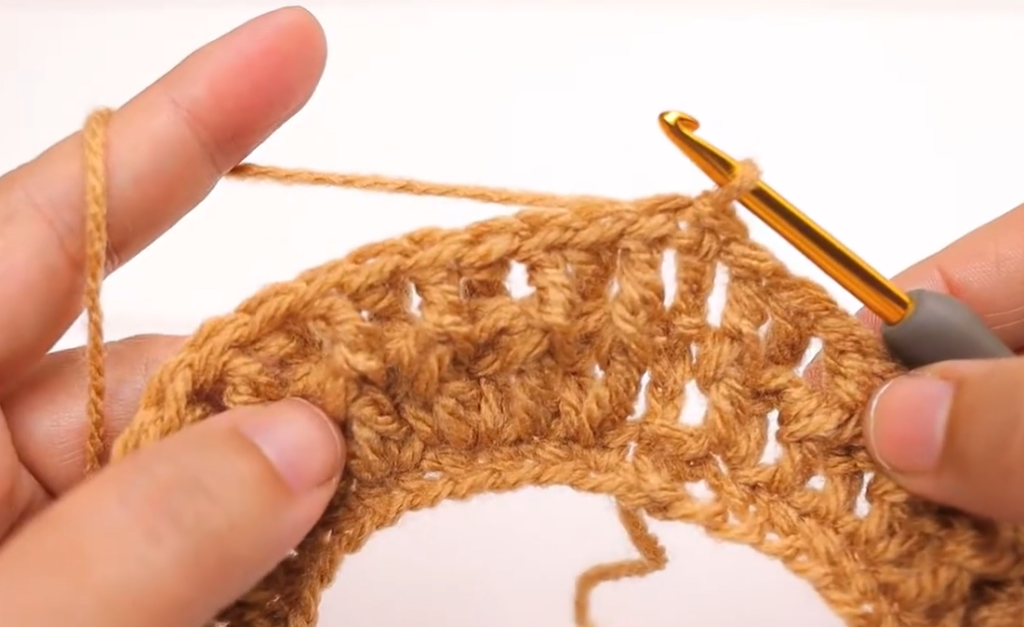
✨ Section 2: Special Stitches
Star Stitch (Star St)
The Star Stitch is typically worked over two rows. The first row creates the ‘star’, and the second row sets up the next row of stars.
Star Stitch Base (worked in a row/round):
- Ch 3. Insert hook into the 2nd Ch from hook, pull up a loop (2 loops on hook).
- Insert hook into the 3rd Ch from hook, pull up a loop (3 loops on hook).
- Insert hook into the next st on the row below, pull up a loop (4 loops on hook).
- Insert hook into the next st, pull up a loop (5 loops on hook).
- Insert hook into the next st, pull up a loop (6 loops on hook).
- Yo, pull through all 6 loops on hook. Ch 1 to close the star (the “eye” of the star). (First star made).
Subsequent Stars:
- Ch 2. Insert hook into the eye of the star just made, pull up a loop (2 loops on hook).
- Insert hook into the last spike of the previous star, pull up a loop (3 loops on hook).
- Insert hook into the same st where the last spike was placed, pull up a loop (4 loops on hook).
- Insert hook into the next unworked st of the row below, pull up a loop (5 loops on hook).
- Insert hook into the next unworked st of the row below, pull up a loop (6 loops on hook).
- Yo, pull through all 6 loops. Ch 1 to close the star.
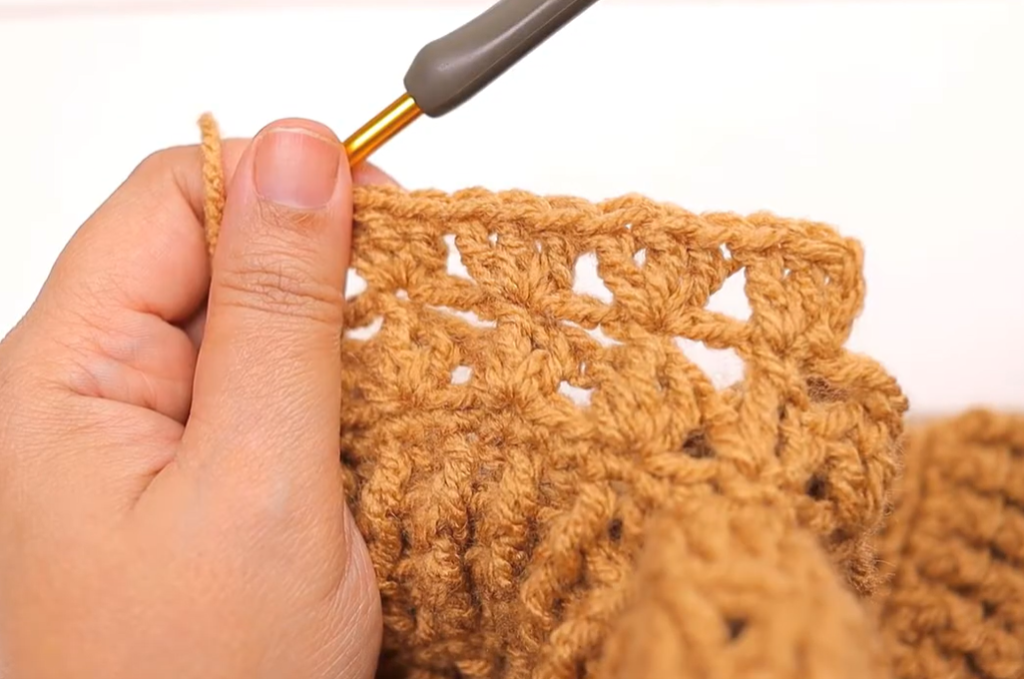
🌸 Section 3: The Yoke (Raglan Construction)
The yoke is worked in the round after an initial ribbed neckline. This size is for 6-12 months.

Neckline Ribbing
- Change Hook: Use the 3.5 mm hook.
- Row 1: Ch 6. Sc in the 2nd Ch from hook and in each Ch across. (5 Sc). Ch 1, turn.
- Row 2: Sc in the Back Loop Only (BLO) of each Sc across. Ch 1, turn.
- Repeat Row 2 until the piece measures approximately 14 inches (35 cm) when slightly stretched. Do not FO.
- Join Ribbing: Sl St the short ends together to form a ring.
Raglan Setup
- Change Hook: Use the 4.0 mm hook.
- Round 1 (Base): Ch 2 (does not count as st). Hdc evenly around the edge of the ribbed collar, ensuring you have a stitch count that is easily divisible by 4. Aim for 76 Hdc. Join with Sl St. (76 Hdc).
- Marking Corners: Divide the 76 stitches for the raglan: 12 (Sleeve) | 26 (Front) | 12 (Sleeve) | 26 (Back). Place a marker in the 12th, 38th, 50th, and 76th stitches. The corners will be worked into these marked stitches.
Raglan Increases with Star Stitch

- Round 2 (Star St Row):
- Work the Star Stitch Base (6 loops) starting at the beg of the round.
- Continue with Subsequent Stars until you reach the marked corner st.
- Corner Increase: In the marked corner st, work (Star St, Ch 1, Star St). Move marker to the Ch-1 sp.
- Continue the Star Stitch pattern across the next panel, working (Star St, Ch 1, Star St) in each marked corner st. Join with a Sl St to the eye of the first star. (Increases 4 stars).
- Round 3 (Setup Row): Ch 2 (does not count as st). Hdc in the same st (the eye). Hdc in the Ch-1 sp of the Star St. Work 2 Hdc into the eye of each Star St around the entire round. When you reach a corner Ch-1 sp, work 3 Hdc into the corner sp. Join with Sl St. (Increases the stitch count significantly).
- Round 4 (Star St Row): Ch 1, Sc in the same st. Work the Star Stitch Base starting with the Sc just made. Continue the Star Stitch pattern around the entire round. When you reach a corner, work (Star St, Ch 1, Star St) into the center Hdc of the 3 Hdc from the previous row. Join with Sl St to the eye of the first star. (Increases 4 stars).
- Round 5 (Setup Row): Ch 2. Hdc in the eye of the Star St. Work 2 Hdc into the eye of each Star St around. When you reach a corner Ch-1 sp, work 3 Hdc into the corner sp. Join with Sl St.
- Continue alternating Rounds 4 and 5 until the yoke measures approximately 6-7 inches (15-18 cm) from the neckline, ensuring it fits under the baby’s arms.
Dividing for Body and Sleeves
- Next Round (Divide): Work the established pattern across the Back Panel. When you reach the first corner, work 1 Star St into the corner. Ch 4 (underarm chain). Sk all stitches across the Sleeve Panel up to the next corner. Work 1 Star St into the corner. Continue the pattern across the Front Panel. Repeat the Ch 4, Sk Sleeve step for the second armhole. Continue the pattern to the end. Join with Sl St.
🌟 Section 4: Body and Sleeves
The Body
- Body Rounds: Continue alternating the Star Stitch Row (Round 4 repeat) and the Setup Row (Round 5 repeat) in the round. Work the pattern over the Ch-4 underarm chain (treating the chain as 4 stitches).
- Length: Continue until the body reaches the desired length before the ribbing—approximately 5-6 inches (12.5-15 cm) from the underarm.
Hem Ribbing
- Change Hook: Switch to the 3.5 mm hook.
- Ribbing Row 1: Ch 2. Dc in each st around. Join with Sl St.
- Ribbing Row 2: Ch 2. Fpdc around the first st. Bpdc around the next st. Rep (Fpdc, Bpdc) around. Join with Sl St.
- Ribbing Row 3 – 5: Repeat Ribbing Row 2 until the ribbing measures approximately 1.5 inches (4 cm). FO.
The Sleeves (Make 2)
- Sleeve Start: Join yarn at the center of the Ch-4 underarm chain.
- Sleeve Rounds: Continue the established Star Stitch/Setup Row pattern in the round. Work evenly around the armhole opening and the Ch-4 underarm.
- Tapering: To taper the sleeve, skip a stitch randomly on the Setup Row (Hdc row), approximately every 5 or 6 rounds.
- Length: Continue until the sleeve reaches the desired length before the cuff—approximately 8-9 inches (20-23 cm) from the underarm.
Cuffs (Ribbing)
- Change Hook: Switch to the 3.5 mm hook.
- Cuff Row 1: Ch 2. Dc in each st around (ensure the stitch count is a multiple of 2). Join with Sl St.
- Cuff Rows 2 – 5: Ch 2. Rep (Fpdc, Bpdc) pattern around. Join with Sl St.
- FO.
Video Tutorial:
🎀 Section 5: Finishing Touches
- Embellishment: Sew the simple satin ribbon bow to the bottom right of the sweater for a decorative touch, as seen in the image.
- Weave Ends: Weave in all loose yarn ends securely using your tapestry needle.
Your gorgeous, richly textured Cinnamon Starfall Sweater is complete! This piece is sure to keep a little one warm and stylish.
Would you like me to find a coordinating pattern for a pair of little ribbed trousers or booties?


