
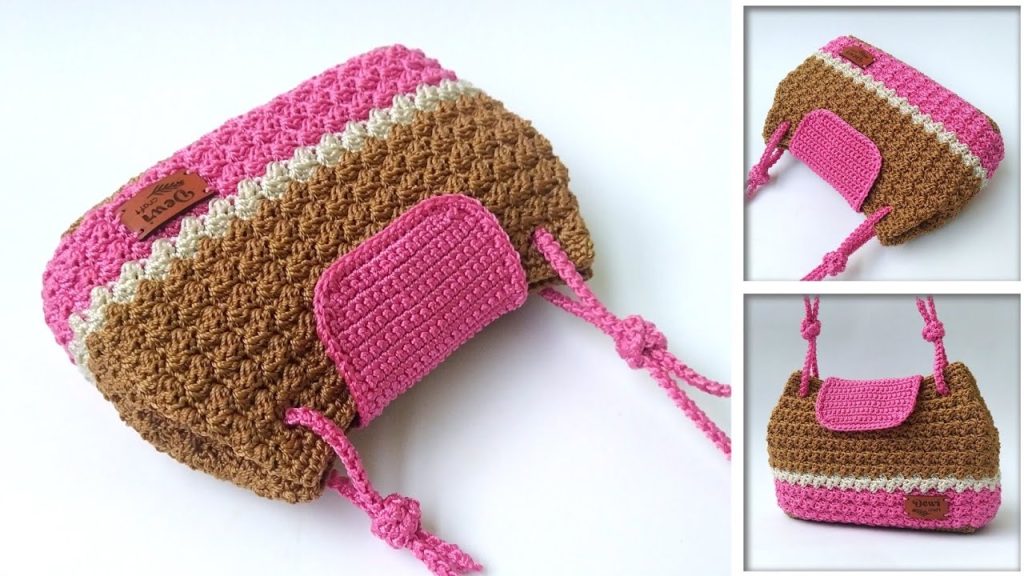
Welcome, crocheters! Ready to tackle a stylish project that looks complex but is surprisingly beginner-friendly? Inspired by the elegant design from SANG DEWI CRAFT, this “Beginner Breeze” Flap Bag pattern is your comprehensive guide to creating a structured, beautiful, and highly functional accessory.
This pattern breaks down the construction into simple steps: a solid rectangular base, an eye-catching textured body made with a unique cluster stitch, and a perfectly shaped flap closure. Using sturdy yarn like nylon or cotton cord gives the finished bag excellent structure. The final result is a chic, modern bag measuring approximately 24 cm wide by 14 cm high.
🧶 Materials & Key Tools
Gather your supplies—durability is key for this stunning accessory!
| Icon | Item | Details |
| Hook | Crochet Hook | 4.0 mm (or size needed to achieve firm tension). |
| Yarn | Main Yarn (Color A) | Approximately 150g of sturdy yarn (Nylon, Cotton Cord, or heavy worsted weight). |
| Yarn | Contrast Yarn (Color B) | Small amount for a stripe accent (optional). |
| Notions | Accessories | Scissors, Yarn Needle, Stitch Markers (essential!), and a Magnetic Snap Closure for the flap. |
| Size | Finished Bag | Approx. 24 cm (Length) x 14 cm (Height). |
📝 Abbreviations (U.S. Crochet Terms)
| Abbreviation | U.S. Terminology | Description |
| ch | Chain | |
| sl st | Slip Stitch | |
| sc | Single Crochet | |
| hdc | Half Double Crochet | |
| dc | Double Crochet | |
| st(s) | Stitch(es) | |
| sk | Skip | |
| sc2tog | Single Crochet 2 Together | Decrease stitch. |
| RS | Right Side | |
| WS | Wrong Side |
👜 Pattern: The Firm Base (Alas)
We start with a flat, sturdy rectangular base worked in back-and-forth single crochet rows.

Initial Chain:
Using Color A, make a slip knot and ch 40 (plus one ch for turning).
Row 1 (RS):
Sc in the 2nd ch from the hook, and sc in each ch across. (40 sc).
Row 2 (WS):
Ch 1 (does not count as st), turn. Sc in the first st and in each st across. (40 sc).
Rows 3 – 14:
Repeat Row 2 until you have completed a total of 14 rows.
Edging (Single Crochet in the Round):
After Row 14, do not turn. We will now single crochet around the entire perimeter to transition into the bag body.
- First Corner: Work 2 sc into the last stitch of Row 14.
- Long Side: Sc evenly down the side edge, placing 1 sc per row end. (14 sc total).
- Second Corner: Work 2 sc into the corner space (the end of the foundation chain).
- Bottom Edge: Sc across the bottom of the foundation chain stitches. (40 sc).
- Third Corner: Work 2 sc into the next corner space.
- Second Long Side: Sc evenly up the second side edge. (14 sc total).
- Fourth Corner: Work 2 sc into the final corner space.
- Join: Sc across the remaining stitches of Row 14 to meet the first stitch of the round. Sl st to the first sc of the round.
Stitch Count Check: The motif requires a stitch count that is a multiple of 3. The starting base typically yields 116 stitches (40+14+40+14 + 8 corner sts). You should aim for a number divisible by 3 (e.g., 114 or 117). If your count is not a multiple of 3, add 1 or 2 sc evenly in this round to ensure your final count is correct.

🌟 Pattern: The Gradient Shell Body Motif
This textured pattern is worked in turned rounds to keep the cluster stitches perfectly aligned. The stitch pattern is a 3-stitch cluster: (sc, hdc, dc).
Round 1 (Setup – Cluster Round):
- Join Color B (Optional: the video uses a single color for this setup round) or continue with Color A.
- Ch 1 (does not count as st).
- Work (sc, hdc, dc) into the same starting stitch.
- *Sk 2 sts, work (sc, hdc, dc) into the next st* (This creates one cluster shell).
- Repeat from * to * around the entire round.
- Join: Sl st to the top of the very first sc in the round.
Round 2 (Motif Round – Worked with a Turn):
- Ch 1, turn the work (you are now working on the WS).
- Work (sc, hdc, dc) into the first sc of the cluster below (the sc that you just joined into).
- *Sk the hdc and dc of the previous cluster, work (sc, hdc, dc) into the sc that starts the next cluster*.
- Repeat from * to * around.
- Join: Sl st to the top of the very first sc in the round.
Body Height Striping Sequence:
The body height is built by repeating Round 2 according to the following color sequence:
- Color A: Work 7 repetitions of Round 2.
- Color B (Contrast Stripe): Change yarn color. Work 2 repetitions of Round 2.
- Color A (Main Body): Change yarn color. Work 14 repetitions of Round 2.
Total Body Height: 23 turned rounds of the Gradient Shell Motif. Fasten off Color A after the final round.

✂️ Pattern: Top Border and Flap Construction
This section creates a stabilizing border and then the back flap that secures the bag.
Top Border (Single Crochet):
- Join Color A (if you finished with Color B) or continue with the last color.
- Ch 1 (does not count as st), turn. Sc in the same st and in each st around. Sl st to join.
- Repeat Round 2 for a total of 2 rounds of single crochet. This creates a clean, sturdy edge.
Flap Placement:
- Identify the back of the bag (the side opposite your starting/fastening point).
- Use stitch markers to section off the area for the flap. The video uses a space of approximately 8 cm from the side edges, leaving the center stitches for the flap. Mark the first and last stitches of your flap area.
- Do not join rounds from here—the flap is worked in straight rows.
Flap Straight Rows:
- Ch 1 (does not count as st), turn. Sc in the first marked st and in each st across to the second marked st.
- Ch 1, turn. Sc in the first st and in each st across.
- Repeat Row 2 until you have completed 12 straight rows.
Flap Decrease Rows (Shaping the Curve):
Now we will gently shape the flap by decreasing one stitch at the beginning and end of each row.
- Row 1 (Decrease): Ch 1, turn. Sc2tog over the first two sts. Sc in each st until the last two sts. Sc2tog over the last two sts.
- Row 2 (Decrease): Ch 1, turn. Sc2tog over the first two sts. Sc in each st until the last two sts. Sc2tog over the last two sts.
- Row 3 (Decrease): Ch 1, turn. Sc2tog over the first two sts. Sc in each st until the last two sts. Sc2tog over the last two sts.
Finishing: Complete any remaining stitches with an sc border around the edges of the flap and the top of the bag opening to create a clean finish, and then fasten off. Weave in all ends.

👝 Pattern: Strap and Final Assembly
The original design features a long, customizable, and adjustable cord strap.
Strap Construction:
The video refers to a separate tutorial for the strap and lining, but based on the final product:
- Create a strap (either crocheted cord or a bought chain/strap) approximately 120 cm long.
Strap Attachment & Magnet:
- Magnetic Snap: Sew the first half of the magnetic snap onto the center of the inside of the flap (where the tip of the flap closes). Position the second half of the snap onto the corresponding front panel of the bag body.
- Strap Anchor Points: On the front and back panel, mark two points for strap attachment: one 2 cm from the side corner and one 6 cm from the side corner.
- The strap is typically attached by creating a small loop or knot onto the bag fabric at these two points, allowing the strap to be adjusted and cinched through the loops on the bag. This method eliminates the need for hardware rings.
Lining: The finished bag is often enhanced with a fabric lining. For detailed lining instructions, check the description of the original YouTube video for a separate tutorial link.
Video Tutorial:
✅ Final Thoughts & Congratulations
You have finished the Beginner Breeze Flap Bag! Your bag boasts a durable foundation, a beautiful textured body, and a perfectly shaped flap. The final weight is a lightweight 170 grams, making it comfortable for all-day use.
Enjoy showing off your new, professionally-styled crochet piece! Happy crafting!


