
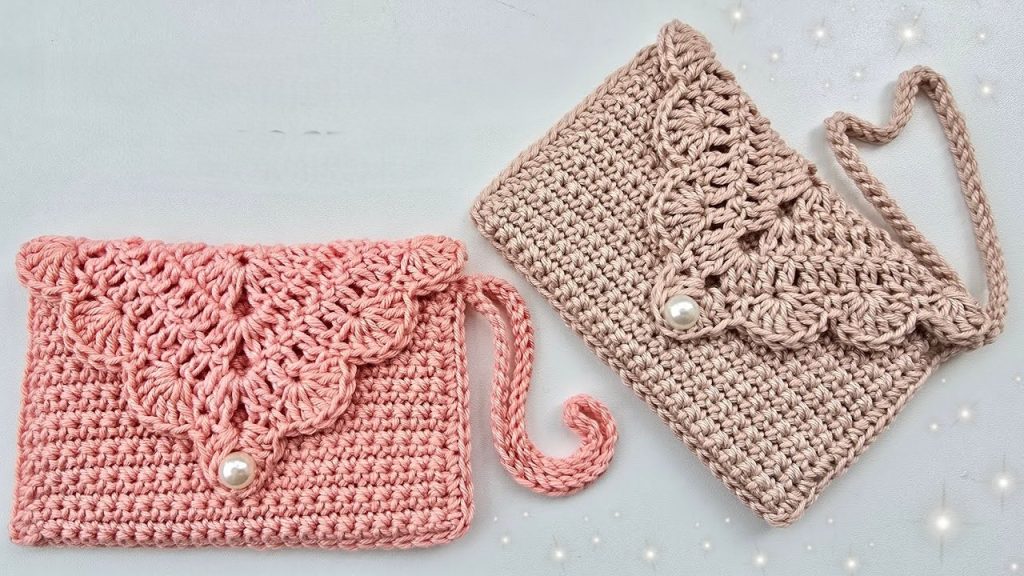
Welcome, dedicated crafters! Are you looking for a project that delivers maximum style with minimum fuss? Inspired by the brilliant “CARTEIRA DE CROCHÊ SEM COSTURA” tutorial by Deisi Cardoso, we have created this detailed, easy-to-follow pattern for a stunning, structured wallet or clutch.
The magic of this design lies in its seamless construction. You crochet the entire piece—the flap, the body, and the pocket—in one continuous piece, then fold and join the sides using neat slip stitches and single crochet, eliminating the need for tedious sewing. It’s perfect for gifting, selling, or treating yourself!
The final size is petite and practical, ideal for cards, cash, and small documents. Let’s grab our hooks and yarn!
🧶 Materials & Key Tools
The original design uses a fine, light yarn to keep the wallet thin and compact.
| Icon | Item | Details |
| Hook | Crochet Hook | 3.0 mm (or size needed to achieve firm tension). |
| Yarn | Main Yarn | Fine/Sport weight (US 2) or DK weight (US 3) durable yarn, such as Amigurumi (100% Cotton), Nylon, or cotton cord. You will need very little—approx. 30 grams. |
| Notions | Closure | Large decorative Pearl or Button (approx. 10mm-15mm) and matching thread for attachment. |
| Notions | Markers | Stitch markers or contrasting scrap yarn (essential for marking increases and body width). |
| Notions | Final Touches | Scissors, Tapestry Needle (for weaving ends). |
📝 Key Abbreviations (U.S. Terms)
| Abbreviation | U.S. Terminology |
| ch | Chain |
| sl st | Slip Stitch |
| sc | Single Crochet |
| dc | Double Crochet |
| MR | Magic Ring |
| st(s) | Stitch(es) |
| sk | Skip |
| inc | Increase |
📐 Gauge & Final Dimensions
Achieving the proper gauge is crucial to ensure cards and cash fit inside your finished wallet.
- Gauge: After Row 4 of the Flap (see below), the wide edge should be roughly 13 cm wide, or adjusted to your preference.
- Finished Size (Approximate):
- Width: 13 cm (5.1 inches)
- Height (Closed): 9 cm (3.5 inches)
- Weight: Approximately 29 grams.
⭐ Part 1: The Foundation Flap (The Triangle)
This triangular section will become the wallet’s decorative flap and one side of the body.

Row 1:
- Begin with a MR.
- Ch 3 (counts as 1 dc). Work 2 dc into the ring.
- Ch 3 (This is the decorative center point).
- Work 3 dc into the ring. (Total: 6 dc + ch 3 space).
- Pull the MR closed.
Row 2 (Start of Increases):
- Ch 3 (counts as 1 dc), turn.
- Inc: Work 2 dc in the same stitch (the first st).
- Dc in each of the next 2 sts.
- Center Fan: In the ch-3 space, work (2 dc, ch 3, 2 dc).
- Dc in each of the next 2 sts.
- Inc: Work 3 dc into the top of the starting ch-3 from Row 1 (the last st).
Row 3:
- Ch 3, turn.
- Inc: Work 2 dc in the same stitch.
- Dc in each st until you reach the center ch-3 space.
- Center Fan: In the ch-3 space, work (2 dc, ch 3, 2 dc).
- Dc in each st until the last st.
- Inc: Work 3 dc into the top of the starting ch-3 from the previous row (the last st).
Row 4:
Repeat Row 3.
Note: For the size shown in the video (13 cm wide), 4 rows of this increasing triangle are sufficient. If you need a larger wallet, continue repeating Row 3 until the wide edge measures your desired width.
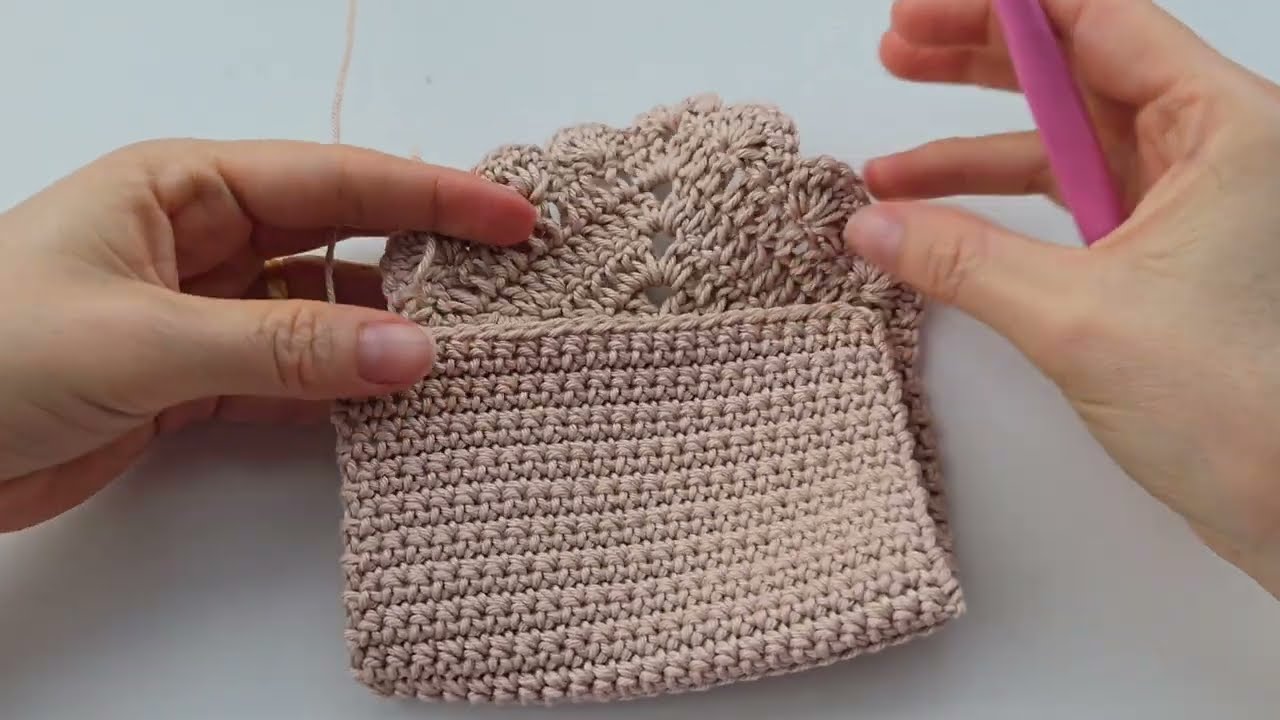
🎀 Part 2: Flap Decoration and Body Transition
We now work an SC border and then a decorative shell pattern around the triangle.
Step 1: Establishing Wallet Width (The Top Edge):
- Do not turn. You are now looking at the wide, straight edge of the triangle.
- We need to establish the 24 SC width for the wallet body. This is done by working SCs along the side of the 4 DC rows.
- SC Border: Work 3 sc along the side of the DC post for each of the 4 rows (3 sc * 4 rows = 12 sc). Place a stitch marker in the first and last of these 12 SC.
- Continue SCs: Work 1 sc into the ch 3 and 2 sc in the first dc of the row. Stop here. This defines your working width of 24 stitches.
Step 2: Decorative Shells (Working Around the Pointy Edge):
The shells are placed around the bottom point of the triangle.
- Skip 1 st on the top edge. Sc in the next st.
- Shell 1: Sk 1 st. Work 6 dc in the next st.
- Sk 1 st. Sc in the next st.
- Shell 2: Sk 1 st. Work 6 dc in the next st.
- Sk 1 st. Sc in the next st.
- Shell 3: Sk 1 st. Work 6 dc in the next st.
- Sk 1 st. Sc in the next st.
Step 3: Center Loop for Button:
- Sk 1 st. Work 2 dc into the center ch-3 space.
- Ch 3 (or chain more if your button is larger).
- Work 2 dc into the same ch-3 space.
Step 4: Shells on the Second Side:
- Sk 1 st. Sc in the next st.
- Shell 4: Sk 1 st. Work 6 dc in the next st.
- Repeat Shells 5 and 6 using the same pattern, finishing with an sc.
Step 5: Return to Body Width:
- Sc in the remaining stitches along the edge until you reach the stitch marked in Step 1.
- Sl st into the marked stitch.

💼 Part 3: The Seamless Body (Back & Pocket)
The body is worked in straight rows of SC on the 24-stitch width.
Body Row 1 (The Back Panel Start):
- Ch 1, turn. Sc in the first marked st and in each of the 24 sts across. (24 sc).
Body Rows 2 – 20 (The Back Panel):
- Ch 1, turn. Sc in each st across. (24 sc).
- Repeat for a total of 20 rows (or until the panel is about 9 cm long).
Body Row 21 (The Hinge/Bottom):
This row creates the fold line between the back panel and the pocket.
- Ch 1, turn. Work sc only in the FRONT LOOP (FL) of each of the 24 sts across. (24 sc).
Body Rows 22 – 40 (The Pocket Panel):
- Ch 1, turn. Work sc under both loops of each st across. (24 sc).
- Repeat for a total of 19 rows (making a total of 20 rows after the hinge row).
🧵 Part 4: Seamless Assembly & Finishing
We now fold the piece and join the sides and bottom without cutting the yarn.
Step 1: Folding:
Fold the piece in half at the hinge line (Body Row 21), bringing the Pocket Panel up against the Back Panel. The working yarn should be at the top right corner.
Step 2: Joining the First Side (SC Join):
- Ch 1 (to establish height).
- Insert hook through the side of the first row of the Pocket Panel AND the corresponding side of the first row of the Back Panel.
- Yarn over and pull through both sides, then complete an sc.
- Repeat this SC join for all 20 row-ends along the first side, joining the Pocket Panel to the Back Panel.
Step 3: Joining the Bottom (SL ST Join):
- Do not turn. You are now at the bottom edge of the wallet.
- Work a sl st into the remaining Back Loops (BL) left exposed by the FL-SC Hinge Row (Row 21).
- Sl st in each of the 24 exposed BLs across the bottom edge. This neatly seals the bottom of the wallet.
Step 4: Joining the Second Side (SC Join):
- Continue from the last sl st.
- Join the second side edge by repeating the SC Join method from Step 2 for all 20 row-ends.
- Sl st into the top corner stitch to secure.

🔗 Part 5: Wrist Strap (Lanyard)
The wrist strap is optional but adds functionality.
- Start: Ch 1 (to establish height).
- Chain Length: Chain 50 (or more, if you desire a longer strap). Check the length against your hand to ensure a comfortable fit.
- Form Loop: Keeping the chain straight, sl st into the corner stitch where the chain began.
- Reinforce: Sl st back down the entire chain (50 sl sts) to create a sturdy, thick strap.
- Sl st into the base corner stitch one last time to secure the strap.
- Fasten off and weave the end inside the wallet.
Video Tutorial:
✅ Final Touches & Conclusion
- Weave in Ends: Use your tapestry needle to securely weave in any remaining yarn tails, hiding them between the stitches.
- Button Attachment: Line up the center ch-3 loop on the flap with the corresponding point on the wallet body. Sew your decorative pearl or button securely to the center of the wallet body.
- Block (Optional): Give the wallet a light steam or spray block to set the shape and flatten the fabric.
Congratulations! You have successfully crocheted a beautiful, professional-looking wallet without a single seam. Enjoy your compact and chic Seamless Shell Wallet!


