
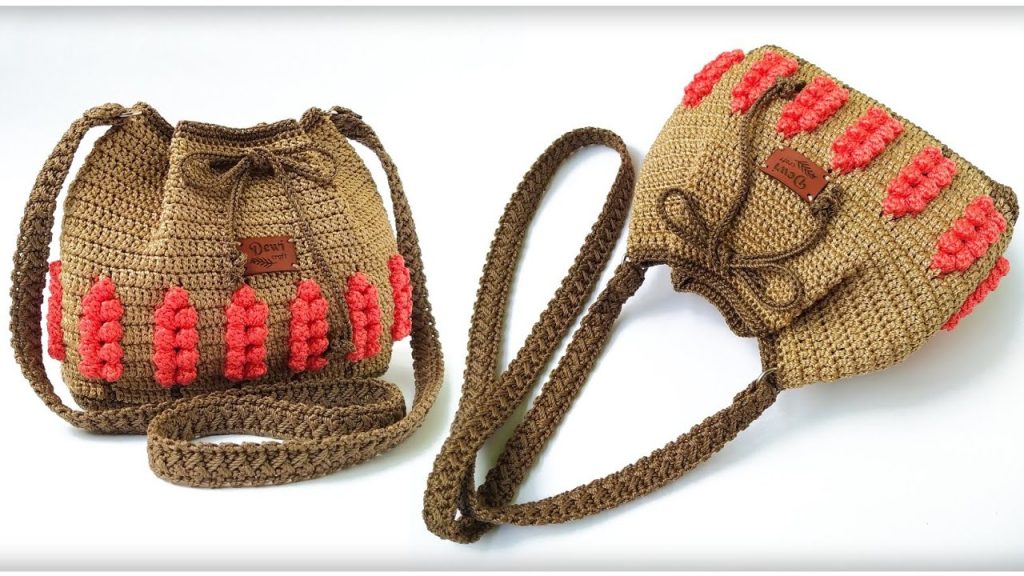
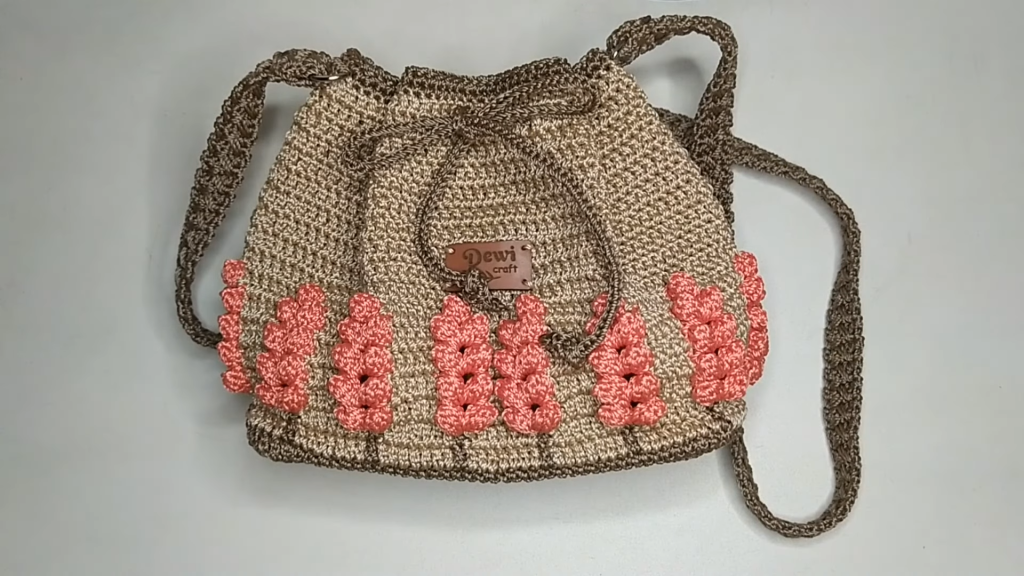
Welcome to the ultimate guide for creating the “Artisan Pop” Bag, a structured and visually stunning accessory! Inspired by the contemporary designs of SANG DEWI CRAFT, this pattern delivers a gorgeous, tapestry-like fabric texture, featuring distinctive, raised popcorn clusters.
This is a deep-dive pattern that incorporates color-changing techniques (tapestry crochet) and an intricate Double Popcorn Cluster (PC-Cluster) stitch, worked in turned rounds to ensure a seamless, strong structure. The result is a bag approximately 25 cm wide and 17 cm tall, complete with a sturdy rectangular base and built-in hardware attachment points. Prepare for a rewarding and impressive crochet journey!
🧶 Materials & Key Tools
The structure of this bag relies heavily on using durable, non-stretchy yarn. The pattern uses two colors, referred to as Main Color (MC) and Contrast Color (CC).
| Icon | Item | Details |
| Hook | Crochet Hook | 4.0 mm (or size needed to achieve very firm, dense tension). |
| Yarn | Main Color (MC) | Approx. 150g of sturdy yarn (Nylon cord, Polyester cord, or stiff cotton cord). |
| Yarn | Contrast Color (CC) | Approx. 50g of the same yarn type. |
| Hardware | D-Rings (2) | 1.5 cm size is ideal for attaching the shoulder strap. |
| Notions | Markers & Needle | Stitch Markers (crucial for the base and motif), Scissors, and a Yarn Needle. |
| Hardware | Drawstring Cord | A separate, finished cord (80 cm long) for the drawstring closure. |
📝 Abbreviations & Special Stitches (U.S. Terms)
| Abbreviation | U.S. Terminology | Description |
| ch | Chain | |
| sl st | Slip Stitch | |
| sc | Single Crochet | |
| dc | Double Crochet | |
| st(s) | Stitch(es) | |
| rep | Repeat | |
| yo | Yarn Over | |
| MC | Main Color | |
| CC | Contrast Color | |
| PC-Cluster | Double Popcorn Cluster | See Special Stitches below. |
Special Stitch: Double Popcorn Cluster (PC-Cluster)
This intricate stitch creates a prominent, bobble-like element.

- 5 DC Popcorn (Part 1): Work 5 dc in the designated stitch. Remove the hook from the working loop. Insert the hook into the first dc of the 5-dc group. Place the working loop back on the hook and pull it through the first dc (Popcorn made). Ch 3 (secures the Popcorn and acts as the stitch center).
- 5 DC Popcorn (Part 2): Work 5 dc into the same stitch. Remove the hook from the working loop. Insert the hook into the first dc of this second 5-dc group. Place the working loop back on the hook and pull it through the first dc (second Popcorn made). Ch 1 (secures the entire cluster).
📐 Part 1: The Rigid Foundation Base
We start with a flat, firm base worked in rows of Single Crochet, then edged for the round count.
Initial Chain:
Using MC, make a slip knot and ch 40. Chain 1 more for turning.
Rows 1 – 12 (Base Core):
- Sc in the 2nd ch from the hook, and sc in each ch across. (40 sc).
- Ch 1 (does not count as st), turn. Sc in the first st and in each st across. (40 sc).
- Repeat Row 2 until you have completed a total of 12 rows.
Edging (SC in the Round):
After Row 12, do not turn. We work SC around the perimeter to define the body stitch count.
- Corners: Work 3 SC in each of the four corners to curve the shape smoothly. Note: The video suggests adding extra SCs in the corners and along the sides to ensure the final total count is a multiple of 8 (the required motif repeat).
- Sides: Work 1 SC per row end (12 SC) down each long side. Work 40 SC along the bottom of the foundation chain. Work 40 SC along the top of Row 12.
- Adjust and Join: Count your total stitches. If it is not a multiple of 8, evenly adjust by adding single SC increases or decreases until the count is a multiple of 8.
- Sl st to the first SC to join.

🌈 Part 2: Body Setup & Color Blocking
In these rounds, we establish the height and practice carrying the yarn for the color-changing motif.
Round 1 (DC Setup):
- Ch 3 (counts as 1 dc). Dc in each st around.
- Sl st to the top of the starting ch-3 to join.
- Note: This round is where the drawstring will be woven later.
Round 2 (Color Block Setup):
In this and subsequent rounds, carry the unused color loosely beneath your working stitches.
- Ch 3 (MC, counts as 1 dc). Dc in the next 2 sts (total 3 dc in MC).
- Change Color to CC (Drop MC, pick up CC). Dc in the next 5 sts (5 dc in CC).
- Change Color to MC. Dc in the next 3 sts (3 dc in MC).
- Change Color to CC. Dc in the next 5 sts (5 dc in CC).
- Repeat: *Dc in 3 sts (MC), Dc in 5 sts (CC)* around the entire round.
- Sl st to the top of the starting ch-3 to join.
🌟 Part 3: The PC-Cluster Motif Rounds
This section creates the intricate textured pattern using the PC-Cluster stitch and continues the tapestry colorwork.
Round 3 (Bobble Round 1):
- Ch 3 (MC, counts as 1 dc), turn. Dc in the next st (total 2 dc in MC).
- Change Color to CC.
- PC-Cluster: Sk 1 st, work a PC-Cluster (Double Popcorn Cluster) in the next stitch.
- Change Color to MC. Ch 1 (secures the CC yarn). Sk 1 st.
- Dc in the next 5 sts (5 dc in MC).
- Change Color to CC.
- PC-Cluster: Sk 1 st, work a PC-Cluster in the next stitch.
- Repeat: *Ch 1 (MC), sk 1 st, Dc in 5 sts (MC), Change Color to CC, sk 1 st, PC-Cluster (CC)* around.
- Sl st to the top of the starting ch-3 to join.
Round 4 (Tapestry DC Round):
This round centers the colors for the next texture round.
- Ch 3 (MC, counts as 1 dc), turn. Dc in the next 4 sts (total 5 dc in MC).
- Change Color to CC. Dc in the next 3 sts (over the PC-Cluster’s ch-1 space and the two stitches surrounding it).
- Change Color to MC. Dc in the next 5 sts (5 dc in MC).
- Repeat: *Change Color to CC, Dc in 3 sts (CC), Change Color to MC, Dc in 5 sts (MC)* around.
- Sl st to the top of the starting ch-3 to join.

Round 5 (Bobble Round 2):
This round staggers the bobble placement.
- Ch 3 (MC, counts as 1 dc), turn. Dc in the next 4 sts (total 5 dc in MC).
- Change Color to CC.
- PC-Cluster: Sk 1 st, work a PC-Cluster (CC) in the next stitch (which should be the center of the 3-DC block from R4).
- Change Color to MC. Ch 1 (secures the CC yarn). Sk 1 st.
- Dc in the next 5 sts (5 dc in MC).
- Repeat: *Change Color to CC, sk 1 st, PC-Cluster (CC), Ch 1 (MC), sk 1 st, Dc in 5 sts (MC)* around.
- Sl st to the top of the starting ch-3 to join.
Motif Repetition:
Repeat Rounds 4 and 5 until you have worked a total of 10 rounds of the motif (5 sets of the two-round repeat), or until the bag is your desired height. The motif should create a diagonally shifting pattern of bobbles.
⛓️ Part 4: Top Border & Hardware Integration
We finish the bag with a clean, solid edge and integrate the D-rings.
Round 11 (Final DC Round):
- Ch 3 (MC), turn. Dc in each st around (no more color changes).
- Sl st to the top of the starting ch-3 to join.
Round 12 (SC Border):
- Ch 1, turn. Sc in each st around. Sl st to join.
- Repeat for a total of 2 rounds of SC border.
Round 13 (SC with D-Ring Attachment):
- Continue SC until you reach the center of the narrow end (the side of the bag). Mark the central 4 stitches on this side.
- Secure D-Ring: Work 4 SC over the metal ring, ensuring the ring is secured tightly to the top edge of the bag.
- Continue SC across the top.
- Repeat the D-Ring attachment process on the opposite narrow end of the bag.
- Sl st to join. Fasten off MC.
🎀 Part 5: Drawstring & Strap
The unique drawstring and the adjustable strap complete the bag’s functionality.
Drawstring Insertion:
- Take the separate 80 cm cord.
- Using a yarn needle, weave the cord through the gaps of the DC posts of Round 1 (the first DC round worked after the base).
- Weave it in and out, ensuring it comes out at the side, allowing you to pull the drawstring closed from one side of the bag.
Adjustable Shoulder Strap:
The video suggests an adjustable strap starting with a chain of 5, measuring 110 cm long when complete.
- Ch 5 (or your desired strap width).
- Work a chosen stitch (e.g., SC or Slip Stitch) back and forth in rows until the strap measures 110 cm.
- Attach the finished strap securely to the integrated D-rings.
Video Tutorial:
✅ Final Dimensions & Finishing
Your finished “Artisan Pop” Bag should measure approximately:
- Length: 25 cm
- Height: 17 cm
- Weight: Approximately 235 grams.
Finishing Touches:
- Use your tapestry needle to securely weave in all loose ends from the tapestry crochet sections, ensuring they are hidden within the dense fabric.
- For maximum longevity and structure, consider lining the bag with a custom-sewn fabric lining and a zipper.
Congratulations on completing your spectacular, richly textured handbag! Enjoy showing off your mastery of color and complex crochet stitches!


