
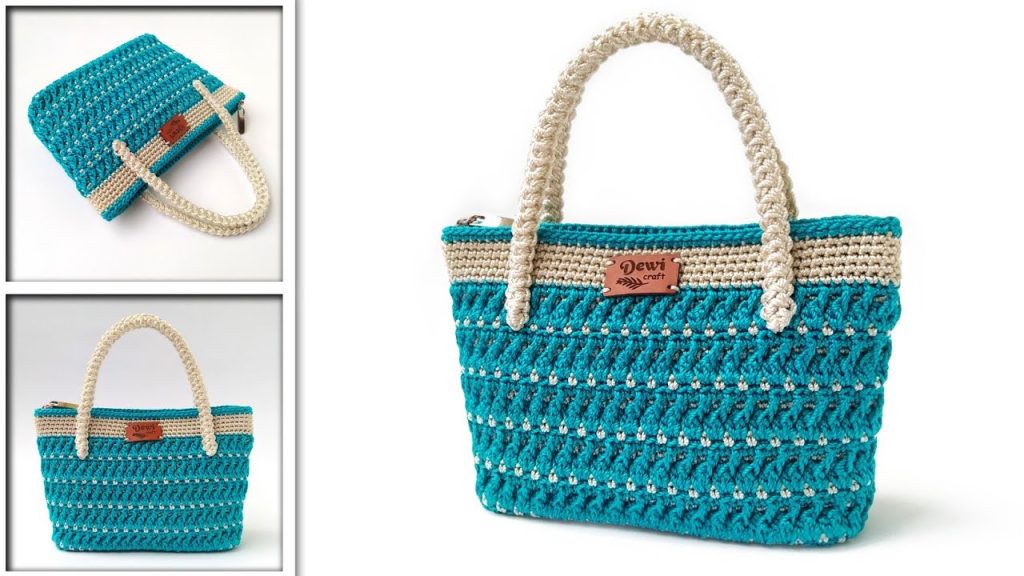
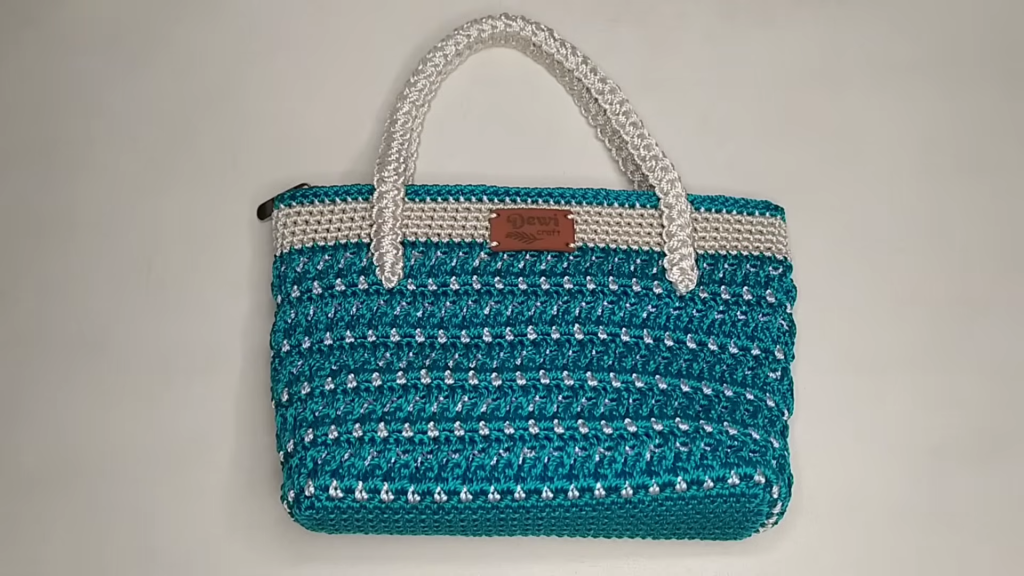
Welcome, crocheters, to a pattern that combines structure, texture, and elegant two-tone colorwork! Inspired by the clean, modern design from SANG DEWI CRAFT, this “Seraphina Mesh” Handbag features a durable base and a unique, shifting stitch pattern that incorporates both open mesh and raised cluster stitches. It’s a rewarding project that results in a beautiful, structured bag perfect for everyday use.
This pattern is designed to be worked seamlessly in turned rounds, creating a sturdy piece with no vertical seams. The finished bag, when using the suggested materials, measures approximately 21 cm wide by 13 cm high, with a depth of 6 cm.
🧶 Materials & Key Tools
The use of cord or heavy nylon yarn is essential for achieving the required rigidity and structure of this bag.
| Icon | Item | Details |
| Hook | Crochet Hook | 4.0 mm (or size needed to achieve very firm tension). |
| Yarn | Main Color (MC) | Approximately 100g of sturdy cord yarn (Nylon, Polyester, or cotton cord). |
| Yarn | Contrast Color (CC) | Approximately 50g of the same yarn type. |
| Hardware | Handles | Two lengths of finished cord or chain for short handles (approx. 30 cm each). |
| Notions | Markers & Needle | Stitch Markers (crucial for counting and marking handle placement), Scissors, and a Yarn Needle. |
| Size | Finished Dimensions | Approx. 21 cm (Length) x 13 cm (Height) x 6 cm (Depth). |
| Weight | Finished Weight | Approx. 150 grams. |
📝 Abbreviations & Special Stitches (U.S. Terms)
Familiarize yourself with these terms before you start. Note that turned rounds are used throughout the body.
| Abbreviation | U.S. Terminology | Description |
| ch | Chain | |
| sl st | Slip Stitch | |
| sc | Single Crochet | |
| dc | Double Crochet | |
| st(s) | Stitch(es) | |
| rep | Repeat | |
| MC | Main Color | |
| CC | Contrast Color | |
| FPDC | Front Post Double Crochet |
Special Stitch: 3 DC Together (3DCtog) Cluster
This stitch creates a soft, raised bobble effect.
- Yo, insert hook into st/space, pull up a loop, yo, pull through 2 loops (2 loops on hook).
- [ Yo, insert hook into the same st/space, pull up a loop, yo, pull through 2 loops ] Repeat two more times (4 loops on hook).
- Yo, pull through all 4 loops to close the cluster.
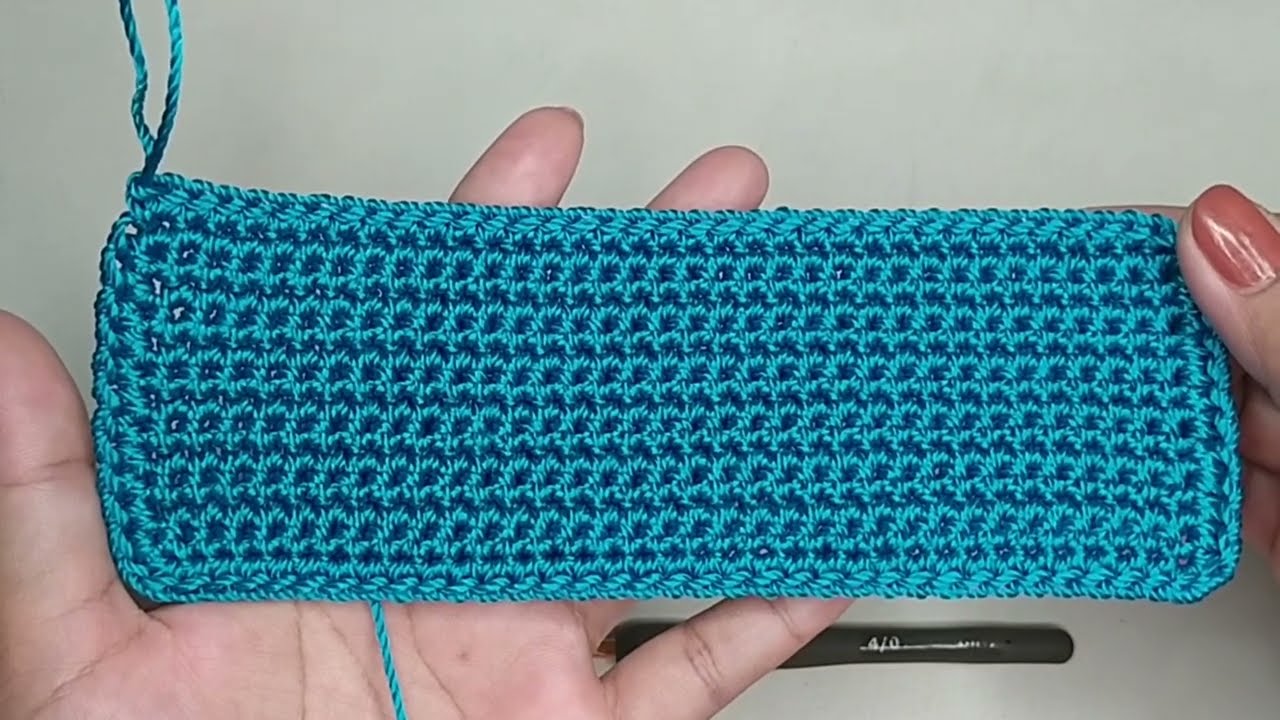
📐 Part 1: The Firm Foundation Base
We begin with a flat, rigid base worked in rows of Single Crochet, then edged in the round to set up the body’s stitch count (a multiple of 2).
Initial Chain:
Using MC, make a slip knot and ch 35. Chain 1 more for turning.
Rows 1 – 12 (Base Core):
- Sc in the 2nd ch from the hook, and sc in each ch across. (35 sc).
- Ch 1 (does not count as st), turn. Sc in the first st and in each st across. (35 sc).
- Repeat Row 2 until you have completed a total of 12 rows.
Edging (SC in the Round):
After Row 12, do not turn. We work SC around the entire perimeter. The final stitch count must be an even number (a multiple of 2).
- First Corner: Work 2 sc into the last stitch of Row 12.
- Long Side: Sc evenly down the side edge, placing 1 sc per row end. (12 sc total).
- Second Corner: Work 2 sc into the corner space (the end of the foundation chain).
- Bottom Edge: Sc across the bottom of the foundation chain stitches. (35 sc).
- Third Corner: Work 2 sc into the next corner space.
- Second Long Side: Sc evenly up the second side edge. (12 sc total).
- Fourth Corner: Work 2 sc into the final corner space.
- Completion & Join: Sc across the remaining stitches of Row 12 to meet the first stitch of the round. The final count should be approximately 98 stitches. Ensure your final count is even (a multiple of 2). Sl st to the first sc to join.
🌟 Part 2: The Two-Tone Motif Body
The main body is created by repeating a 4-Round sequence that utilizes both colors and different textures.
Round 1 (Mesh/Granny Setup – CC):
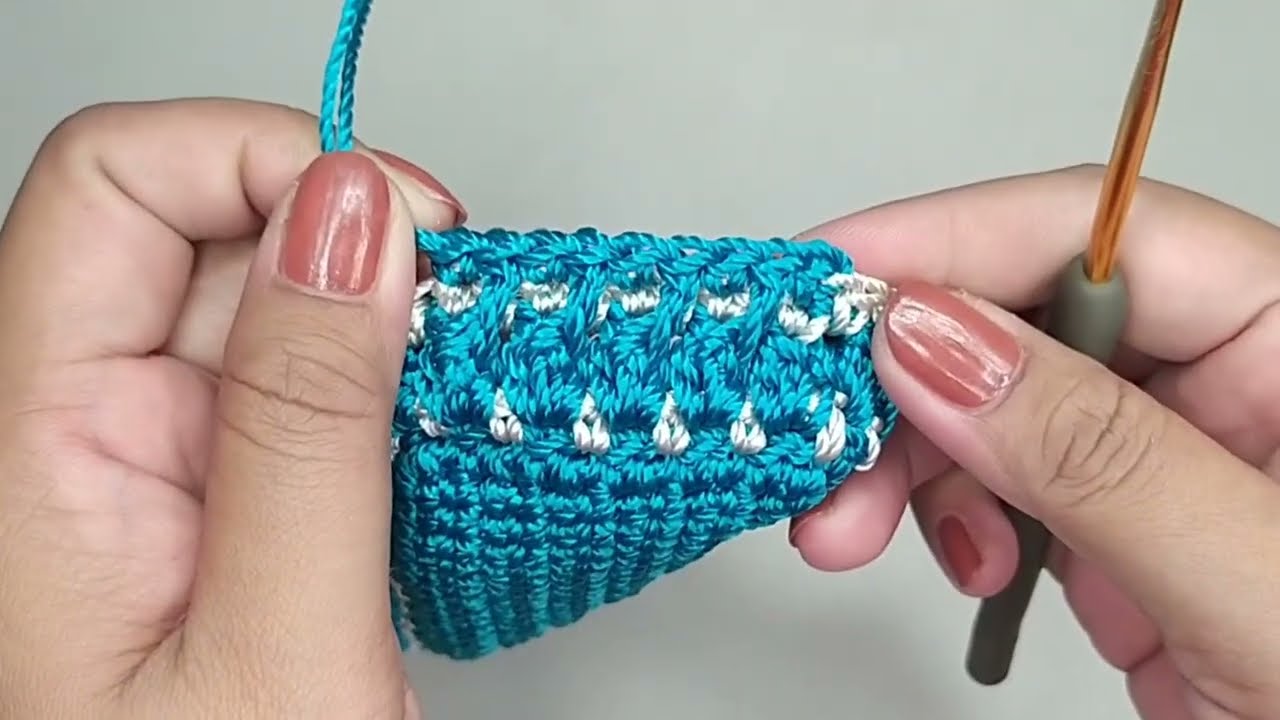
Join CC.
- Ch 1 (does not count as st), turn. Sc in the same st.
- *Ch 1, sk 1 st, sc in the next st*.
- Repeat from * to * around the entire round.
- Sl st to the first sc to join. Fasten off CC.
Round 2 (Cluster Round – MC):
Join MC into the first ch-1 space.
- Ch 1, turn. Work a 3DCtog Cluster into the same ch-1 space.
- *Ch 1, sk 1 sc, work 3DCtog Cluster into the next ch-1 space*.
- Repeat from * to * around.
- Sl st to the top of the first cluster to join. Fasten off MC.
Round 3 (SC Transition – CC):
Join CC into the top of the first cluster.
- Ch 1, turn. Sc in the same cluster top.
- Sc in the next ch-1 space.
- *Sc in the next cluster top, sc in the next ch-1 space*.
- Repeat from * to * around, working one sc into every stitch and every chain space. The final count should match your base perimeter count.
- Sl st to the first sc to join. Fasten off CC.
Round 4 (Texture Round – MC):
Join MC into the first sc.
- Ch 1, turn. Sc in the same st.
- *FPDC around the center post of the 3DCtog Cluster from Round 2 (directly below the next stitch).
- Sk 1 st behind the FPDC, sc in the next st***.
- Repeat from * to * around.
- Sl st to the first sc to join. Fasten off MC.
Motif Repetition
Repeat the 4-round sequence (Rounds 1, 2, 3, and 4) a total of 5 times for the suggested height (20 rows/rounds total in the body motif section).
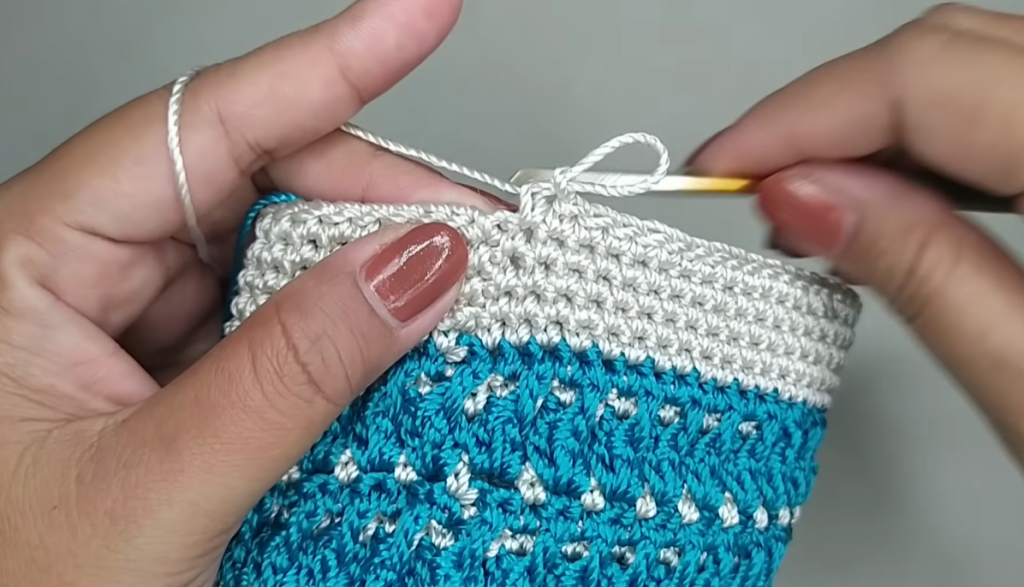
⛓️ Part 3: Top Edging & Handle Placement
After completing the motif, we create a strong, solid top border for the opening and secure the handles.
Top Border Rounds (CC):
Join CC to any stitch at the top of the last motif round.
- Ch 1, turn. Sc in the same st and in each st around. Sl st to join.
- Repeat Round 1 for a total of 5 rounds of single crochet. This creates a sturdy, professional-looking rim.
Handle Placement:
- Lay the bag flat and identify the center point on the front and back panels.
- Measure 4 cm outwards from the center on both the left and right sides of both the front and back panels. Place stitch markers at these four points.
- Thread the ends of your finished 30 cm handle cords/chains onto a yarn needle.
- Securely attach one end of a handle to the marker on the left side of the front panel, weaving and knotting the yarn firmly into the dense SC border.
- Attach the other end of the same handle to the marker on the left side of the back panel.
- Repeat this process for the second handle on the right side markers.
✅ Part 4: Finishing Touches & Dimensions
Your “Seraphina Mesh” bag is now complete!
- Weave in Ends: Use your yarn needle to securely weave in all remaining yarn tails. Because you alternated colors and fastened off four times per repeat, this is the most time-consuming but crucial step. Weave tails along the inside of the matching color rows for invisibility.
- Block (Optional): Give the bag a light steam or spray block to further set the shape and flatten the fabric, especially the base.
- Lining & Zipper (Recommended): The video suggests adding a custom fabric lining and zipper for a polished, functional finish. Check the original video description for a link to that separate tutorial.
Video Tutorial:
Your final “Seraphina Mesh” Handbag should measure:
- Length: 21 cm
- Height: 13 cm
- Depth (Base Width): 6 cm
Enjoy your beautiful, dual-textured creation!


