

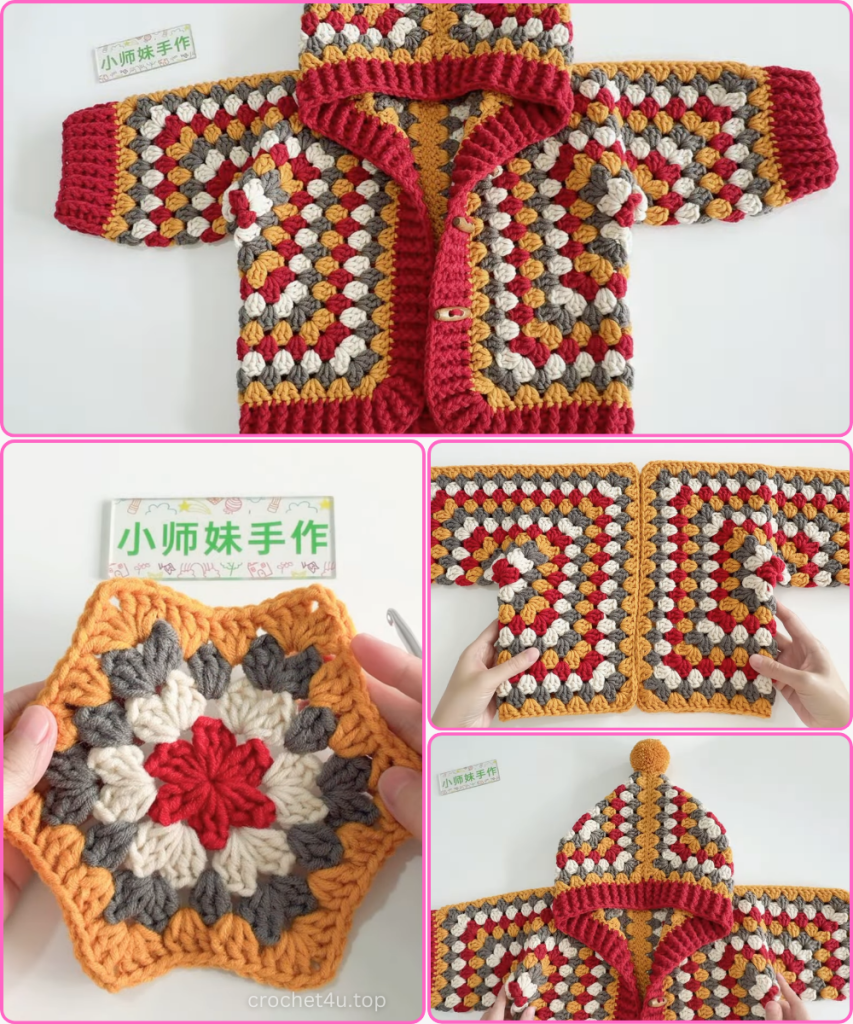
Welcome to your next favorite crochet project! If you love the classic look of granny squares but want to create something functional and cozy for a little one, this Colorful Granny Hexagon Baby Jacket is the perfect choice. This design features a clever “L-fold” construction that turns two large hexagons into a stylish, hooded cardigan.
This pattern is designed for babies and toddlers aged 2 to 3 years old. It’s windproof, warm, and highly customizable in terms of size and color.
🧶 Materials & Tools
Before we start, let’s gather our supplies. For this specific project, we are using a chunky yarn and a large hook to ensure the jacket is plush and works up quickly.
- Yarn: 8-ply combed cotton or a similar weight yarn.
- Colors: 4 different colors (e.g., Cream, Pink, Gray, and Blue).
- Quantity: Approximately 2 skeins per color (8 skeins total).
- Hook: 5.5 mm crochet hook.
- Buttons: 3 to 4 toggle-style (olive shape) buttons.
- Notions: A large pom-pom for the hood, a tapestry needle for sewing, and scissors.
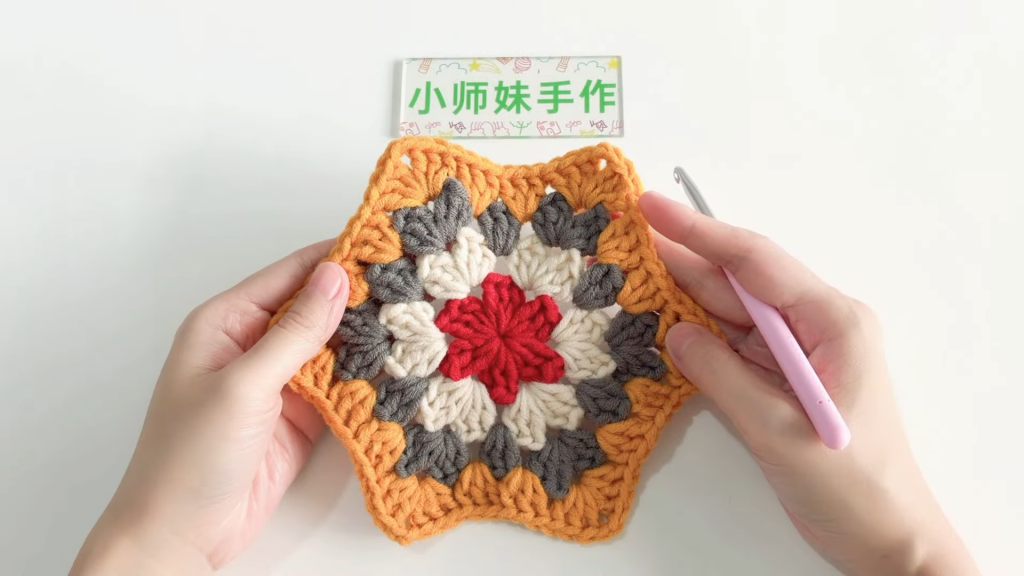
📏 Step 1: Crafting the Magic Hexagons
The body of this jacket is made from two identical large hexagons. Instead of a traditional 4-sided square, we create 6 sides to allow for the unique folding technique.
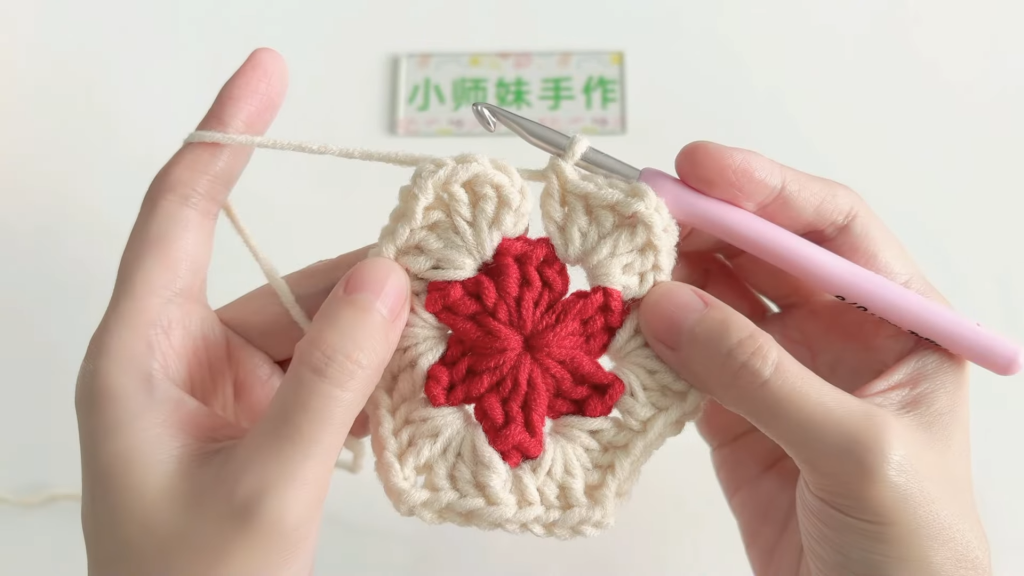
- Round 1: Start with a Magic Ring.
- Chain 3 (counts as your first Double Crochet – DC).
- Work 2 DC into the ring.
- Chain 2, work 3 DC into the ring. Repeat from * to * 5 more times.
- You should have 6 groups of 3-DC separated by 2-chain spaces.
- Pull the ring tight and join with a slip stitch to the top of the initial Ch-3. Fasten off.
- Round 2: Change to a new color. Attach yarn in any 2-chain corner space.
- Chain 3, 2 DC, Ch 2, 3 DC into the same space (this is your first corner).
- In the next 2-chain space, work (3 DC, Ch 2, 3 DC). Repeat around.
- You will have 6 corners. Join and fasten off.
- Round 3: Change color. Attach in a corner space.
- Work a corner: (3 DC, Ch 2, 3 DC).
- In the “side” space between the two corners below, work 3 DC.
- Repeat this pattern around: Corner, then 3-DC in the side space.
- Rounds 4–12: Continue expanding the hexagon.
- Every corner gets (3 DC, Ch 2, 3 DC).
- Every side space gets 3 DC.
- In the video, the hexagon is worked up to 12 rounds. If you need a larger size, simply continue adding rounds until the “L-fold” fits the child’s chest and arm length.
🧥 Step 2: Assembly and Folding
This is where the magic happens! We transform the flat hexagons into a garment.
- The Fold: Take one hexagon and fold it in half so that it forms an “L” shape. One side of the L becomes the sleeve, and the other becomes the front/back panel.
- The Seams: * Back Seam: Place the two folded hexagons side-by-side. Use a tapestry needle and yarn to sew the long back edge together using a mattress stitch or whip stitch.
- Sleeve Seams: Sew the top edge of the “sleeve” part of the L.
- Neckline: Leave the top center section (about 4 groups of DC on each side) open for the collar and hood attachment.
🎀 Step 3: Ribbed Cuffs
To keep the wind out and add a professional finish, we add ribbed cuffs to the sleeves.
- Round 1: Attach yarn to the sleeve opening. Work 38 DC evenly around the edge. Join.
- Round 2: Chain 2 (does not count as a stitch).
- Front Post Double Crochet (FPDC) around the first post, then Back Post Double Crochet (BPDC) around the next post.
- Repeat this 19 times around.
- Rounds 3–4: Repeat the FPDC/BPDC pattern to build the ribbing.
- Round 5: For a tighter finish, work a final round of Front Post Single Crochet (FPSC) and Back Post Single Crochet (BPSC). Fasten off.

🌦️ Step 4: The Hood Construction
The hood is made using the same granny square technique but with a standard 4-sided square construction.
- The Squares: Crochet two squares (approx. 5-6 rounds each, or until they match the width of your neckline).
- Joining: Fold each square in half and attach them to the left and right sides of the neckline opening.
- The Top Seam: Sew the two squares together at the top to form the peak of the hood.
✨ Step 5: The Front Opening and Edging
We will now add a continuous ribbed border around the bottom, up the front, around the hood, and back down.
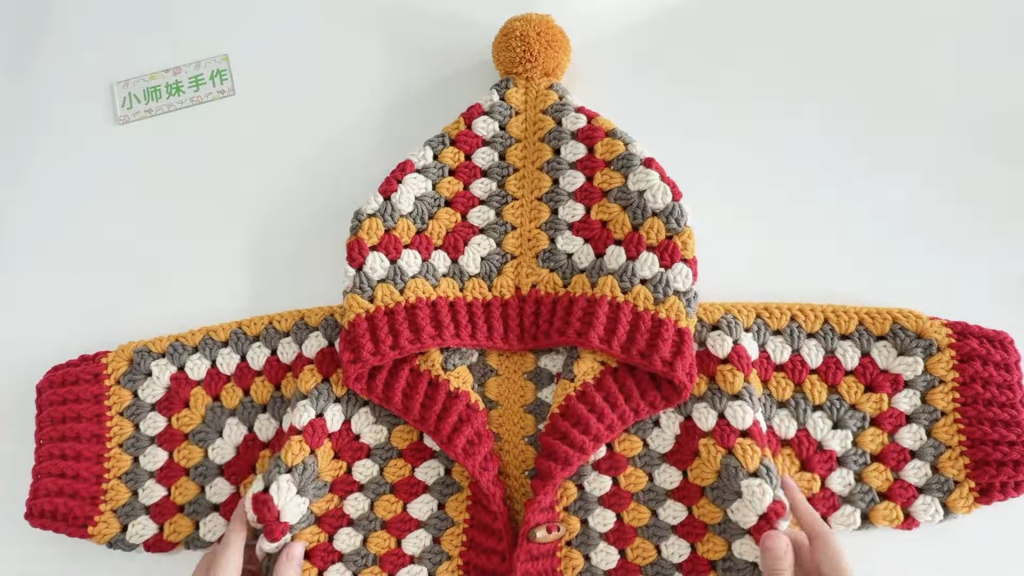
- Round 1: Starting at the bottom back center, work DC into every stitch and space around the entire perimeter of the jacket (bottom hem, front opening, and hood edge).
- Rounds 2–4: Work the ribbing pattern: Chain 2, (FPDC, BPDC) all the way around. This creates a thick, stretchy border that holds the jacket’s shape.
🧶 Step 6: Finishing Touches
- Buttons: Sew your toggle buttons onto the right front panel. Use the spaces between the granny clusters on the left panel as your buttonholes.
- Pom-Pom: Securely fasten a large毛线球 (yarn ball/pom-pom) to the tip of the hood for a cute, playful look.
- Weave in Ends: Use your tapestry needle to hide all yarn tails on the inside of the garment.
Your Granny Hexagon Hooded Jacket is complete! This project is a wonderful way to use up scrap yarn or create a vibrant, coordinated wardrobe piece.


