
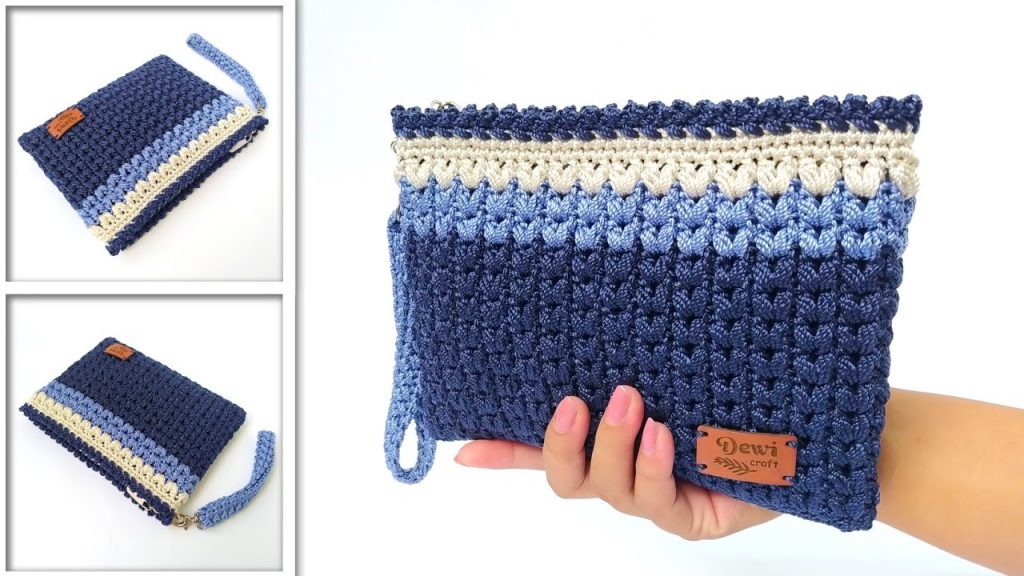
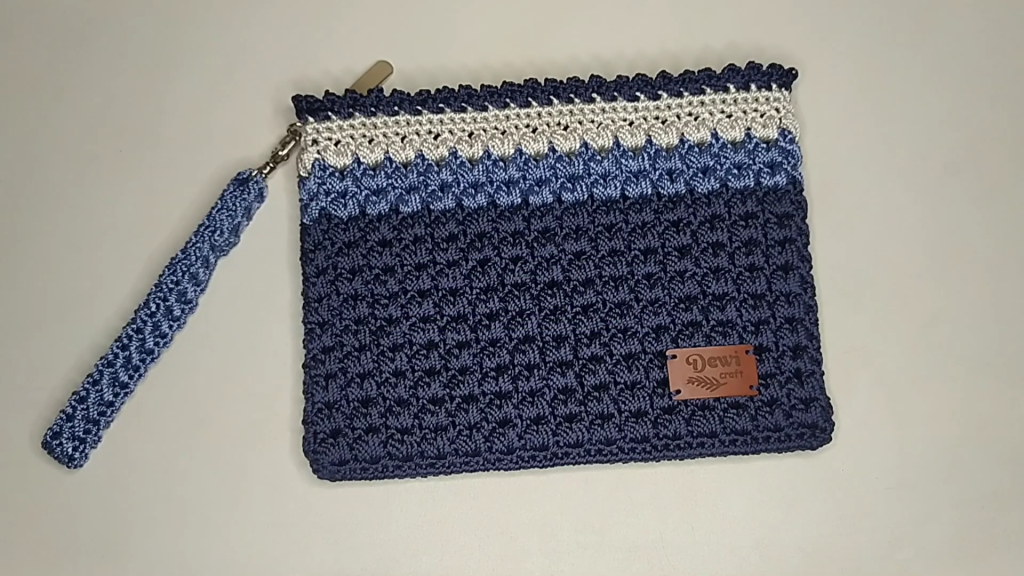
Welcome, dedicated crafters, to a fun and highly structured project! Inspired by the fantastic beginner-friendly tutorial from SANG DEWI CRAFT, this “Starlight Cluster” Drawstring Clutch pattern uses a continuous, dense double puff stitch cluster to create a beautiful, tight texture reminiscent of miniature popcorn or bobbles. This technique results in a self-supporting, firm bag perfect for use as a clutch, wristlet, or small purse.
This is a comprehensive guide worked in turned rounds for a seamless finish, featuring a rigid base and a contrasting top border with integrated D-rings. The finished item is approximately 20 cm wide by 15 cm high.
✨ Materials & Key Tools
The success of this project lies in using a stiff, non-stretchy cord yarn to ensure the clutch holds its shape and structure.
| Icon | Item | Details |
| Hook | Crochet Hook | 4.0 mm (or size needed to achieve very firm tension). |
| Yarn | Main Color (MC) | Approximately 100g of sturdy cord yarn (Nylon or Polyester cord) for the base and body. (E.g., Navy Blue) |
| Yarn | Contrast Color (CC) | Approximately 50g of the same yarn type for the top accent. (E.g., Periwinkle/Natural) |
| Hardware | D-Rings (2) | 1.5 cm size, integrated into the top border. |
| Hardware | Wristlet Strap | A separate crocheted cord or thin strap (approx. 30 cm long) with snap hooks (1.5 cm). |
| Notions | Markers & Needle | Stitch Markers, Scissors, and a Yarn Needle. |
| Size | Finished Clutch | Approx. 20 cm (Length) x 15 cm (Height) x 6 cm (Depth). |
| Weight | Finished Weight | Approx. 150 grams. |
📘 Abbreviations & Special Stitches (U.S. Terms)
The entire body is worked in turned rounds.
| Abbreviation | U.S. Terminology | Description |
| ch | Chain | |
| sl st | Slip Stitch | |
| sc | Single Crochet | |
| st(s) | Stitch(es) | |
| rep | Repeat | |
| MC | Main Color | |
| CC | Contrast Color |
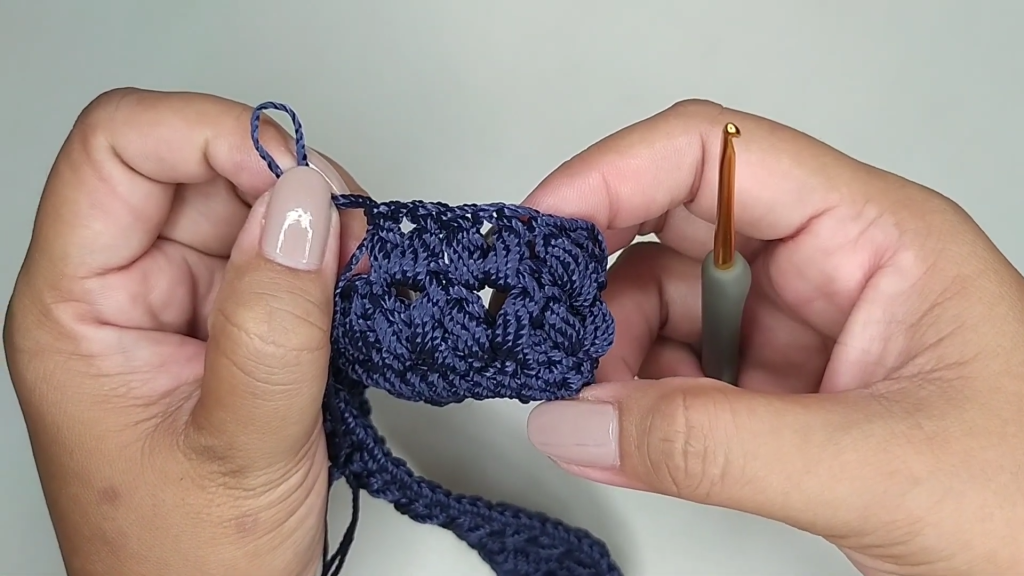
Special Stitch: Puff Stitch Cluster (Puff)
A full puff stitch made by drawing up three yarn-overs in the same space.
- Yo, insert hook into st/space, pu a lp (pull up a loop to the height of a DC).
- [ Yo, insert hook into the same st/space, pu a lp ] Repeat two more times (7 loops on hook).
- Yo, pull through all 7 loops to close the puff.
- Ch 1 (to secure the puff and complete the stitch unit).
- Double Puff Cluster: Two Puff stitches worked in the same space, separated by a chain. (Puff, Ch 1, Puff, Ch 1).
🧱 Part 1: The Rigid Foundation Base (MC)
We start with a flat, rigid base worked in rows of Single Crochet, then edged in the round to set up the body’s stitch count. The final stitch count must be a multiple of 3.
Initial Chain:
Using MC, make a slip knot and ch 45. Chain 1 more for turning.
Rows 1 – 12 (Base Core):
- Sc in the 2nd ch from the hook, and sc in each ch across. (45 sc).
- Ch 1 (does not count as st), turn. Sc in the first st and in each st across. (45 sc).
- Repeat Row 2 until you have completed a total of 12 rows.
Edging (SC in the Round):
After Row 12, do not turn. We work SC around the entire perimeter.
- Bottom Corner: Work 3 sc into the first corner stitch.
- Long Side: Sc in the next 44 sts across the starting chain edge.
- Top Corner: Work 3 sc into the next corner stitch.
- Short Side (Row Ends): Sc evenly down the side edge, placing 1 sc per row end. (12 sc total per side).
- Remaining Top Corner: Work 3 sc into the next corner stitch.
- Second Long Side: Sc in the next 44 sts.
- Final Corner: Work 2 sc into the very last corner stitch (where you started R1).
- Count & Adjust: Count your total stitches (approximately 114 sts). This count should be a multiple of 3 for the motif. If necessary, evenly distribute a final increase/decrease on the long sides to meet the required multiple.
- Sl st to the first sc to join.
🌟 Part 2: The Starlight Cluster Body Motif (MC)
This pattern is created by repeating a two-round sequence that offsets the puff clusters in each round.
Round 1 (SC Mesh Setup – MC):
- Ch 1 (does not count as st), turn the work.
- Sc in the same st and sc in the next st.
- *Ch 1, sk 1 st, sc in the next 2 sts*.
- Repeat from * to * around the entire round.
- Sl st to the first sc to join.
Round 2 (Double Puff Cluster – MC):
- Sl st twice into the next two stitches (to move the starting point into the first ch-1 space).
- Ch 1 (does not count as st). Pull up a loop to a DC height.
- Double Puff Cluster: Work (Puff, Ch 1, Puff, Ch 1) all into the ch-1 space.
- *Sk 3 sts (the 2 SC and 1 Ch-1 space), work Double Puff Cluster (Puff, Ch 1, Puff, Ch 1) into the next Ch-1 space*.
- Repeat from * to * around.
- Sl st to the top of the first Puff to join.
Round 3 (Offset Double Puff Cluster – MC):
- Sl st into the next Ch-1 space (the center of the puff cluster). This centers the work for the offset.
- Ch 1 (does not count as st). Pull up a loop.
- Double Puff Cluster: Work (Puff, Ch 1, Puff, Ch 1) into the center Ch-1 space.
- *Sk the rest of the current cluster, work Double Puff Cluster (Puff, Ch 1, Puff, Ch 1) into the center Ch-1 space of the next cluster*.
- Repeat from * to * around.
- Sl st to the top of the first Puff to join.
Motif Repetition:
Repeat Rounds 2 and 3 sequence until you have completed a total of 9 rounds of the puff motif.
Color Accent Rounds (CC):
Join CC (Contrast Color).
- Repeat Rounds 2 and 3 sequence using CC for a total of 2 rounds.
- Fasten off MC.
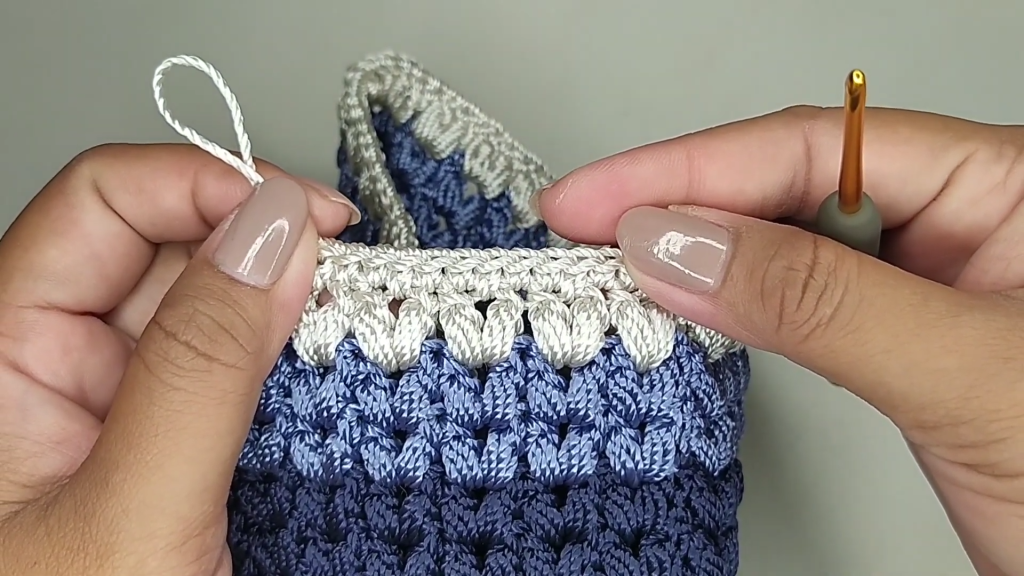
⛓️ Part 3: Top Border & Hardware Integration
We now transition to a smooth border and secure the D-rings for the wristlet strap.
SC Transition Round (CC):
- Ch 1 (does not count as st), turn the work.
- Sc into the same st (top of Puff). Sc into the next Ch-1 space (between puffs). Sc into the next st (top of Puff).
- Continue around, working a Single Crochet into the top of every Puff and every Ch-1 space. This should bring the stitch count back to the original multiple of 3.
- Sl st to the first sc to join.
SC Border Rounds 2 – 5 (CC):
- Ch 1, turn. Sc in the same st and in each st around. Sl st to join.
- Repeat for a total of 4 more rounds of SC border (5 total SC rounds). This creates a firm, sturdy rim.
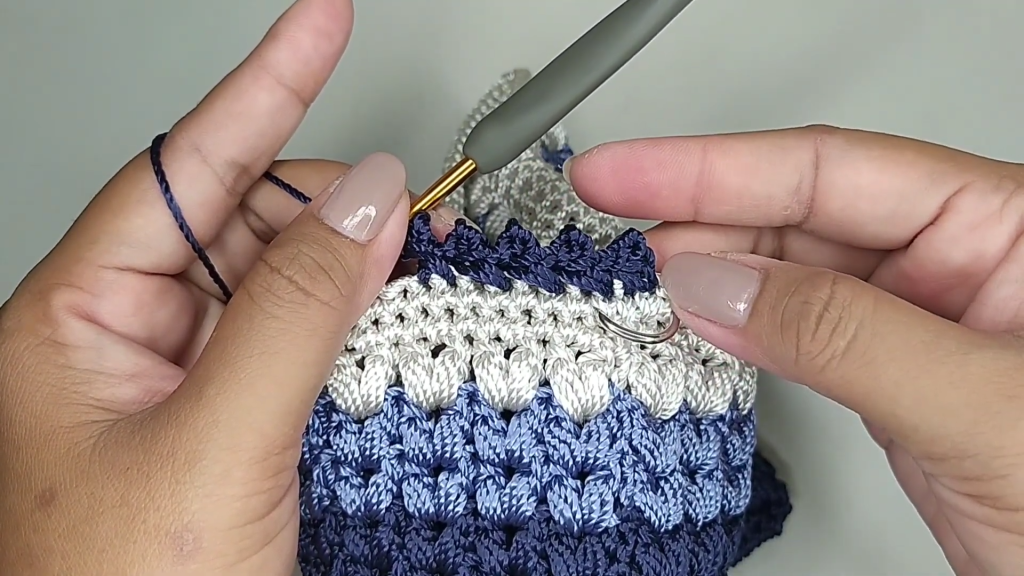
Round 6 (D-Ring Integration):
Before starting the 6th SC round, locate the center of both narrow ends (sides) of the bag.
- Continue the SC round until you reach the center side. Mark a 4-stitch wide area.
- D-Ring Attachment: Place the D-ring (1.5 cm) flat against the top edge. Work 4 SC over the metal ring, ensuring the ring is secured tightly.
- Continue SC across the top.
- Repeat the D-Ring Attachment process on the opposite narrow end of the bag.
- Sl st to join.
Drawstring Slit/Final Border (CC):
This final decorative round also incorporates a slip stitch pattern.
- Ch 1, turn. Sc in the same st. Sc in the next st, then Ch 2, sl st (forms a little loop).
- *Skip 1 st, sc in next st, sc in next st, Ch 2, sl st*.
- Repeat from * to * around the top edge. (This creates the decorative picot-like border with small gaps).
- Sl st to the first sc to join. Fasten off CC.
Video Tutorial:
✅ Part 4: Final Touches & Assembly
Your “Starlight Cluster” Clutch is now ready for finishing!
- Weave in Ends: Use your yarn needle to securely weave in all remaining yarn tails.
- Strap Creation: The video demonstrates a flat, tight strap (approx. 30 cm for a wristlet). Use SC in the back loop and dropping down for the final stitch to create a firm, braided effect.
- Ch 4. Sc in 2nd ch and across (3 sc).
- Strap Row: Ch 1, turn. Sc in the Back Loop of the first st. Sc in the Back Loop of the next st. For the final st, insert the hook into the stitch below the turning chain (to create the braided look).
- Repeat the Strap Row until 30 cm. Attach a snap hook to one end.
- Attachment: Attach the strap hook to one of the integrated D-rings.
- Lining & Zipper (Highly Recommended): For a professional finish and to secure the contents, it is strongly recommended to sew a custom fabric lining and a zipper into the bag.
Your finished “Starlight Cluster” Drawstring Clutch should be a structured, firm, and beautifully textured accessory!


